18 – ENGLISH
l
When the safety devices fail to work, the warn-
ing light will emit a few ashes to signal the
type of problem. To verify the type of anom-
aly, consult the “TROUBLESHOOTING...
(troubleshooting guide)” chapter.
7.4.3 “Maintenance notice” function
This function noties the user when the automation needs a
maintenance check. The number of manoeuvres after which the
signal is triggered can be selected among 8 levels, through the
“Maintenance notice” adjustable parameter (see paragraph “
Level 2 programming (adjustable parameters)“).
Level 1 adjustment is “automatic” and takes into account the
severity of the manoeuvres, in other words, their force and dura-
tion, while the other adjustments are dened on the basis of the
number of manoeuvres.
The maintenance request signal is given through the warning
light (Flash) or the lamp connected to the "OGI" output when it
is programmed as a “Maintenance indicator” (see paragraph “
Level 2 programming (adjustable parameters)“).
l
The “Flash” warning light and the maintenance in-
dicator give the signals indicated in “Table 8” based
on the number of manoeuvres completed with re-
spect to the set limit.
Table 8
MAINTENANCE NOTICE THROUGH FLASH AND MAINTENANCE
INDICATOR
Number of manoeu-
vres
Signal on “Flash”
Maintenance indica-
tor signal
Below 80% of the
limit
Normal (0.5 sec on,
0.5 sec off)
Lit for 2 seconds
at the start of the
opening manoeuvre
Between 81% and
100% of the limit
Remains lit for 2
seconds at the start
of the manoeuvre
Flashes for the
entire duration of the
manoeuvre
Exceeding 100% of
the limit
Remains lit for 2
seconds at the
start and end of the
manoeuvre then
carries on normally
Flashes always
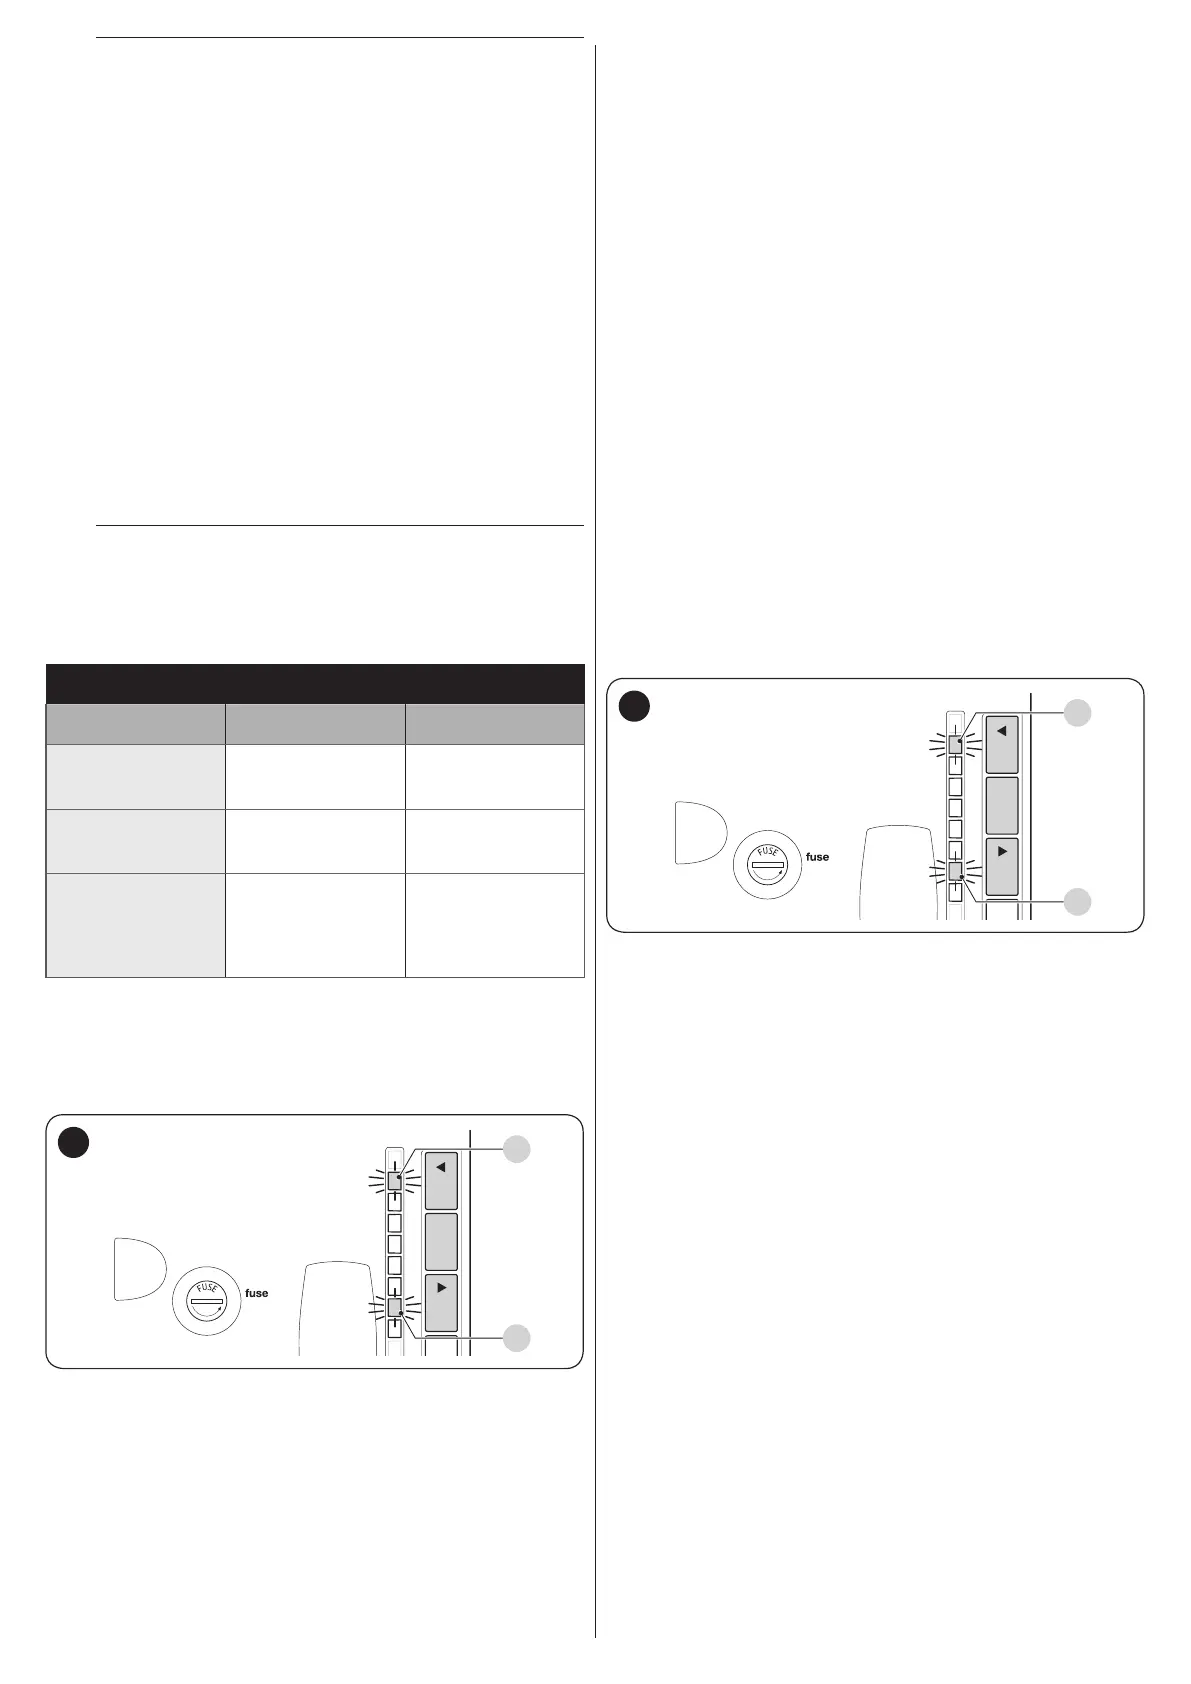
7.4.4 Verifying the number of manoeuvres completed
The “Maintenance notice” function can be used to verify the
number of manoeuvres completed as a percentage of the set
limit.
1.6AT
L1L2L3L4L5L6L7L8
OpenStop/SetClose
L1
30
To do this:
1. press and hold the [Stop/Set] button until LED “L1” starts
ashing
2. release the [Stop/Set] key when the “L1” LED starts ash-
ing
3. press the [Open
p
] or [Close
q
] button to shift the ash-
ing LED to “L7”, that is, the “entry LED” for the “Mainte-
nance notice” parameter
4. press and hold the [Stop/Set] button. With the [Stop/Set]
button pressed:
– wait roughly 3 seconds until the LED representing the
current level of the “Maintenance notice” parameter
lights up
– press and immediately release the [Open
p
] and
[Close
q
] buttons
– the LED corresponding to the selected level will ash
several times; the number of ashes indicates the
percentage of manoeuvres completed (in multiples of
10%) with respect to the set limit. For example: with
the maintenance notice set to L6, namely 10,000, if the
viewing LED ashes 4 times, it means that 40% of the
manoeuvres has been reached (i.e. between 4,000 and
4,999 manoeuvres). The LED will not ash unless 10%
of the manoeuvres have been completed.
5. release the [Stop/Set] button.
7.4.5 Manoeuvre counter resetting
Once maintenance has been performed on the system, the ma-
noeuvre counter must be reset.
1.6AT
L1L2L3L4L5L6L7L8
OpenStop/SetClose
L1
31
To do this:
1. press and hold the [Stop/Set] button until LED “L1” starts
ashing
2. release the [Stop/Set] key when the “L1” LED starts ash-
ing
3. press the [Open
p
] or [Close
q
] button to shift the ash-
ing LED to “L7”, that is, the “entry LED” for the “Mainte-
nance notice” parameter
4. press and hold the [Stop/Set] button. With the [Stop/Set]
button pressed:
– wait roughly 3 seconds until the LED representing the
current level of the “Maintenance notice” parameter
lights up
– press and hold for at least 5 seconds the [Open
p
]
and [Close
q
] buttons then release them. The LED
corresponding to the selected level will emit a series
of fast ashes to signal that the manoeuvre counter has
been reset
5. release the [Stop/Set] button