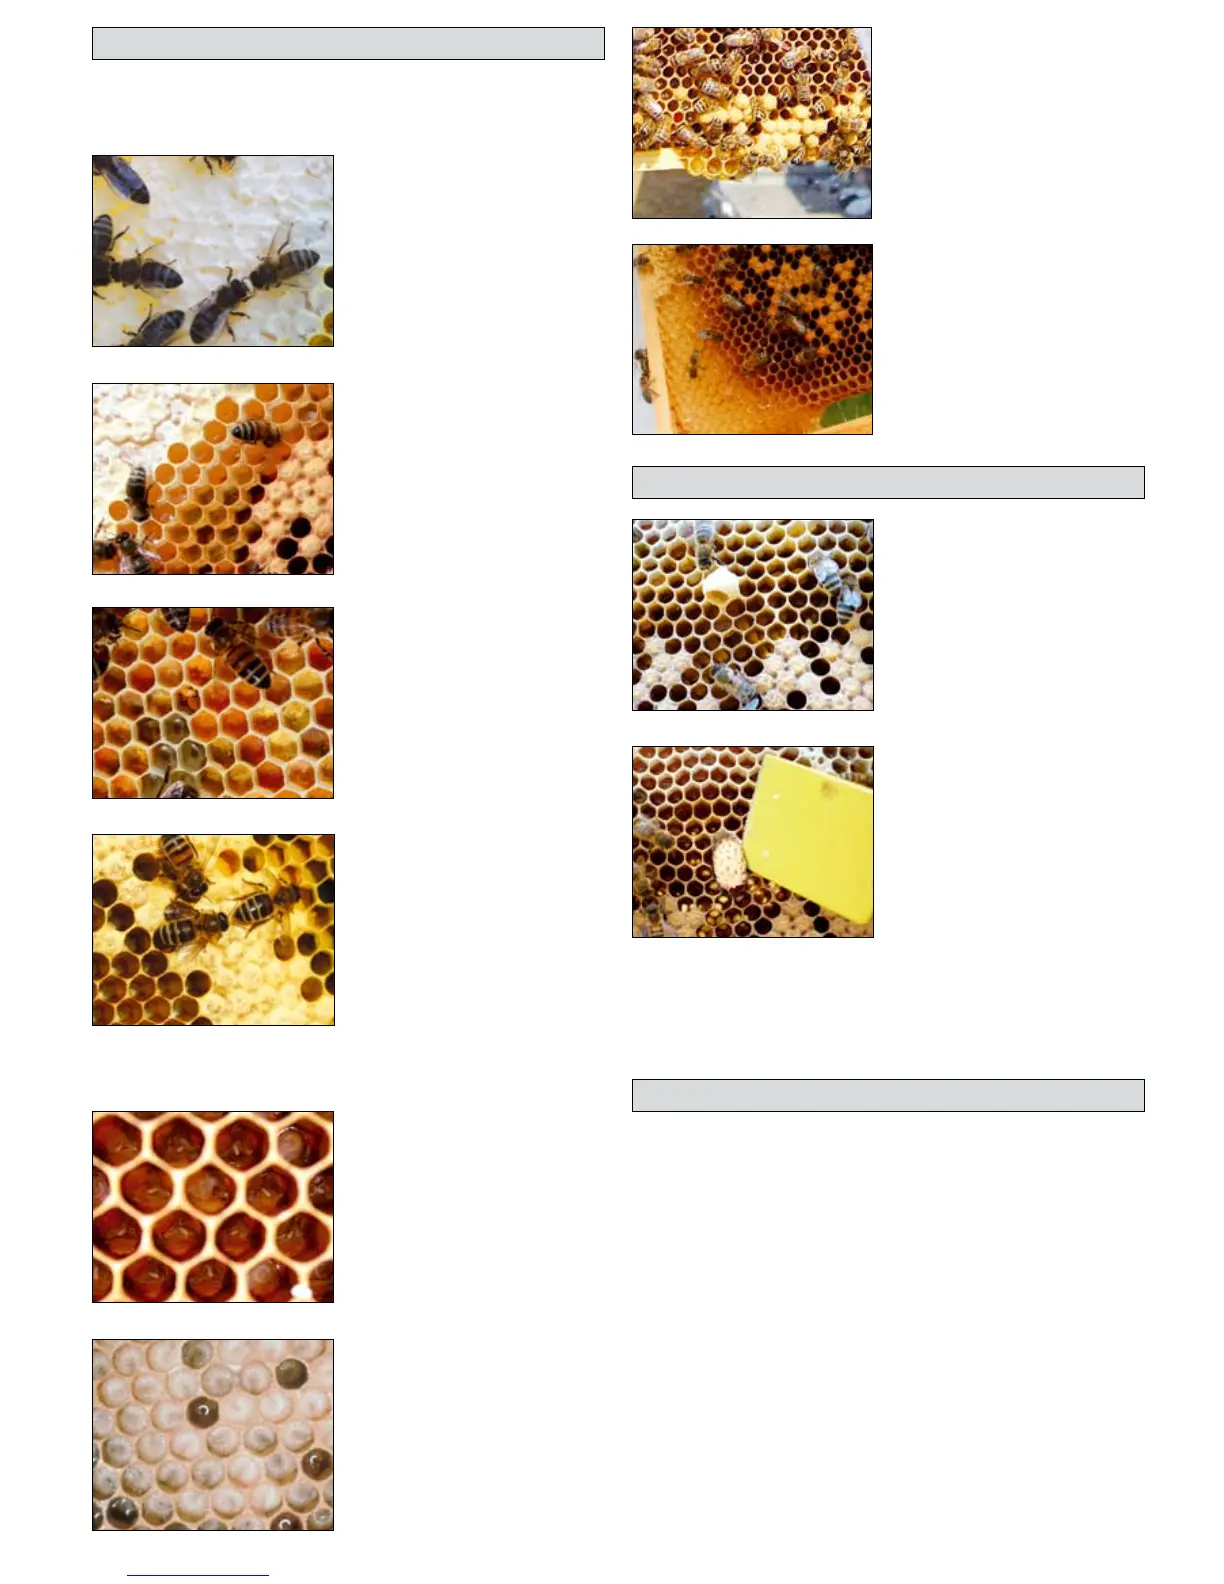
There are five sections of a frame which are: capped honey stores;
nectar; pollen; brood; and empty cells. These are easy to identify, all are
important and their quantity and distribution need to be noted as part of
your inspection in your record book.
Nectar - In the rows of cells
immediately underneath the capped
honey, there should be stores of
nectar. This is a snack food for bees
(the equivalent of having a bowl of
nuts on your desk), which they can
dip into easily. The bees consume this
and feed it to the larvae. Uncapped
nectar looks shiny.
Capped Honey - There should be a
reserve of capped honey at the very
top of the frame, this often extends
around the corners. If there isn’t,
then the bees are running extremely
low on food reserves and you will
need to feed them. This can happen
at any time of year, even in summer
if the bees haven’t been able to fly
for a week because of bad weather.
Identifying parts of the comb
Pollen - This may not be so clearly
defined but you should see cells
packed with pollen, often different
shades ranging from bright orange
and red to almost black. Pollen is the
protein, that bees eat. There must
always be pollen available if there
is brood. Bees can run out of pollen
during prolonged bad weather.
Eggs - Difficult to spot but well
worth trying as these tell you where
the queen has been active most
recently. Eggs are only about 1-2mm
long. There should be one egg right
at the bottom of the cells in the
middle. If they are on the side, or
more than one per cell it’s likely that
the queen has failed and a worker is
laying eggs.
Drone cells - Large hexagonal with
a domed cap. More often drone cells
are found at the bottom of a frame.
If lots of drone cells are found all
over the brood frames it could be
the queen has failed to mate and is
unable to lay worker brood.
Larvae - You should learn to
recognise healthy larvae so that if
bees get a brood disease such as EFB
or AFB you can spot it early. Healthy
larvae are pearly white and look like
little caterpillars.
Brood - A good brood patch is
circular with a high density of cells
containing either eggs, larvae or
sealed brood, depending on how
long ago the queen was active on
that frame. If the cells containing
brood are sporadic, (i.e. there are
a lot of empty cells) it is a sign that
either the queen is failing or the bees
have ejected diseased larvae.
The cell caps should be flat for female
worker bees and raised for male (drone) bees. If the caps are sunken there
could be a problem. See Page 46.
Queen cups - A queen cup is
the beginning of a queen cell.
Sometimes the bees will start quite
a few but not draw them out any
more than this. They can be found
on the edges of the comb as well as
the middle. You should make a note
of them and inspect again within 8
days when they may have progressed
to full queen cells.
Queen Cells - If you discover one
or more queen cells you will need
to decide whether to leave one or
remove them all. If it is in the months
of April, May, June or July and the
colony is strong then you should
consider artificial swarming. You will
need to select one queen cell and
remove all the rest before dividing
the colony.
At other times of the year it may be because the queen has failed and the
bees are replacing her, again remove all but one queen cell.
To remove a queen cell simply cut it out from the base using your hive
tool. For more information on the procedure for artificially swarming
your bees see Page 42.
Empty cells - During the day many
of the bees are out foraging but at
night they all cluster in the hive.
If there are no empty cells at the
very bottom of the frames, then
the message will spread that a new
home is needed and the colony is in
danger of swarming. In this case you
need to add more brood frames or
supers to make space for the colony.
Adding frames and moving divider board
Queen cells
If you are starting with a nucleus of bees in the spring, then you will need
to add some frames for them to expand onto straight away. With an
established colony, the queen will be expanding the nest up until June/
July and you will frequently have to add frames to keep up because if
the bees run out of space this can lead to swarming or the building of
wild comb. If you artificially swarm your bees, you will also need to add
frames. So you can see, adding frames is something you will get quite
used to! When you add brood frames you normally add towards the
entrance of the Beehaus. To encourage a nucleus colony or small over
wintered colony to draw the frames out, you can feed them with syrup,
there’s more information on feeding on page 36. Don’t forget to mark in
the record book when you add frames.
WhenthecolonyhaslledonehalfoftheBeehausbutisstillexpanding,
you can move the divider board to make room. Lift the divider board out
and move it as far down as you need to.
Please note that in any other position other than the centre the divider
board will not make a complete division. If you need to make a complete
seal because you have another colony of bees in the other side, then you
can use a material such as a scouring pad cut to shape to block
the spaces.