Advanced beekeeping
This section covers beekeeping techniques that you might not use very
often but may come in handy.
When should you mark the queen?
The best time to find the queen is in April, at the start of the season when
there are only a small number of bees in the colony. It’s usually easy to
find the queen in a nucleus so mark her as soon as you can.
You might find it handy to practise marking a drone which isn’t critical
to the colony so that you feel confident when it comes to marking
the queen.
Method
You will see in some books, beekeepers picking the queen up in their
fingers to mark her. This is extremely risky because it’s very easy to
damage the queen or accidentally drop and loose her. It is much safer to
use a queen marking cage like the one pictured. You can order one from
the Omlet shop.
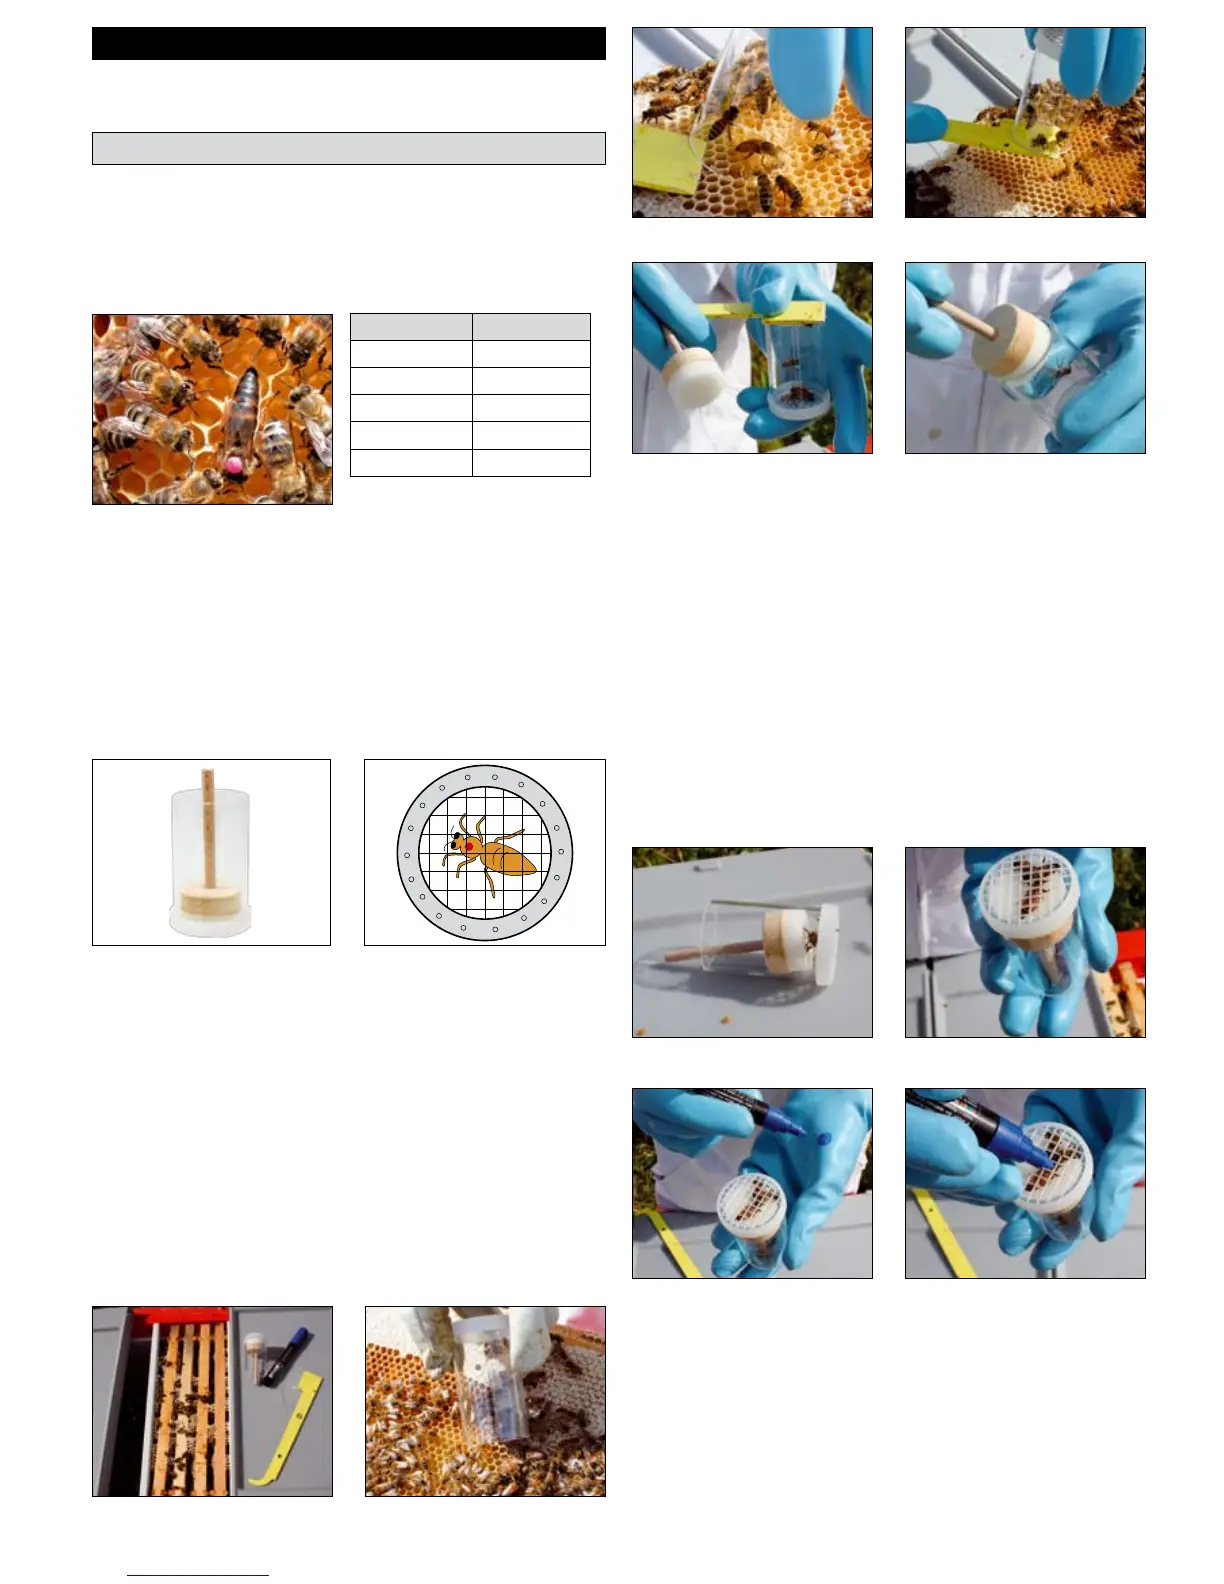
First find the queen on the comb and then gently rest this frame flat on
top of the Beehaus. Place the queen marking cage over the queen and,
using the flat end of the hive tool to cover the opening, lift the cage up
so that you can slide the plunger in. It doesn’t matter if you trap a few
worker bees in as well.
Queen marking cage and plunger.
(www.omlet.co.uk/shop/plunger)
The queen is held against the screen by
the plunger.
What colour to choose?
You can use any colour you like but if you are going to be selling bees
then it’s worth sticking to the international colour code. This allows you
to tell the age of any a marked queen. For example if you requeened a
colony in 2012 - you would put a yellow dot on her upper thorax.
Place the cage over the queen. Marking kit and a nucleus colony.
You can rest the cage on it’s side while
you get the paint ready.
It’s safer to put the first dab on
your glove.
Use two fingers to hold the plunger.
Delicately mark the queen with paint.
Gently slide the hive tool under to trap
the queen in the cage.
Turn the cage over and make sure the
queen is at the bottom.
Now you can lift the cage.
Remove the hive tool and slide the
plunger in.
At this point you can put the cage with the plunger in down on it’s side
so that you can get your paint ready. If you are using a pot of paint you
can use the stem of a blade of grass or a very fine brush; if you are using
a pen then uncap it now.
Using both hands pick up the cage and slide the plunger up so that the
queen is gently pushed up against the grid. If she is the wrong way up
you need to wait until she turns over. You are aiming to trap her so that
her thorax (the part of her body just behind her head) is neatly positioned
in one of the openings in the grid. When she is trapped like this, use
two fingers of the hand holding the cage to hold the plunger in position.
Now, with your free hand, take your paint brush or paint pen and put the
first dib of paint on your glove. The reason for this is to avoid accidentally
covering the queen in a great blob of paint, put the second dib of paint
on the queen’s thorax. It’s better to make several small marks rather than
one large one.
Now release the pressure on the plunger, but leave the queen in the cage
for for a minute or two for the paint to dry. It’s very important not to
rush the queen back into the hive. Place the marking cage and plunger on
the frames and let the bees find the queen. They will all crowd around
her, touching her to check that she is their queen and after a few minutes
should guide her back down into the frames.
How to mark a queen
Whenever you inspect your bees it’s useful to check that the queen is alive
and well. However, this is easier said than done with a strong colony of
over 40,000 bees. So, to make your life easier, you can mark the queen
with a coloured dot on her back.
What do you mark her with?
You can mark the queen with hobby paint or even a stick-on dot.
YEAR ENDING QUEEN
5 or 0 Blue
6 or 1 White
7 or 2 Yellow
8 or 3 Red
9 or 4 Green
A marked queen is easier to spot.
The international colour code
for queens.