8.1. Engineering Mode
8.1.1. Base Unit
Important:
Make sure the address on LCD is correct when entering new data. Otherwise, you may ruin the unit.
1). Press {MENU}.
2). Select "Settings" using or
then press
{SELECT} or {>}.
H/S key operation
H/S LCD
{^}
3). Enter "7", "2", "6", "2", "7", "6", "6", "4".
Note: 7262 7664 = PANA SONI
(see letters printed on dial keys)
5). Enter "
ە
", "
ە
", "
ە
", "
ە
" (Address). (*1)
6). Enter "
㸨
", "
㸨
" (New Data). (*1)
4). Select "Write EEP" using or
then press
{SELECT} or {>}.
{^} {V}
Default Data
Select "Set tel line" using or
then press
{SELECT} or {>}. (*)
{^} {V}
Service Mode
Read EEP
Write EEP
Set Addr.:
{OFF}
{FLASH}
{CALL WAIT}
Dial keypad
BACK
SELECT
CLEAR
OK
{V}
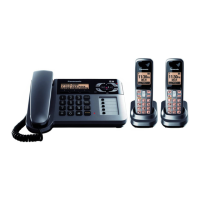
This pictured model is KX-TGE270.
Make sure the link between Base and Handset before that. Then in case using not original Handset,
you need to deregister Handset.
Note: Refer to Registering a Handset to a Base Unit in the Operating Instructions.

 Loading...