Speaker set-up
»
1
Attach the stickers to the speaker cords
Note
After you have completed set-up and connection, wind the excess
cord and keep together with string.
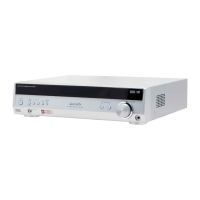
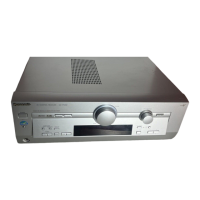
Rear of receiver
Connect so the numbers on the stickers
match the numbers under the terminals.
The 6 speaker cords are all the same.
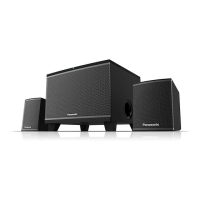
Rear panel of small speakers
Rear panel of large speaker
About 10 cm (4q)
»
3
Connect the cords to the speakers
»
2
Connect the cords to the receiver
º Speaker cords
³Connect the cords so the numbers on the stickers match the num-
bers under the terminals.
³Connect the red cords to the red terminals (i) and the black cords to
the black terminals (j).
³Ensure the wires of the cords are fully inserted so they do not touch
each other and short circuit.
1
FRONT L
1
1
FRONT L
FRONT L
2
2
FRONT R
FRONT R
3
3
SURROUND L
SURROUND L
4
4
SURROUND R
SURROUND R
5
5
CENTER
CENTER
6
6
SUBWOOFER
SUBWOOFER
1
1
FRONT L
FRONT L
2
2
FRONT R
FRONT R
3
3
SURROUND L
SURROUND L
4
4
SURROUND R
SURROUND R
5
5
CENTER
CENTER
6
6
SUBWOOFER
SUBWOOFER
FRONT L
1
1
1
FRONT L
FRONT L
1 Front speaker
(left)
3 Center speaker
2 Front speaker
(right)
4 Surround speaker
(left)
5 Surround speaker
(right)
6 Subwoofer
Red
Black
Red
Black
Red
Black
The 5 small speakers are the same.
Connect the cords with stickers 1 to 5 attached to the small
speakers: 2kfront, 2ksurround, and 1kcenter.
Connect the cord with sticker 6 attached to the large
speaker: subwoofer.
 Loading...