Riemenschutz
Belt
guard
Garde-courroie
Guardacorreas
Copricinghia
Achtung:
Nicht
ohne
Riemenschutz betreiben,
Unfallgefahr!
Danger!
Do not run machine without beltguard!
Attention:
Ne
pas
faire
marcher
sans
garde-
courroie.
Risque
d'accidenti
Atencibn:
No
ponga
la maquina en
marcha
sin
guardacorreas. iPeligrode accidente!
Attenzlone:
Non
far
funzionare
la
macchina
senza
guardacinghia,
rischio d'incidente!
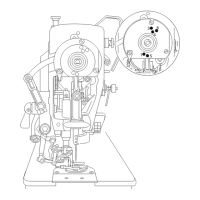
Maschine
ausschalten.
Riemenschutz
wie folgt
anschrauben:
Linke und rechte Schutzhaifte mit ihren Schlitzen hinter die Kbpfe
der
Befestigungsschrauben
a1 und
a2
schieben
(siehe
Fig. 15). Distanzhulse c auf die
Befestigungsschraube
d
stecken
und die
Schraube
d in die
Gewindebohrung d1 eindrehen. Unter Beachtung, daf} die Lasche c1 hinter
den
Schlitz b3 und vor die
Distanzhulse
c
kommt,
den
Riemenschutz
ausrichten
und
die
Schrauben
d, a1
und
a2
test
anziehen.
Switch off the machine. To
screw
on the belt
guard,
proceed
as
follows:
Attach
the
right
and
left belt
guard
sections
so
that
screws
a1
and
a2
enter
the
appropriate slots in
the
back
wall of
the
belt
guard
(Fig.
15).
Push
spacing
sleeve
c
onto
screw
d
and
screw
this
screw
into
hole
d1 a few
turns. Make
sure
lug c1 is positioned behind slot b3
and
in front of
spacing
sleeve
c, align
the
belt
guard
and
tighten
screws
d, a1
and
a2
securely.
Mettre
la
machine
hors
circuit.
Monter
le
garde-courroie
superieur
comme
suit:
Mettre en
place
les
deux
parties
du
garde-courroie
en en
engageant
les
fentes
derriere
les
tetes
des
vis a1
et a2 (fig. 15).
Placer
la douille
d'ecartement
c
sur
la vis d et
visser
celle-ci
dans
le trou
taraude
d1.
En veillant ^
ce
que
la
languette
c1
prenne
appui derriere la fente b3 et
devant
la douille c,
ajuster
le
garde-
courroie
et
serrer
les
vis
d,
a1
et
a2.
Desconecte
la maquina. El
guardacorreas
se
coloca
y atornilla de la forma siguiente:
La
mitad
izquierda
y
derecha
del
guardacorreas
se
introducen
con
sus
ranuras
detras
de
lascabezas
de
los
tornillos de fijacibn a1 y a2
(vease
fig. 15).
Se
introduce el mangiuto distanciador c
sobre
el tornillo de fija-
cion d y
se
atornilla
6ste
en el
agujero
roscado
d1.
Teniendo
cuidado
de
que
la
oreja
c1
queda
detras
de la
ranura
b3 y
delante
del manguito distanciador c,
se
alinea
el
guardacorreas
y
se
aprietan
los tornillos d,
la
y
a2.
Disinserire
la
macchina.
Awitare
il
copricinghia
come
segue:
Spingere le
meta
sinistrae
destra
della protezione con le lorofessure dietro le
teste
delle
viti
difissaggio a1 e a2
(vedi fig. 15). Infilare la
boccola
distanziatrice
c
sulla
vite di
fissaggio
d ed
awitare
questa
nel foro filettato
d1.
Facendo
attenzione
che
la
fascetta
c1 arrivi
dietro
la
fessura
b3
e
davanti
la
boccola
distanziatrice
c,
posizionare
il copricinghia e
stringere
le viti d, a1 e
a2.