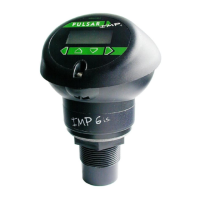
Outdoor and Open Vessel Installation
The IMP+
IMP+IMP+
IMP+ can be simply mounted on a bracket, suitable for the application
and secured using the thread located at the top of the transducer
(2"BSP/NPT).
Care should be taken to ensure that the IMP+
IMP+IMP+
IMP+ is not installed in direct
sunlight, in order to avoid errors in the measurement of ambient
temperature.
Attention should also be taken, when mounting the unit, to ensure that
strong windy conditions are avoided, wherever possible, to prevent
abnormal operation.
IMP+
IMP+IMP+
IMP+
“L” should as a minimum be at least that as detailed in the table above,
but can be greater if required.
Closed Vessel Installation
“L” should as a minimum be at least that as detailed in the table above, but
can be greater if required.The IMP+
IMP+IMP+
IMP+ can be simply screwed into a flange and
secured using the thread located at the top of the transducer (1.5" or 2"BSP/
NPT, dependent on model).
Where possible use a flange made of a synthetic material such as PVC, in
cases where a metal flange is used it is advisable to fit a suitable gasket
between the flange of the IMP+
IMP+IMP+
IMP+ and the connection to the vessel.