48
Annex 1: Installation and System Turn ON Progress List
The environment is meeting all technical
requirements.
3.3.1 Cleaning
3.3.2 Temperature
3.3.3 Radiating System
3.3.4 Heating System
3.3.5 Grounding System
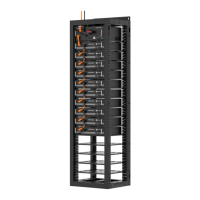
Battery rack is installed follow the technical
requirements.
Control Module (BMS) and Battery Module are
installed well.
Refer to
chapter 3.5.3.
and 3.5.4
Connect External Power Cable +/- between each
BMS to the PCS or DC-bus distribution cabinet.
Connect internal power cables of each battery
string.
Connect internal communication cables of each
battery string.
Set up ADD switch of every BMS (Address
Assignment for Master and slave control).
Connect external communication cables from BMS
to BMS, BMS to inverter or upper controller,
or another.
Double check every power cables, communication
cables installed well. And ADD Switches are
setting right.
Refer to
chapter 3.6.3.
and 3.6.4.
Switch the external power or PCS on, to sure
all the power equipments can work normally.
Turn the BMS (Battery Control Modules) of each
battery string on (from 1
st
BMS to the last,
one by one)
⚫ Turn on the “Power Switch”:
⚫ Turn on the “Start Button”:
⚫ The battery string’s system will check
itself, if work normal the battery
string system will go into self-check
mode.
If has failure during the self-check, must
debug the failure then can start next step.
The master control module must be turned on
after other slave control modules self-check
finish.
The first installation should do full charging
progress.
After Master controller has communicated with
each slave BMS, it will run parallel
The first
installation
should do full