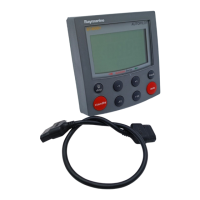
5.1Mounting
Theproductisdesignedtobeushmounted.
Beforemountingtheunit,ensurethatyouhave:
•Selectedasuitablelocation.
•Identiedthecableconnectionsandroutethatthecablewill
take.
•Detachedthefrontbezel.
p70Mounting
p70rMounting
1.Checktheselectedlocationfortheunit.Aclear,atareawith
suitableclearancebehindthepanel,isrequired.
2.Fixtheappropriatecuttingtemplatesuppliedwiththeproduct,
totheselectedlocation,usingmaskingorself-adhesivetape.
3.Usingasuitableholesaw,makeapilotholesineachcorner
ofthecut-outarea.
4.Usingasuitablesaw,cutalongtheinsideedgeofthecut-out
line.
5.Ensurethattheunittsintotheremovedareaandthenle
aroundthecutedgeuntilsmooth.
6.Drillfourholesasindicatedonthetemplatetoacceptthe
securingscrews.
7.Peelthebackingoffofthegasket,andplacetheadhesive
sideofthegasketontothedisplayunitandpressrmlyonto
theange.
8.Connectcablestotheunit.
9.Slidetheunitintoplaceandsecureusingscrewsprovided.
Note:Drill,tapsize,andtighteningtorqueisdependentonthe
thicknessandtypeofmaterialtheunitistobemountedon.
Frontbezel
Removingthefrontbezel
Important:Usecarewhenremovingthebezel.Donotuse
anytoolstoleverthebezel,doingsomaycausedamage.
1.Usingyourngerspullthebezelawayfromtheunitatthe
topandside,asshownin2.
Thebezelwillstarttocomeawayfromtheunitatthetop
andside.
2.Nowpullthebezelawayfromtheunitontheoppositeside,
asshownin3.
Thebezelwillnowcomefreefromtheunit,asshownin4.
30
p70/p70R

 Loading...