Getting Started
12
1
6.
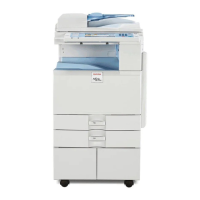
Main unit opening lever
Use to open the main unit.
Important
❒ Do not leave the main unit open
more than 10 minutes, other-
wise copy quality may deterio-
rate.
7.
Main power switch
Use to turn the main power on or off.
If you will not use the machine for a
long time, disconnect the power cord.
Normally, the machine should be left
on.
Note
❒ If the machine does not operate af-
ter turning on the operation
switch, check the main power
switch is also turned on. If off, turn
it on.
8.
Paper roll tray (optional)
Load a paper roll here. See p.14 “Op-
tions”.
9.
Operation switch
Use to turn the power on or off. The
power indicator lights when the pow-
er is on.
10.
Control panel
See p.17 “Control Panel”.
11. {
{{
{Scanner Stop}
}}
} key
Use if originals are feeding in slanted,
or to cancel scanning while an original
is feeding in.
12.
Original guide
Set to the width of your originals.
13.
Original table
Place originals here scanning side
down.
14.
Main unit front cover
Open when toner runs out.
15.
Bypass tray
Use to feed paper in manually. Load
paper print side up.
16.
Cut paper tray (optional)
Load cut paper here. See p.14 “Op-
tions”.
17.
Lower output stacker
When the lower output is selected,
copies are stacked here. See “Copy
Output Locations”,Copy Reference.
18.
Lower output auxiliary guide
Pull this out to insert rolled paper or
long originals.
NeptuneC1_GBzen_F_FM_pre.book Page 12 Tuesday, December 16, 2003 5:03 PM
 Loading...