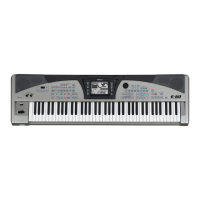
4
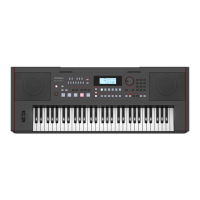
Panel & Display Description
1. [POWER] switch
Switches the power on or o.
2. [VOLUME] knob
Adjusts the master volume.
3. [CHORD] button
Lets you access the Chord mode.
4. [LESSON] button
Lets you access the Lesson mode.
5. [CHORD DICT.] button
Turns the chord dictionary on or o.
6. [SYNC] button
Turns the sync function on or o.
7. TEMPO[-]/[+] buttons
Adjusts the current tempo.
8. [START/STOP] button
Starts or stops playing the style.
9. [INTRO/ENDING] button
Plays the intro or ending.
10. [FADE] button
Turns fade-in or fade-out on or o.
11. [FILL A] button
Plays ll A.
12. [FILL B] button
Plays ll B.
13. [QUICK MEMORY] button
Registers the panel settings.
14~17. [1]~[4] buttons
Recalls a registered panel setting.
18. [O.T.S.] button
Turns one touch setting function on or o.
19. [STYLE] button
Lets you access the Style mode.
20. [TONE] button
Lets you access the Tone mode.
[ ]
Press and hold to turn arpeggiator on or o.
21. [DUAL] button
Turns the dual function on or o.
22. [SPLIT] button
Turns the split function on or o.
23. [TRANSPOSE] button
Adjusts the transpose setting.
24. [SUSTAIN] button
Turns the sustain function on or o.
[ ]
Press and hold to turn modulation on or o.
25. [MIXER] button
Lets you access the Mixer menu.
26. [MENU] button
Lets you access the Function menu.
27. [SONG] button
Lets you access the Song mode.
28. [ ] button
Song mode: plays/pauses the song.
Other mode: plays/pauses the recorded
song.
[ ]
Press and hold to enter the Record mode.
29. [METRONOME] button
Turns the metronome on or o.
30. [PIANO] button
Lets you access the Piano mode.
31. [<]/[>] and Numeric buttons:
Select the number or set parameter values.
Front Panel
1
2
3 4 5
6 7
8 9
10 11 12
13
19 20 21 22 23 24 25 26 27 28 29 30
31
14 15 16 17 18
 Loading...