EasyManua.ls Logo

RoomTec Murphy Bed Building Queen Vertical - User Manual

RoomTec Murphy Bed Building Queen Vertical
29 pages
Print Icon
To Next Page IconTo Next Page
Loading...
Murphy Bed Building Instruction Manual
(Queen Vertical)
Customer Service: (800)209-3199 (MON -FRI 9:00am-5:00pm
Eastern Time) or hello@room-tec.com
Note: If you encounter any problems with the installaon, missing
or replacement parts, please Contact ROOMTEC.
Please also tell us your “ORDER ID,” we will solve the issue for
you as soon as possible.
Question and Answer IconNeed help?

Do you have a question about the RoomTec Murphy Bed Building Queen Vertical and is the answer not in the manual?

Summary

Introduction and Preparation

Tools Needed:

List of tools required for assembling the Murphy bed.

Important Safety Warning

Important safety advisory regarding mechanical energy and secure wall anchoring.

Cabinet Specifications

Finished Bed Cabinet Dimensions

Detailed measurements for the finished bed cabinet's external dimensions.

Component Identification

Key Bed Components Identification

Identifies main structural parts like bed frame, side rails, and face panels.

Plywood Cutting and Materials

Plywood Sheet Requirements

Specifies the quantity and size of plywood sheets needed for cutting.

Materials and Hardware List

Lists all materials and hardware required for the bed construction.

Part A: Inner Wood Bed Frame Assembly

Frame Strut Construction and Mounting

Details on constructing, positioning, and mounting the frame struts.

Part B: Side Rails Assembly

Side Rail Preparation and Pivot Placement

Instructions for preparing side rails and initial pivot hardware placement.

Part C & D: Foot and Head Rails

Part D. Head Rail

Identifies and describes the foot and head rail components.

Hardware Placement for Side Rails

Leg Support Rail Installation

Instructions for installing the leg support rail onto the side rails.

Right Side Rail Assembly

Leg Pivot and Plate Mounting

Steps for attaching the leg pivot and associated plates to the right side rail.

Left Side Rail Assembly

Leg Pivot and Plate Mounting

Steps for attaching the leg pivot and associated plates to the left side rail.

Ball Stud Placement

Lower Ball Stud Plate Mounting

Guidance on positioning and mounting the lower ball stud plate.

Right Side Rail Ball Stud Plate Mounting

Mounting the Lower Ball Stud Plate

Specific instructions for mounting the ball stud plate on the right side rail.

Left Side Rail Ball Stud Plate Mounting

Mounting the Lower Ball Stud Plate

Specific instructions for mounting the ball stud plate on the left side rail.

Female Pivot Plate Mounting

Mounting Female Pivot Plates

Instructions for attaching the female pivot plates to the side rails.

Main Frame Assembly

Mounting Foot, Head, and Side Rails

Steps for assembling the main bed frame by attaching rails.

Face Panel Preparation

Face Panel Preparation (Steps 17-19)

Preparing the bed face panels, including edge taping and marking.

Attaching Bed Face Panels

Attaching Bed Face Panels to Frame

Instructions for laying and positioning the bed face panels onto the frame.

Securing Face Panels

Securing Face Panels to Frame

Final steps for securing the face panels, ensuring proper alignment and overhang.

Part G: Bed Cabinet Verticals (Left)

Vertical Cabinet Assembly Steps

Instructions for assembling the left bed cabinet vertical with hardware.

Part G: Bed Cabinet Verticals (Right)

Vertical Cabinet Assembly Steps

Instructions for assembling the right bed cabinet vertical with hardware.

Part F: Bed Headboard

Headboard Preparation

Instructions for preparing the bed headboard, including edge finishing.

Part H: Bed Header Components

Header Assembly and Finishing

Steps for assembling the bed header components and final finishing.

After-Sales Service

Customer Service and Contact Information

Contact details and support information for after-sales service.

Overview

This document provides comprehensive instructions for assembling and maintaining a Queen Vertical Murphy Bed from ROOMTEC. The manual is designed to guide users through the entire building process, from inspecting box contents to the final assembly and finishing touches.

Function Description

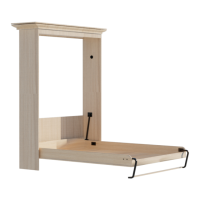
The ROOMTEC Queen Vertical Murphy Bed is a space-saving furniture solution designed to store a queen-sized bed vertically within a cabinet when not in use. This allows for efficient use of floor space in rooms where a permanent bed might be impractical, such as guest rooms, home offices, or small apartments. When needed, the bed can be easily lowered for use, providing a comfortable sleeping surface. The design emphasizes secure anchoring to the wall, a critical safety feature due to the stored mechanical energy involved in its operation.

Usage Features

The assembly process is broken down into several parts, each focusing on specific components of the bed.

Tools Needed: A comprehensive list of tools is provided to ensure a smooth assembly. These include a power drill with various drill bits (1/8", 1/4", 5/16", 1" Forstner Bit, 5/8" Forstner Bit), a power saw (table saw or circular saw), a jigsaw or coping saw, Phillips-head and flat-head screwdrivers (or driver bits for a drill), a tape measure, a #4 Allen wrench, a hammer, clamps, a straight edge or framing square, a household iron for veneer tape, a utility knife, and a stud finder.

Plywood Cutting Guide: The manual includes a detailed plywood cutting guide for a Queen Size Deluxe Kit Vertical Bed. It specifies the required number of 3/4" x 4' x 8' and 1/4" x 4' x 8' plywood sheets and provides diagrams for cutting various components such as the rear rail, head rail, foot rail, cabinet verticals, face panel, mattress support, front rail, side rails, and header boards.

Bill of Materials / Cut Sheet: A comprehensive bill of materials is provided, listing all necessary components for the Queen Size Deluxe Kit Vertical Bed with 3/4" Plywood Face Panel. This includes solid wood pieces for the inner wood bed frame (frame struts and frame sides), plywood pieces for the side rails, foot rail, head rail, bed face panel, bed headboard, and bed cabinet verticals. It also lists components for the bed header (headerboard, front rail, rear rail, mounting cleats), leg support rail, and 1/4" plywood mattress support. Additional materials like veneer or melamine tape, wood glue, finish nails (1-1/2" and 2"), and various screws (#8 1-1/4" coarse thread, #8 1-1/2" coarse thread, #8 2" coarse thread) are specified. The manual also notes the need for two cabinet handles or pulls and specifies that the mattress must weigh between 65-80 pounds.

Assembly Steps: The manual details the assembly in a step-by-step manner:

  • Part A: Inner Wood Bed Frame: This section covers the construction of the five frame struts, positioning them between the frame sides, and mounting them using wood glue, finish nails, or screws. Specific spacing for queen-size beds is provided.
  • Part B: Side Rails, Part C: Foot Rail, Part D: Head Rail: These sections emphasize that side rails must be made of plywood due to stress. Instructions for applying wood veneer or melamine edge banding tape for a finished look are included. Placement holes for the female pivot are also indicated.
  • Hardware Placement for B. Side Rails: This section details the placement of pivoting leg brackets, templates, female pivots, and lower ball stud plates. Templates are used to accurately mark drilling locations.
  • B. Right Side Rail and B. Left Side Rail: These sections provide detailed instructions for leg placement, including measuring down from the top and in from the front, and drilling specific diameter holes. Steps for placing the leg pivot into the drilled hole and securing it with black screws and "T" nuts are outlined. A crucial note advises clamping scrap wood to the rail to prevent tear-out during drilling.
  • Mounting Lower Ball Stud Plates and Female Pivots: This section provides a general overview of the orientation and mounting positions, emphasizing the use of specific pages for detailed instructions. It specifies mounting the lower ball stud plate to the outside of the side rail and the female pivot to the inside.
  • Step 11 & 12: Mounting the Lower Ball Stud Plate: These steps provide detailed measurements and instructions for mounting the lower ball stud plate to both the right and left side rails, including drilling pilot holes, inserting T-nuts, and screwing the plate in place. A 5/16" spacer under the ball is recommended for accurate placement.
  • Step 13: Mounting Female Pivot Plates: Instructions for mounting the female pivot plate to the inside of the right and left side rails, pressing the pivot into the hole, and securing it with silver screws are provided.
  • Step 14: Mounting the Foot Rail Part C and Head Rail D: This involves drilling pilot holes and driving screws to attach the foot rail and head rail to the inner wood bed frame, ensuring flush alignment.
  • Step 15: Mounting Left and Right Side Rails to Inner Wood Bed Frame: This step describes drilling holes and driving screws to attach the side rails to the inner wood bed frame, ensuring the pivot plates are mounted to the inside of the side rails.
  • Step 16: Mounting the Side Rails B to the Foot Rail Part C and Head Rail Part D: This step involves drilling pilot holes and driving screws to attach the side rails to the foot rail and head rail, ensuring flush alignment. It also instructs to remove pivot leg hardware after completion.
  • Step 17-21: Bed Face Panels: These steps cover preparing the bed face panels, including applying wood veneer or melamine edge tape, marking a 1/4" line on the back side, positioning the panels on a flat surface, and attaching them to the inner wood bed frame. Instructions emphasize ensuring the face panel and foot rail are flush and that the face panel extends 1/4" past the edge of the frame on long sides. Specific screw placement (X, Y, Z sections) is detailed to aid in racking into square.
  • Step 22: Placement of Cabinet Handles: This step specifies that cabinet handles should be placed between 5' and 6' on the face panel for optimal leverage.
  • Part G: Bed Cabinet Verticals (Left & Right): These sections detail the installation of the bed stop, upper piston plate with ball stud, and male pivot plate on both the left and right bed cabinet verticals. Specific drilling depths, screw types, and "T" nut placements are provided. An option for accommodating existing base molding is also mentioned.
  • Part F: Bed Headboard: This section covers applying wood veneer or melamine edge tape to the bed headboard for a finished look.
  • Part H: Bed Header Components: This section details the assembly of the bed header, including the rear rail, header board, front rail, and mounting cleats. Instructions for gluing and screwing components, maintaining a 1/2" lip, and drilling pilot holes are provided.
  • Step 32: Finishing: The final step instructs to remove all hardware, sand, and finish all components.

Maintenance Features

The manual includes an "After-Sales Service Card" that provides important maintenance guidelines:

  • Cleaning: Users are advised to avoid harsh, corrosive, and abrasive cleaners to preserve the finish and integrity of the bed components.
  • Environment: It is recommended to keep the bed dry and avoid damp environments to prevent damage to the wood and hardware.

The manual also emphasizes the importance of contacting customer service for any issues regarding shipping, product quality, missing parts, or installation problems, providing a phone number and email address for support. Users are asked to provide their "ORDER ID" for efficient assistance.

RoomTec Murphy Bed Building Queen Vertical Specifications

General IconGeneral
SizeQueen
Mounting OrientationVertical
CategoryIndoor Furnishing
TypeMurphy Bed
BrandRoomTec

Related product manuals