EB 8384-4 EN 41
Attachment to the control valve – Mounting parts and accessories
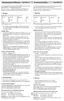
4.7.1 Mounting the position
sensor with direct at-
tachment
Type3277-5 Actuator with 120cm²
(Fig.15)
The signal pressure from the positioner is
routed over the signal pressure connection of
the connecting plate (9, Fig.15 left) to the
actuator diaphragm chamber. To proceed,
rst screw the connecting plate (9) included
in the accessories onto the actuator yoke.
− Turn the connecting plate (9) so that the
correct symbol for the fail-safe action
"actuator stem extends" or "actuator stem
retracts" is aligned with the marking
(Fig.15, below).
− Make absolutely sure that the gasket for
the connecting plate (9) is correctly insert-
ed.
− The connecting plate has threaded holes
with NPT and G threads. Seal the thread-
ed connection that is not used with the
rubber seal and square plug.
20
21
9
11
1.1
1.2
3
2
1
Actuator stem
extends retracts
Signal pressure
Signal pressure
Vent plug
Symbol
Marking
1 Lever
1.1 Nut
1.2 Disk spring
2 Follower pin
3 Follower clamp
9 Connecting plate
11 Cover
20 Position sensor
21 Mounting plate
Fig.15: Mounting for Type3277-5 Actuator (left) and Type3277 Actuator (right)

 Loading...