38 EB 8384-4 EN
Attachment to the control valve – Mounting parts and accessories
The following applies to all reversing am-
pliers:
The signal pressure of the positioner is sup-
plied at the output 1 of the reversing ampli-
er. An opposing pressure, which equals the
required supply pressure (Z) when added to
the pressure at output 1, is applied at output
2.
The following relationship applies:
output 1 + output 2 = Supply pressure (Z).
Connect output 1 to the signal pressure con-
nection on the actuator that causes the valve
to open when the pressure rises.
Connect output 2 to the signal pressure con-
nection on the actuator that causes the valve
to close when the pressure rises.
Î Set slide switch on positioner to AIR TO
OPEN.
How the outputs are marked depends on the
reversing amplier used:
− Type3710:Output 1/2 = Y
1
/Y
2
− 1079-1118and1079-1119:
Output 1/2 = A
1
/A
2
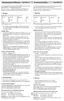
4.6.1 Reversing amplier
(1079-1118 or 1079-
1119)
Fig.14
1. Mount the connecting plate (6) from the
accessories in Table5 to the positioner.
Make sure that both O-rings (6.1) are
seated correctly.
2. Thread the special nuts (1.3) from the ac-
cessories of the reversing amplier into
the boreholes of the connecting plate.
3. Insert the gasket (1.2) into the recess of
the reversing amplier and slide both the
hollowed special screws (1.1) into the
connecting boreholes A
1
and Z.
4. Place the reversing amplier onto the
connecting plate (6) and screw tight us-
ing both the special screws (1.1).
5. Use a screwdriver (8mm wide) to screw
the enclosed lters (1.6) into the connec-
tion boreholes A
1
and Z.
Air can escape uncontrolled from the signal
pressure connection!
Do not unscrew the sealing plug (1.5) out of
the reversing amplier.
The rubber seal (1.4) is not required and can
be removed when the sealing plug is used.
6. After initialization, set Code16 (Pressure
limit) to No.
Pressure gauge attachment
The mounting sequence shown in Fig.14 re-
mains unchanged. Screw a pressure gauge
bracket onto the connections A
1
and Z.
Pressure gauge
bracket
G¼ 1400-7106
¼NPT 1400-7107
Pressure gauges for supply air Z and output
A
1
as listed in Table1 to Table7.
Note
A
1
1.5 1.6
1.3
6.266.1
1.2 1.1 1 1.6
Z
A
2
1.4
A
1
A
2
Z
A
1
Output 38 Supply 9
Output 38 Supply 9
1.3 1.21.1
From the positioner
Control signals to the
actuator
1 Reversing amplier
1.1 Special screws
1.2 Gasket
1.3 Special nuts
1.4 Rubber seal
1.5 Sealing plug
1.6 Filter
6 Connecting plate
6.1 O-rings
6.2 Screws
Fig.14: Mounting a reversing amplier (1079-1118 or 1079-1119)
NOTICE
!
Note

 Loading...