Ready
Read Diagn
Result
TeachIn
LED
Auto-Setup
Data
Autofocus
LNK TX
Userdefined
300
200
100
70
40
100
0
[mm]
[%]
Ready
Read Diagn
Result
TeachIn
LED
Auto-Setup
Data
Autofocus
LNK TX
Userdefined
300
200
100
70
40
100
0
[mm]
[%]
O
O
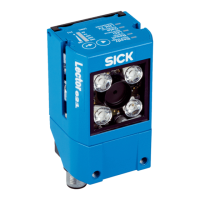
Press key 2 x shortly 1
1
Press the function button twice briefly.
✓
The Auto-Setup LED lights up blue.
4. Start Auto-Setup.
Ready
Read Diagn
Result
TeachIn
LED
Auto-Setup
Data
Autofocus
LNK TX
Userdefined
300
200
100
70
40
100
0
[mm]
[%]
Ö
Ready
Read Diagn
Result
TeachIn
LED
Auto-Setup
Data
Autofocus
LNK TX
Userdefined
300
200
100
70
40
100
0
[mm]
[%]
O
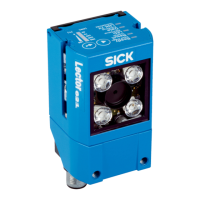
Press key 1 x shortly 1
1
Press the function button once briefly.
✓
The Auto-Setup LED flashes blue.
°
Lector621: The device adjusts itself automatically to the lighting conditions,
the code quality, and the working distance.
°
Lector621 ECO: the device adjusts itself automatically to suit the lighting con‐
ditions and the quality of the code.
NOTE
If the Auto Setup LED lights up yellow or red, the read result is inadequate. If this is
the case, check the alignment and distance of the device in relation to the code
and repeat the procedure.
5. Wait until Auto-Setup has finished. The bar graph display shows the percentage
progress of the Auto-Setup function. 100% means auto setup has finished. The
color of the LED indicates the result (see "Display and operating elements",
page 17).
6. Exit Setup mode and save the parameters.
✓
The existing configuration in the device is overwritten.
Alternatively, the device saves the parameters automatically if 5 minutes elapse without
a pushbutton being pressed, and it returns to read mode.
7.3 Initial commissioning
The device is configured for the particular application situation on site using the
SOPAS ET configuration software on a computer. The default factory settings of the
device are the starting point for this. The default parameter values (configuration data)
in the working memory of the device can be modified for optimization purposes. To do
so, the user creates an application-specific parameter set using the SOPAS ET configu‐
ration software, or edits the parameter set later as required. The user then loads the
current parameter set into the permanent parameter memory of the device.
Memory organization for parameter set
The following diagram shows the memory organization scheme for the internal and
external components involved:
Lector621
1
Optional
2
Device
3
Computer with the SOPAS ET configuration software
4
MicroSD memory card
7 COMMISSIONING
54
O P E R A T I N G I N S T R U C T I O N S | Lector621 8022502/15NT/2020-02-11 | SICK
Subject to change without notice