17
³ INSTALLATION AUF SCHALTTAFEL
(A) - (B)
• Ein Rechteck mit Ausmaßen wie in (A) auf der
Vorderseite der Schalttafel anbringen.
• Mitgelieferte Dichtung auf Gerätekorpus auf-
setzen.
• Den Regler in die Öffnung einsetzen.
• Von der Schalttafelrückseite her die Befesti-
gungselemente seitlich oder oben in die
Führungsschlitze einschieben.
• Die Befestigungselemente gegen die Schalt-
tafelrückseite setzen und mit einem
Schraubendreher gleichmässig festspannen.
Elektrischer Anschluß, sachdienliche Hin-
weise:
• Das Fühlerkabel von den anderen Kabeln ge-
trennt halten, um Störungen zu vermeiden.
• Der Erdleiter muß so kurz als möglich sein.
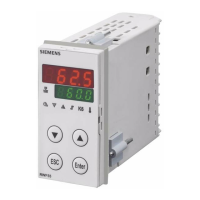
ZUGRIFF ZUM REGLER RWF40 (C)
Der Regler RWF40 hat drei Geräteebenen:
1° : Bedienerebene
Das ist die Bedienebene.
Die Anzeigezeilen 1 und 2, Bild (C) Seite
12, zeigen die Informationen.
2° : Parameterebene
3° : Konfigurationsebene
³ MOUNTING ON THE CONTROL PANEL
(A) - (B)
• Make a rectangular opening having the dimen-
sions indicated in (A) on the panel front.
• Place the seal supplied onto the controller
housing.
• Insert the controller in the opening.
• Insert the fixing brackets in the respective
openings in the controller housing.
• Place the fixing bracket tie rods against the
front panel and screw evenly in place.
Electrical connections, advice:
• Keep the probe cables separate from the oth-
ers to prevent interference.
• The ground wire must be as short as possible.
ACCESS TO THE RWF40
CONTROLLER (C)
The RWF40 controller has three access levels:
1° : User level
It is the operation level.
Displays 1 and 2, fig. (C) page 12, show
the information.
2° : Parameter level
3° : Configuration level
³ APPLICATION AU TABLEAU (A) - (B)
• Percer une ouverture rectangulaire ayant les
dimensions indiquées en (A) sur la partie fron-
tale du tableau.
• Placer le joint fourni à la livraison sur le corps
de l’appareil.
• Placer le régulateur dans l’ouverture.
• Introduire les supports de fixation dans les fis-
sures correspondantes sur le boîtier du régula-
teur.
• Fixer les tirants des supports de fixation contre
le panneau frontal du tableau et visser uni-
formément les vis.
Branchement électrique, précautions à pren-
dre:
• Séparer les câbles de la sonde des autres câ-
bles pour éviter des interférences.
• Le fil de mise à la terre doit être le plus court
possible.
ACCES AU REGULATEUR
RWF40 (C)
Le régulateur RWF40 a trois niveaux d’accès:
1° : Niveau opérateur
C’est le niveau de fonctionnement.
Les écrans 1 et 2, fig. (C) page 12, af-
fichent les informations.
2° : Niveau paramétrage
3° : Niveau configuration