V
Valerie CaldwellSep 12, 2025
How to fix faulty zero-point on Siemens Sitrans F Measuring Instruments?
- TTimothy AndrewsSep 12, 2025
To correct a faulty zero-point on your Siemens Measuring Instruments, make a new zero-point adjustment.


How to fix faulty zero-point on Siemens Sitrans F Measuring Instruments?
To correct a faulty zero-point on your Siemens Measuring Instruments, make a new zero-point adjustment.
What to do if Siemens Sitrans F displays 'Undefined'?
If your Siemens MASS 6000 Measuring Instruments displays 'Undefined', it could be due to no load on the current output or a defective MASS 6000. Check the cables and connections first. If the issue persists, the MASS 6000 may need to be replaced.
Why Siemens Sitrans F has no flow signal?
If you are getting no flow signal from your Siemens Measuring Instruments, it could be due to several reasons. First, check if the current output is deselected and activate it. Next, check if the digital output is deselected and activate it. Finally, verify the flow direction and change it if it's reversed.
How to fix deficient SENSORPROM? unit on Siemens Measuring Instruments?
If your Siemens Measuring Instruments has a deficient SENSORPROM? unit, replace the SENSORPROM? unit.
How to resolve a pulse overflow in Siemens Sitrans F?
If Siemens Measuring Instruments indicates a pulse overflow, it could be because the mass/pulse is too small or the pulse width is too large. Try changing the mass/pulse and the pulse width.
What to do if Siemens Sitrans F shows measuring pipe empty?
If your Siemens Measuring Instruments indicates that the measuring pipe is empty, ensure that the measuring pipe is full.
What to do if flow exceeds 120% of Q max. in Siemens Measuring Instruments?
If the flow exceeds 120% of Q max on your Siemens Measuring Instruments, check Q max in the Basic Settings.
What to do if Siemens Measuring Instruments has defective SENSORPROM? unit?
If your Siemens Measuring Instruments has a defective SENSORPROM? unit, replace the SENSORPROM? unit.
What to do if Siemens Measuring Instruments has wrong SENSORPROM? unit?
If your Siemens Measuring Instruments has the wrong SENSORPROM? unit, replace the SENSORPROM? unit.
What to do if Siemens Sitrans F show a Low Power Alarm?
If your Siemens Measuring Instruments display shows a 'Low Power Alarm', it could be due to low battery capacity or because the meter has just been powered up. Check the calculated battery capacity (parameter 510) against the battery alarm limit (parameter 206). Replace the batteries if needed. Note that flow measurement and communication will stop, but the display will remain active as long as power is available. The alarm will stay active until the problem is resolved.
| Measurement Principle | Coriolis, Electromagnetic, Ultrasonic |
|---|---|
| Communication Protocols | HART, PROFIBUS, Foundation Fieldbus, Modbus |
| Pressure Range | Varies by model (e.g., up to 400 bar for some models) |
| Power Supply | 24 V DC or 110-230 V AC |
| Protection Class | IP67, IP68 |
| Housing Material | Stainless steel, aluminum |
| Liner Material | PTFE, PFA, rubber |
| Electrode Material | Stainless steel, Hastelloy, platinum |
Explains the scope and target audience of the operating instructions.
Details the changes made in previous editions of the documentation.
Lists compatible versions of device integration packages for different manual editions.
Describes the contents of the user documentation package for the product.
Lists the components delivered with the device.
Provides guidance on industrial security functions and cyber threat protection.
Details requirements for proper transport and storage to ensure device protection.
States that manual content does not modify warranty conditions and reserves the right to technical changes.
Outlines essential conditions and precautions for maintaining safe operation.
Lists safety rules and laws applicable during connection, assembly, and operation.
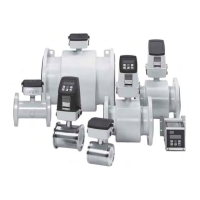
Describes the transmitter's modular design, components, and availability.
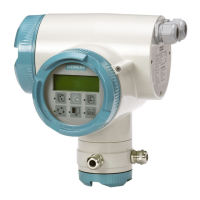
Highlights key features such as Modbus connectivity, local display, and housing options.
Lists various industries and applications where the flowmeter can be used.
Provides information on general purpose and hazardous area approvals.
Details the device's support for the Modbus communication protocol.
Specifies requirements for installation location based on enclosure rating and environmental factors.
Provides step-by-step instructions for mounting the transmitter on a wall.
Covers essential safety precautions for connecting the device, including grounding.
Explains how to integrate the device into a Modbus RTU network.
Details the wiring requirements for Modbus RTU RS 485 bus systems.
Highlights safety precautions related to opening the device and general requirements.
Guides through the initial device setup process, including language, date, and time.
Introduces the wizards available for guided device configuration.
Details the steps for the Quick commissioning wizard for essential application parameters.
Guides through the configuration of essential sensor parameters.
Explains the setup of process values and measurement views.
Guides through the setup of inputs and outputs on available channels.
Provides guidance on configuring the communication interface.
Describes how to operate the device using the local HMI interface.
Explains the access level control for parameters via the HMI menu.
Details how to display current process values using various view types.
Explains how to access and operate the totalizer functions.
Describes how to view and manage active alarms.
Highlights safety precautions regarding device repair and explosion protection.
Information on recalibration services offered by Siemens Flow Instruments.
Provides instructions for cleaning the device enclosure.
Details periodic inspection requirements and checks for device integrity.
Specifies the procedure and part number for replacing the on-board battery.
Describes the first step in troubleshooting by observing the HMI display for alarms.
Provides an overview of potential symptoms, diagnostics, causes, and remedies.
Explains how to use a test block for bench testing transmitter, sensors, and cables.
Provides inspection steps to identify issues when the flowmeter is unable to measure flow.
Details how to verify sensor diagnostic parameters and view receiver signals.
Lists alarms, system messages, and their corresponding causes and corrective actions.
Provides specifications for supply voltage, power consumption, and environmental conditions.
Details Modbus communication parameters such as protocol version and transmission rate.
Specifies technical data for digital and current inputs on channels 3 and 4.
Provides technical data for current and digital outputs on various channels.
Details the device design, materials, ingress protection, and mechanical load specifications.
Specifies ambient temperature, climate class, altitude, and EMC performance.
Lists ATEX, IECEx, and FM approvals for the device.
Provides mechanical dimensions for the wall mount housing transmitter.
Explains how devices are mapped to the Modbus address space for read/write access.
Details general Modbus communication settings like baud rate and parity.
Describes the configurable coil definitions for Modbus communication.
Explains the possibility to remap parameters to chosen Modbus registers.
Details how to adjust the byte order for integer values in Modbus messages.
Details how to adjust the byte order for floating-point values in Modbus messages.
Lists general Modbus function codes and their descriptions.
Manages Modbus master access to device parameters based on PIN information.
Provides a comprehensive list of Modbus RTU holding registers for SITRANS FS430.
Lists Modbus registers for process values for standard applications.
Details Modbus registers for totalizer settings.
Describes Modbus units settings for values and quantities communicated via Modbus.
Provides general sensor settings for clamp-on applications.
Specifies settings related to pipe dimensions and material for clamp-on sensors.
Details parameters for compensating upstream and downstream pipe geometry.
Lists characteristics of process media such as sound velocity and temperature.
Provides recommended sensor spacing methods and distances for clamp-on sensors.
Details settings specific to path 1, including sensor frequency and path geometry.
Explains user calibration parameters like slope correction factor and path offsets.
Provides commands to start automatic factory or user zero offset adjustments.
Details settings for multipoint calibration, including function and protection.
Information on where to find device certificates online and on the documentation disk.
Contact information and resources for technical assistance.
Overview of SIMATIC PDM software for commissioning and maintenance.
Lists functionalities of SIMATIC PDM for monitoring, adjusting, and simulating device data.
Specifies compatible SIMATIC PDM versions for the device's EDD.
Outlines the steps for ensuring proper connection of SIMATIC PDM.
Guides on integrating Electronic Device Descriptions (EDD) into SIMATIC PDM.
Details the process of adding a device to the SIMATIC Modbus network within PDM.
Steps for configuring a new device, including EDD check and parameter upload.
Describes the Quick Start Wizard for easy multistep device configuration.
Guides through the necessary steps to install sensors for clamp-on configuration.
Explains performing the Zero Point Adjustment wizard to remove residual zero offset.
Details how to adjust parameter values using SIMATIC PDM's online menus.
Lists parameters accessible through Device, View, or Diagnostics drop-down menus.
Describes how to view process values, totalizers, and loop current in real time.
Explains how to monitor the trend of process values using the Trend view.