Page 15
4.5 Retro Kit Installation (Assemble Sonic blower to existing motor)
4.5.1 Tools Required
9/16 inch open-end wrench
¼ inch flat head screwdriver
4.5.2 Retro Kit Installation
1. Using a 9/16 inch open-end wrench, mount the vibration isolators and uni-mounts
to the motor. (See Figure 24)
2. Mount the bracket assembly to the motor and then tighten only one screw using
the ¾ inch socket temporarily for belt gap adjustment. (See Figure 25)
3. Using a flat head screwdriver and a rubber mallet, wedge the screwdriver into the
front face of the bushing (Do not wedge in flange area) and then slide it onto the
motor shaft. (See Figure 26)
4. Set the bushing to 1.266 ± .005 (32.2 mm) from the bushing flange to the bracket
reference surface and remove the screwdriver. Using the 5/16 inch allen socket
and 242 Loctite, install the two bushing screws. Tighten the screws to the
specified torque, over tightening may damage the bushing. (See Figure 27, Figure
28, Figure 29, and Figure 30)(See Section 7.2 - Torque Specifications)
5. Tighten the bushing set screw using the 7/32 inch allen wrench.
6. Before installing the motor pulley, double check the bushing setting and then
install the pulley and the three pulley screws using 242 Loctite and the 5/16 inch
allen socket. Tighten the three pulley screws to the required torque specifications.
(See Figure 31)(See Section 7.2 - Torque Specifications)
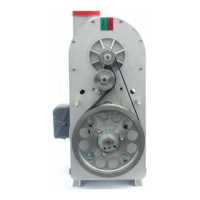
7. Using the 9/16 inch box-end wrench, rotate the belt tensioner arm counter
clockwise (CCW). At the same time wrap the belt around the blower pulley, then
along the right side of the idler pulley, and finally around the motor pulley. (See
Figure 32)
8. Slowly rotate the motor pulley to make sure the belt is seated in the grooves.
9. Using the rubber mallet, adjust the belt gap to ¾ inch ±1/16 inch. (See Figure 33)
10. Using the ¾ inch deep socket, tighten the bracket hardware. (See Section 7.2 -
Torque Specifications)
11. Using a straight edge, check the pulley alignment from the face of the motor
pulley to the face on the blower pulley. Verify that there is no gap and the
alignment must be within ±1/32 inch. (See Figure 34)
12. Using the 1/2 inch socket, install the belt guard.