Home
Sonic Air Systems
Blower
Sonic 150
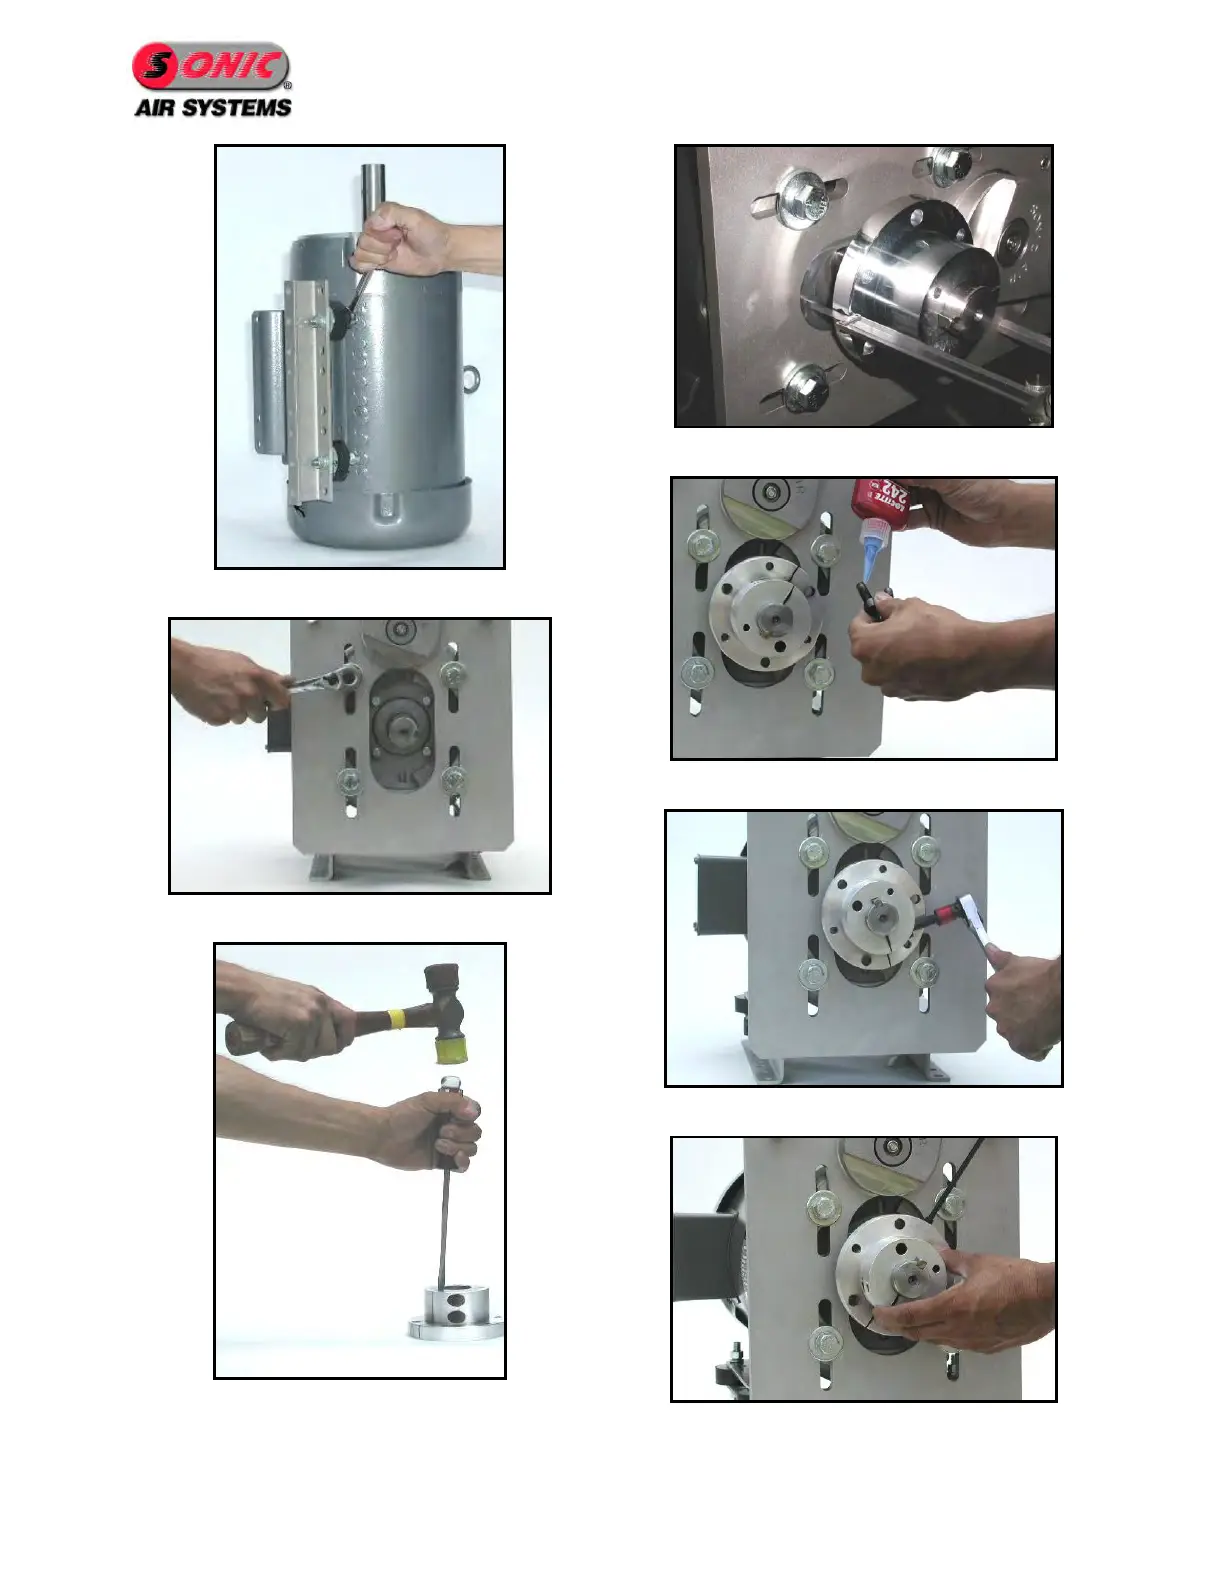
Page 20 (Figure 24 - Install Uni-Mounts)
Sonic Air Systems Sonic 150 - Figure 24 - Install Uni-Mounts; Figure 25 - Mount Bracket to Motor; Figure 26 - Prepare Bushing; Figure 27 - Install Bushing
50 pages
Manual
Save Page as PDF
To Next Page
To Next Page
To Previous Page
To Previous Page
Loading...
Page 16
Figure
24
- Install Uni
-m
ounts
Figure
25
- M
ount Bra
cket to Mo
tor
Figure
26
- P
repare Bushing
Figure
27
-
In
stall Bushing
Figure
28
–
Install Bushing Hardwa
re
Figure
29
- B
ushing Installation
Figure
30
–
Install Set Screw
19
21
Table of Contents
Main Page
Default Chapter
2
Table of Contents
2
1 Sonic 150 / Sonic 150C
5
Introduction
5
Blower Performance
5
Figure 1 - Sonic 150
5
Figure 2 - Sonic 150C
5
Product Profile
6
Typical Applications
7
2 Initial Inspection
8
Figure 3 - Sonic Nameplate
8
Figure 4 - Blower Serial Number
8
3 Safety Instructions
9
Electrical
9
Mechanical
9
4 Installation and Adjustments
10
Lifting and Handling
10
Blower Location
10
Figure 5 - Blower Lifting Point
10
Belt Installation
12
Figure 6 - Remove Belt Guard
13
Figure 7 - Install Belt
13
Figure 8 - Verify Belt Gap
13
Figure 9 - Loosen Bracket Bolts
13
Figure 10 - Adjust Belt Gap to ¾
14
Blower Head Mounting Adjustment
15
Figure 11 - Blower Rotations
15
Figure 12 - Remove Belt Guard
17
Figure 13 - Remove Belt
17
Figure 14 - Remove Motor Pulley
17
Figure 15 - Remove Bracket Hardware
17
Figure 16 - Rotate Bracket
18
Figure 17 - Install Bracket Hardware
18
Figure 18 - Remove Blower Hardware
18
Figure 19 - Move Water-Cooling Plugs
18
Figure 20 - Reinstall Blower Head
18
Figure 21 - Reinstall Belt
18
Figure 22 - Adjust Belt Gap to 3/4
18
Figure 23 - Final Position
18
Retro Kit Installation (Assemble Sonic Blower to Existing Motor)
19
Figure 24 - Install Uni-Mounts
20
Figure 25 - Mount Bracket to Motor
20
Figure 26 - Prepare Bushing
20
Figure 27 - Install Bushing
20
Figure 28 - Install Bushing Hardware
20
Figure 29 - Bushing Installation
20
Figure 30 - Install Set Screw
20
Figure 31 - Install Motor Pulley
21
Figure 32 - Install Belt
21
Figure 33 - Set Belt Gap to ¾
21
Figure 34 - Check Alignment
21
5 Electrical Wiring, and Start-Up
22
Motor Wiring
22
Figure 35 - Motor Rotation Sticker
22
6 Blower Specifications
23
Blower Specification Sheet
23
Assembly Drawing
24
Parts List
25
Motor Reference
32
Pulley / Belt Cross Reference
32
7 Periodic Maintenance
33
Maintenance Schedule
33
Torque Specifications
33
Belt Replacement Procedure
33
Figure 36 - Remove Belt Guard
34
Figure 37 - Remove Existing Belt
34
Figure 38 - Install New Belt
35
Figure 39 - Verify Belt Gap
35
Figure 40 - Loosen Bracket Hardware
35
Figure 41 - Adjust Belt Gap to ¾
35
Belt Tensioner Service
36
Figure 42 - Remove Belt Guard
37
Figure 43 - Remove Belt
37
Figure 44 - Remove Motor Pulley
37
Figure 45 - Remove Bolt
37
Figure 46 - Remove Belt Tensioner
38
Figure 47 - Caution Loose Springs
38
Figure 48 - Correct Position
38
Figure 49 - Verify Belt Gap
38
Figure 50 - Loosen Bracket Hardware
39
Figure 51 - Adjust Belt Gap to 3/4
39
Bearing Cartridge Replacement Procedure
40
Required Tools
41
Bearing Cartridge Replacement Procedure
41
Figure 52 - Remove Belt Guard
42
Figure 53 - Remove Belt
42
Figure 54 - Remove Water Cooling Tubing
42
Figure 55 - Remove Filter or Inlet Screen
42
Figure 56 - Remove Cover
43
Figure 57 - Remove Impeller
43
Figure 58 - Remove Blower Pulley
43
Figure 59 - Remove Thermocouple
43
Figure 60 - Remove Compression Fitting
44
Figure 61 - Remove Bearing Cartridge Hardware
44
Figure 62 - Remove Bearing Cartridge
44
Figure 63 - Blower W/ Bearing Cartridge Removed
44
Recommended Spares
45
8 Troubleshooting
46
9 Performance Guarantee
47
10 Warranty Policy
48
24 /7/365 Service Program
49
12 Sonic Repair Policy
50