— 26 —
This section is extracted from
instruction manual.
7
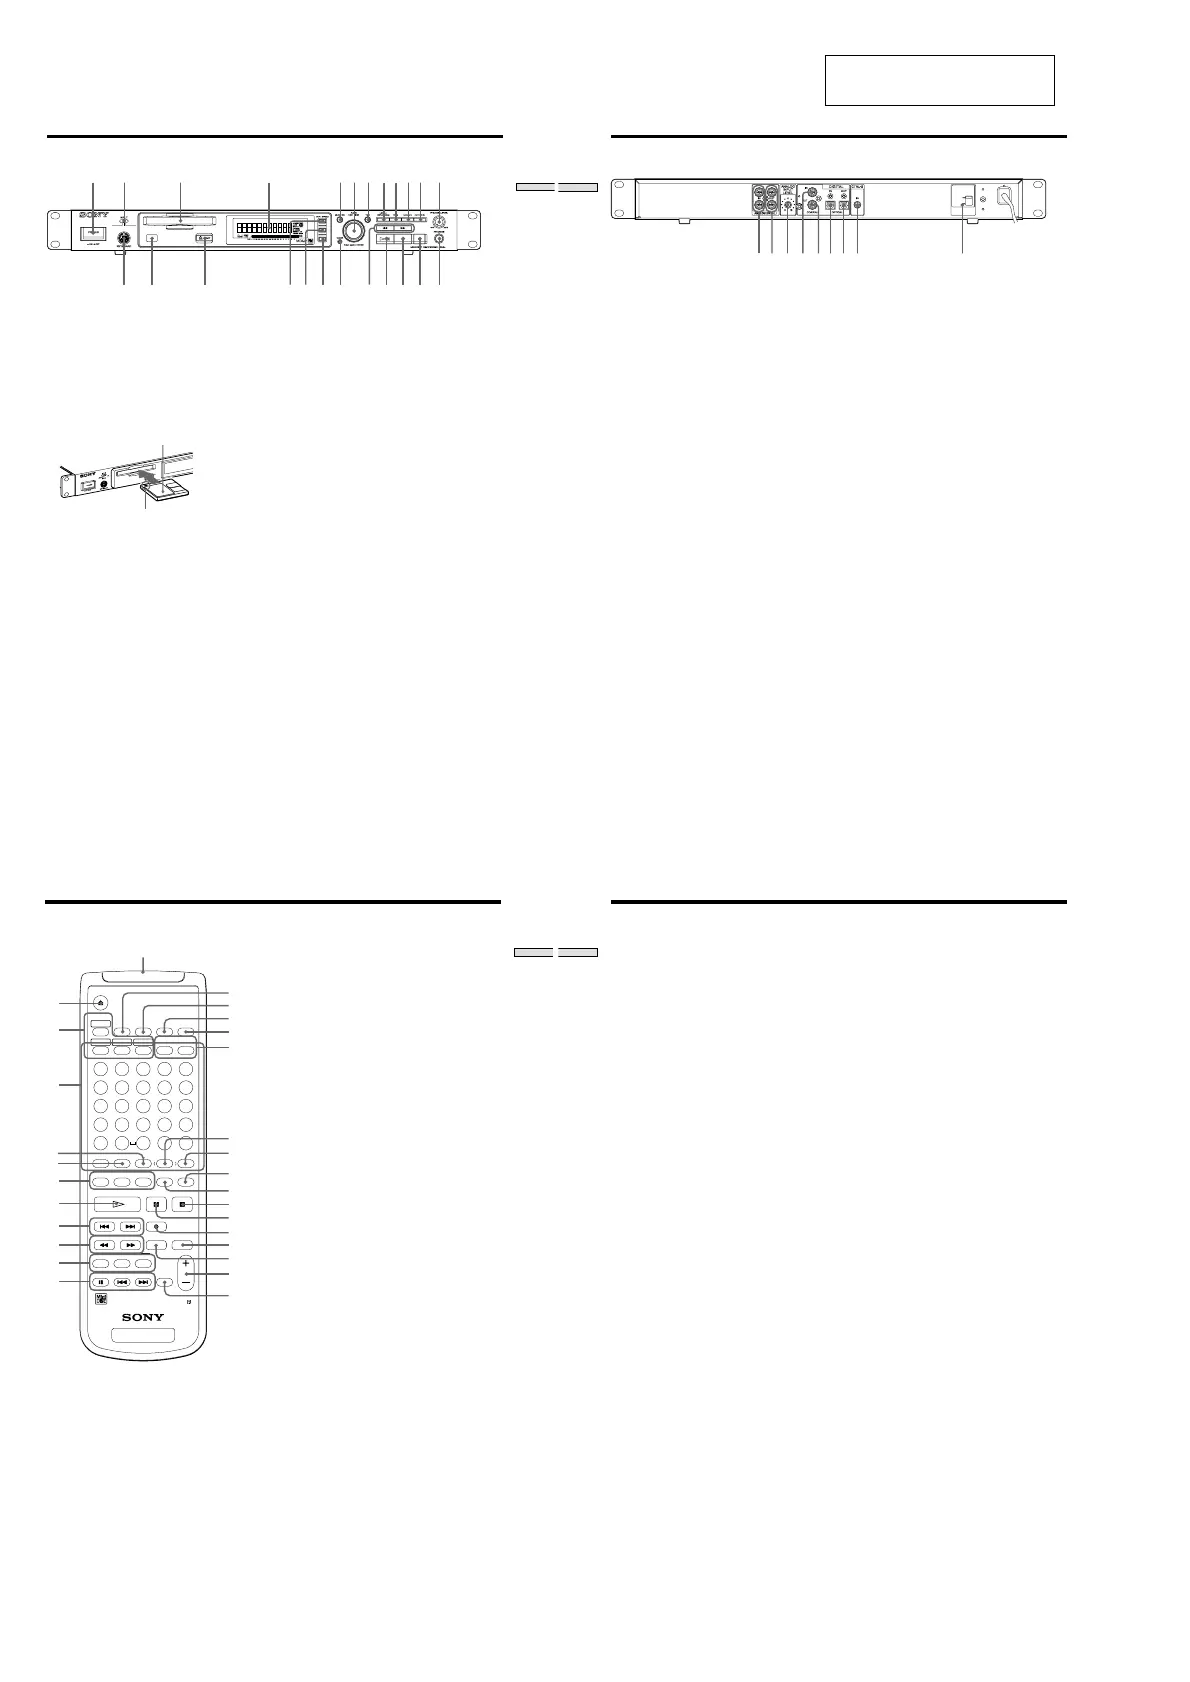
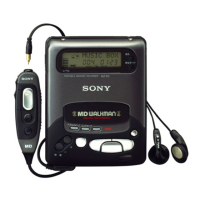
Location and Function of Parts
Preparation
;
a
s
qd qf qg qk ql wa ws wd wfqh qj w;
1 POWER button
Press to turn the recorder on. When you press the
button again, the recorder turns off.
2 INPUT selector
Use to select the input jack (or connector) of the
program source to be recorded.
3 MD insertion slot
Insert the MD as illustrated below.
With the arrow pointing
towards the recorder
With the labeled side up
4 Display window
Shows various information.
5 MENU/NO button
Press to display “Edit Menu” or “Setup Menu.”
Also, the MENU mode is cleared.
6 AMS control (MARK/ENTER button)
Turn to locate tracks, adjust the recording level, select
the input characters, or select a menu item and a
setting value.
7 YES button
Press to carry out the selected operation.
8 LEVEL/DISPLAY/CHAR button
Press to display INPUT or OUTPUT level and disc or
track information, select the type of characters to be
input, and change to time display.
9 TIME button
Press to change time information on the disc or track.
0 LOCATE button
Press to locate pre-marked positions.
!¡ AUTO CUE button
Press to set AUTO CUE, AUTO PAUSE, or OFF.
!™ PHONE LEVEL control
Use to adjust the volume of the headphones.
!£ KEYBOARD jack
Connect a keyboard to this jack.
!¢ Remote sensor
Receives the infrared signal of the remote for remote
operations.
!∞ Z EJECT button
Press to eject the MD.
!§ VARI SPEED button
Press to turn on and off VARI SPEED.
!¶ VARI SPEED + button
Press to increase play speed at 0.5% step when VARI
SPEED is on.
!• VARI SPEED _ button
Press to decrease play speed at 0.5% step when VARI
SPEED is on.
!ª CLEAR button
Press to cancel the selection.
@º m/M (backward/forward) button
Press to lacate a portion whithin a track, change the
contens of a program, or change the input character.
@¡ 7 (play/pause) button
Press to start play and pause or resume play or
recording.
@™ x (stop) button
Press to stop play or recording, or cancel the selected
operation.
@£ z (record) button
Press to record on the MD, monitor the input signal, or
mark track numbers.
@¢ PHONES jack
Connect headphones to this jack.
Front Panel Descriptions
8
Location and Function of Parts
12 6783 4 5
VOLTA GE
SELECTOR
230V
120V
9
1 ANALOG (UNBALANCE) input jacks
Inputs as an analog signal the sound of the component
connected by a pin type connecting cable.
2 ANALOG (UNBALANCE) output jacks
Outputs as an analog signal the contents of the MD of
this recorder to the component connected by a pin type
connecting cable.
3 ANALOG INPUT LEVEL control
Can adjust the level of analog input in a range of _ ∞ ~
+15 dB.
Normally, this control is used in the position (0 dB) of
center click.
4 DIGITAL COAXIAL input jack
Inputs as a digital signal the sound of the connected
component.
5 DIGITAL COAXIAL output jack
Outputs an a digital signal the contents of the MD of
the recorder to the connected component.
6 DIGITAL OPTICAL input connector
Inputs as a digital signal the sound of the connected
component.
7 DIGITAL OPTICAL output connector
Outputs an a digital signal the contents of the MD of
the recorder to the connected component.
8 CONTROL-S jack
Connects the remote or control equipment.
If the plug is connected to the jack, the remote sensor
does not receive infrared rays.
9 VOLTAGE selector
(Exept for the USA/CA models)
Select 120V or 230V according to the local power line
voltage. (Refer to page 2)
Rear Panel Descriptions
9
Location and Function of Parts
EJECT
PLAY MODE
DISPLAY
TIME
MENU/NO
YES
DATE
ABCDE
FGH IJ
12345
678910
11 12 13 14 15
16 17 18 19 20
21 22 23 24 25
KLMNO
PQRST
UVWXY
Z
-
.
,
M.ACCESS
CONTINUE SHUFFLE PROGRAM
RECORDED PRESENT
M.SCANA.PAUSEREPEAT
NAME IN
NAME CHAR
CLEAR SCROLL
T.REC MUSIC SYNC
STOP START
CD PLAYER
STANDBY
FADER
LEVEL
RM-DR1
MINIDISC DECK
CD-SYNC
NUM
/
>
25
?!
BA
A.CUE
1
7
8
9
q;
qa
2
3
6
4
5
qj
qk
ql
w;
ws
wg
wd
qg
wa
wf
wj
wh
qh
qs
qd
qf
wk
Remote Descriptions
1 Z (EJECT) button
Press to eject the MD.
2 PLAY MODE button
Press to select multi-access, normal play, Shuffle Play,
or Program Play.
3 Letter/track number input buttons
Press to input letters, numbers, symbols or select track
numbers.
4 A ↔ B button
Press to select Repeat A ↔ B Play.
5 REPEAT button
Press to select ALL repeat, one track repeat, or repeat
off.
6 NAME button
Press to add the name or change the name of a track or
MD.
CHAR button
Press to select the type of characters to be input.
NUM button
Press to input numbers.
7 H (play) button
Press to start play.
8 ./> (locating tracks) button
Press to locate tracks, adjust the recording level, or
select a menu item and a setting value.
9 m/M (backward/forward) button
Press to locate a portion within a track, change the
contents of a program, or change the input character.
0 CD-SYNCHRO button
Press to operate the CD-Synchro-recording of a CD
component.
!¡ CD PLAYER button
Press to pause or locate tracks the CD component.
!™ DISPLAY button
Press to select the information to be displayed in the
window.
!£ TIME button
Press to change the disc or track time information.
!¢ MENU/NO button
Press to display “Edit Menu” or “Setup Menu.” The
MENU mode is cleared.
!∞ YES button
Press to carry out the selected operation.
!§ DATE (RECORDED/PRESENT) button
Press to display the recorded time of a disc recorded by
a component which contains a function of recording
the recorded date or display the present time of a
component which contains a clock function. (This
recorder does not contain a clock function.)
!¶ A.CUE/A.PAUSE button
Press to set AUTO CUE, AUTO PAUSE, or OFF.
10
Location and Function of Parts
!• M.SCAN button
Press to successively play the located tracks only
for the set time.
!ª SCROLL button
Press to scroll the name of a track or MD.
@º CLEAR button
Press to cancel the selection.
@¡ x (stop) button
Press to stop play or recording, or clear the MENU
mode.
@™ X (pause) button
Press to pause or resume play or recording.
@£ z (record) button
Press to record on the MD, monitor the input signal,
or mark track numbers.
@¢ MUSIC SYNC button
Press to start Music Synchro-recording.
@∞ T.REC button
Press to start Time Machine Recording.
@§ LEVEL + / _ button
Press to adjust the recording level or output level of
analog play.
@¶ FADER button
Press to perform Fade-in Play/Recording or Fade-
out Play/Recording.
@• Control-S jack
Can be used as the wired remote by connecting
with the control-S jack in the rear of the recorder
using a supplied cable.
If the plug is connected to the jack, the remote does
not radiate infrared rays.