SORENSEN DCS SERIES MANUAL INSTALLATION and OPERATION
2-1
SECTION 2. INSTALLATION and OPERATING INSTRUCTIONS
2.1 General
After unpacking, perform an initial inspection and function test to ensure that the unit is in good working order. If
the unit was damaged in shipment, notify the carrier immediately. Direct repair problems to the Service
Department, Sorensen Company. Customer Service Inquiries: 1-800-458-4258.
2.2 Initial Inspection
The equipment should be inspected for damage as follows:
• Inspect for obvious signs of physical damage.
• Turn front panel controls from stop to stop. Rotation should be smooth.
• Test the action of the power switch. Switching action should be positive.
• If internal damage is suspected, remove the cover and check for printed circuit board and/or
component damage. Reinstall cover.
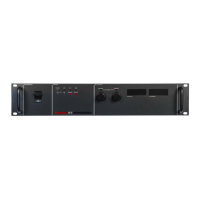
2.3 Installation
2.3.1 Input Voltage Selection
Before using the DCS power supply the correct AC input voltage must be selected and an appropriate line cord and
plug attached, or hook up wire sized for input current based on NEC or local electrical code. The frequency of
the AC input voltage must be maintained between 47 and 63 Hz.
All units are shipped in a configuration requiring a 200-250Vac 10 Amp input. The unit can also be converted for
use with a 100-130Vac 20A input. WARNING: Attempted operation of the DCS power supply with the
incorrect input voltage may result in internal damage to the unit.
For use with a 200-250Vac input, connect a 250Vac 10Amp plug and cord to the rear panel AC connector and the
safety ground screw. (Note that the NEUT. and LINE designations above the AC connector do not apply to
200-250V operation.)
To convert the unit for use with a 100-130Vac 20A input, perform the following steps:
1. Ensure that the unit is switched off and disconnected from any power source.
2. Remove the Phillips head screws which secure the cover and then remove the cover from the unit.
3. Remove the 230Vac voltage selector jumper located at the front center of the PCB from its mating
header (designated P1 on the PCB) and install the attached 115Vac jumper in its place.
4. Remove the adhesive backed 115VAC 20A label from fan and cover the 230VAC 10A input
specification above the rear panel AC connector.
www.valuetronics.com