8 Repair Thermo E 200 / 320
808
8.9 Solenoid valve removal and
installation
NOTE
The solenoid valve must be completely replaced and
may not be further dismantled! In case of replacement
or assembly and disassembly a new gasket ring must
be used.
It is not absolutely necessary to remove the fuel pump to
disassemble the solenoid valve.
Make sure that any fuel leaking is immediately collected,
bound and professionally disposed of.
Removal
1. Remove burner (see 8.2)
2. Lift off ignition electrode (2, Fig. 804) from the
electronic ignition unit by twisting a screwdriver
sideways (see Fig. 804).
3. Remove disc (5, Fig. 805).
4. Disconnect the solenoid valve plug (6) from control
unit (15).
5. Using suitable tools loosen the hexagon, wrench size
16 (6, Fig. 806) of the solenoid valve (6, Fig. 805) from
the fuel pump (10) and unscrew the solenoid valve (6).
.
Installation
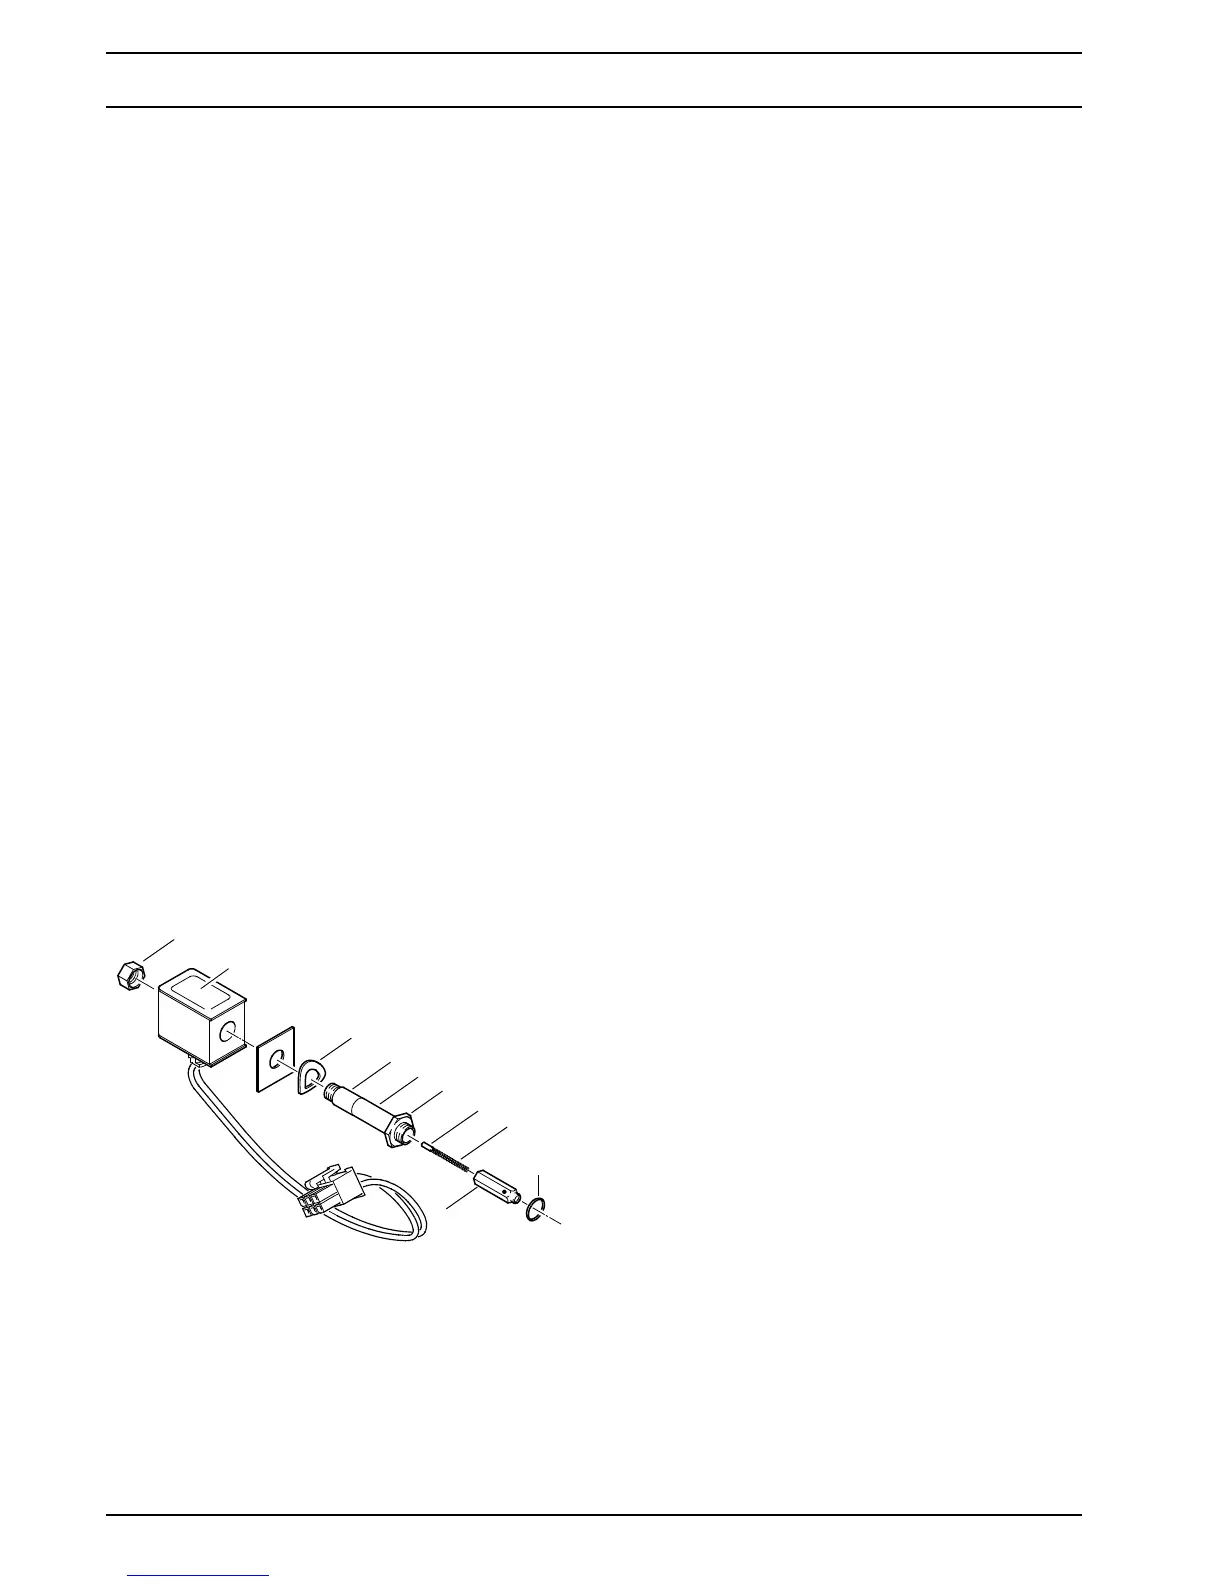
1. Gasket ring (10, Fig. 806) towards the fuel pump must
be replaced. Make sure stay, spring and lifter are
correctly assembled, observe installation position
(see Fig. 806).
2. Attach solenoid valve (6, Fig. 805) to the fuel pump
(10).
3. Using suitable tools, tighten hexagon, wrench size 16
(6, Fig. 806) of the solenoid valve with 5 Nm ± 0.5 Nm.
4. Connect the solenoid valve plug (6, Fig. 805) to the
control unit (15).
5. Fit disc (5) onto the nozzle holder and align with the
flame detector in the control unit (15) and the
electronic ignition unit (1).
6. Fit ignition electrode (3).
7. Install burner (see 8.2).
ATTENTION
If the nut, wrench size 12 (1, Fig. 806) was loosened,
then it must be tightened with a tightening torque of
1.5 Nm + 0.3 Nm and subsequently secured using
locking paint.
8.10 Atomizer nozzle removal and
installation
Removal
1. Remove burner (see 8.2).
2. Lift off ignition electrode (2, Fig. 804) from the
electronic ignition unit by twisting a screwdriver
sideways (see Fig. 804).
3. Remove disc (5, Fig. 805).
NOTE
We recommend to use nozzle wrench item no.
66971_ for nozzle disassembly and assembly.
4. Unscrew atomizer nozzle (4). If no nozzle wrench is
used, a tool must be used to counter on the hexagon
of the fuel pump nozzle holder (10).
Installation
1. Screw in the atomizer nozzle (4, Fig. 805) and tighten
with 20 Nm ± 2 Nm. If no nozzle wrench is used, a tool
must be used to counter on the hexagon of the fuel
pump nozzle holder (10).
5. Fit disc (5) onto the nozzle holder and align with the
flame detector in the control unit (15) and the
electronic ignition unit (1).
6. Fit ignition electrode (3).
7. Install burner (see 8.2).
Fig. 806 Solenoid valve
2
1 Nut, wrench size 12
2 Magnetic coil (coil
with cable, plug and
plate)
3 Spring lock washer
4Core
5Tube
6 Hexagon, wrench
size 16
7Lifter
8Spring
9Stay
10 Gasket ring
1
3
4
6
7
9
10
5
8