4
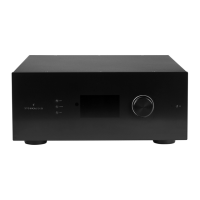
Front panel
1. Power Button
Use this button to toggle the ISP between
ON and STANDBY. Note that the rear panel
switch must be on for the unit to operate.
2. Exit
When navigating the front panel menu, press
Exit to go back.
3. Enter
When navigating the front panel menu, press
Enter to confirm a selection.
4. Edit
Press Edit from the home screen to enable
state changes in the ISP. Use the Volume
combo knob to navigate.
5. Display
The front panel display shows various
information about the unit. It is not a touch
screen. Various parameters can be set
according to instructions “Front Panel” on
page 31. An InfraRed receiver is located next
to the display for programmable IR remote
control usage.
6. Volume
The default state for the knob is to control
volume in the selected theater. Press the
knob to mute audio. When in Edit Mode, you
can use the knob to navigate between fields.
Rear panel
7. HDMI
7 HDMI inputs and 2 outputs are available,
with full support of HDCP 2.2 / HDMI 2.0
requirements up to 18 Gbps speed.
Outputs are mirrored, with HDMI Output
1 supporting eARC and ARC audio return
channel from compatible TVs as well as CEC
pass-through.
Support of High Dynamic Range modes with
HDR10, HLG and Dolby Vision compatibility.
Finally an OSD for on screen information
feedback is available.
See detailed “Specifications” on page 36.
8. Power Inlet / Fuse Socket / Mains
Switch
Mains power is applied to the ISP here. Ensure
the fuse installed matches requirements of
your locality. The rear panel switch must be
ON for the unit to operate.
9. Network
The ISP must be connected to a network for
setup. It is recommended to be connected
for operation. Speed is 100 Mbps. Use CAT5e
or better cable.
10. USB
Two USB ports are provided to which a USB
microphone may be optionally connected for
RTA function. Or, the USB ports may be used
for service.
1
2
3
4
5
6