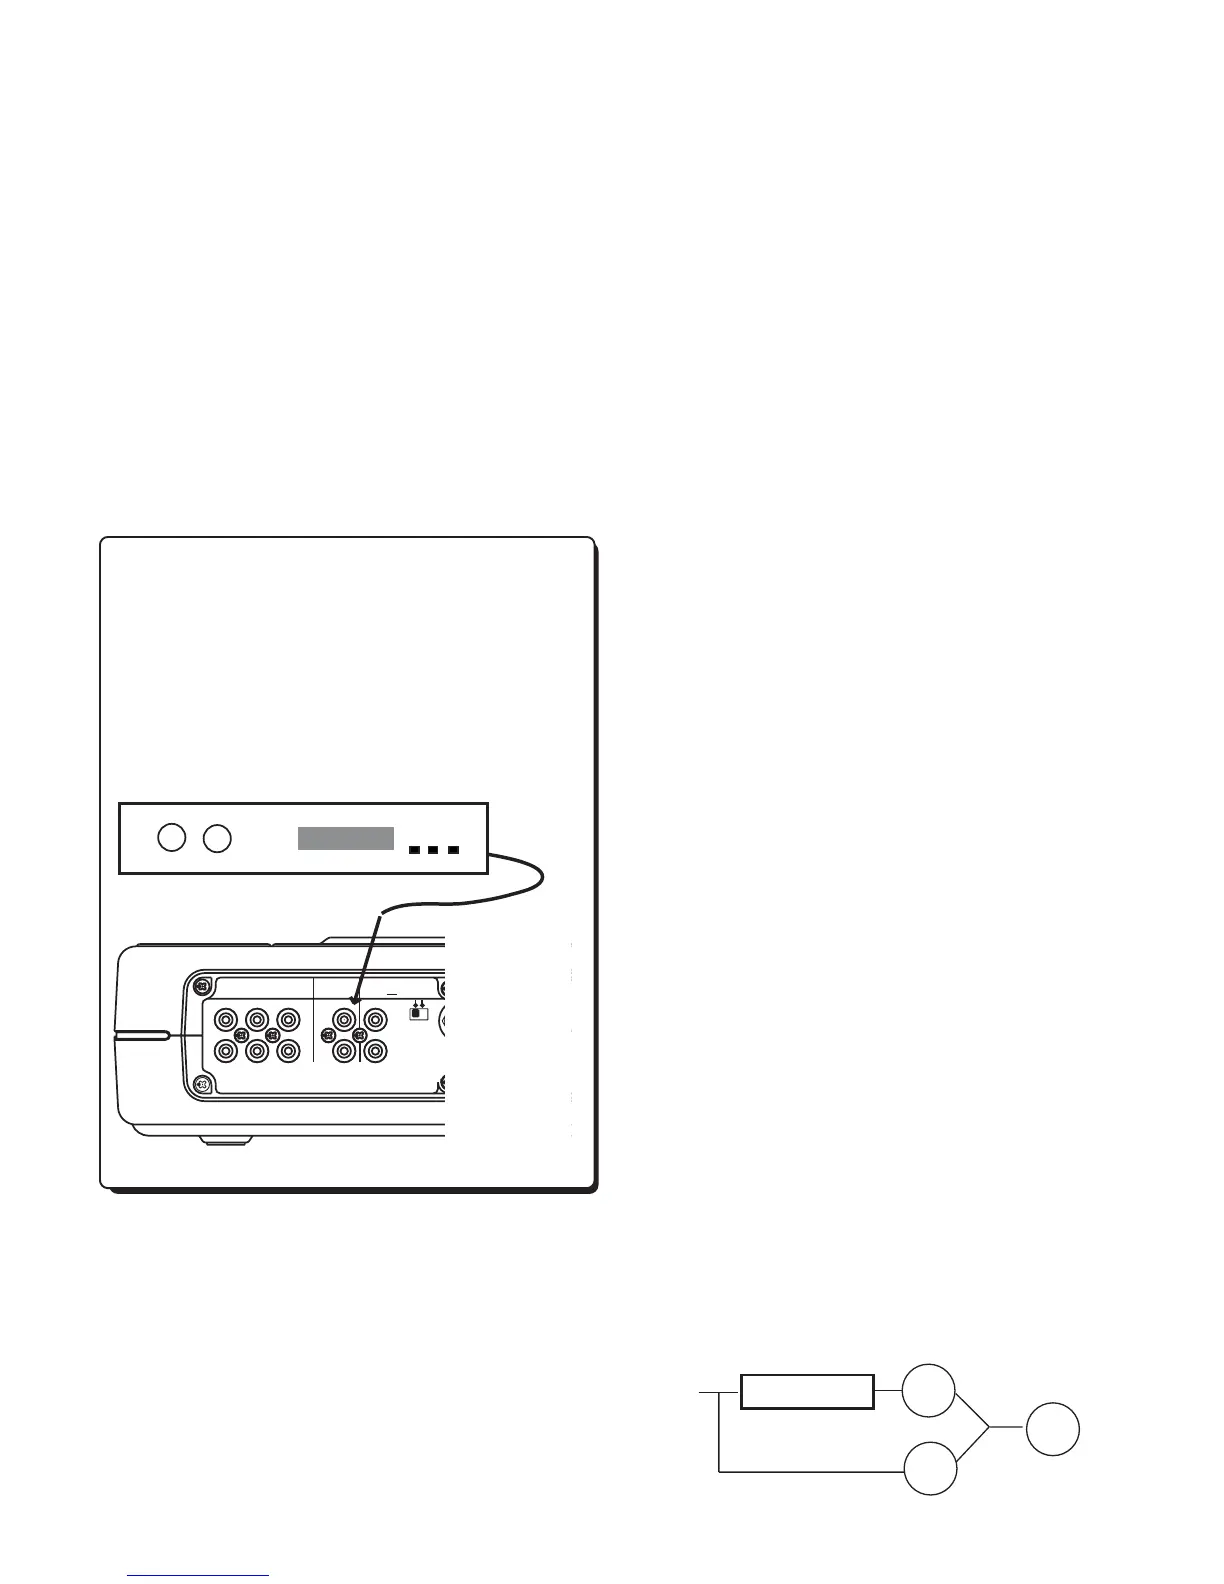
Certain mixers and outboard effects processors are
equipped with digital outputs. If you are recording with
equipment that has a coaxial digital output, connect to
the PSD340’s DIGITAL IN. Follow the same recording
steps from pg. 17, with the exception of step #3.
When recording digital equipment, set the Input switch
to “DIGITAL.”
Adding Reverb or Delay
You can add a reverb or a delay effect to either input
(right or left) on the front panel and the AUX IN. The
PSD340 provides three effects presets: ROOM REVERB,
HALL REVERB, and DELAY. Only one preset can be
used at a time. After an effect preset is selected, you
are then able to determine how much of the effect
you want in each channel. This is known as the MIX
parameter. Reverb cannot be added to recorded tracks.
1. Press the REV/DLY button.
2. Turn effects ON. The display should read “REV/
DELAY OFF”. Turn the SELECT jog wheel to change
the display to “REV/DELAY ON.” Press the SELECT jog
wheel to enter.
3. Select an effect preset. As you turn the SELECT jog
wheel, the display should indicate the different preset
options, REVERB ROOM, REVERB HALL, and DELAY.
Press the SELECT jog wheel to choose a preset.
If you find the sound of the effect to be appropriate,
press the REV/DLY to exit the effects menu and continue
practicing or recording. If you would like to fine tune
certain parameters, proceed to the following section.
4. Adjust the Delay Time. If you have chosen REVERB
ROOM OR REVERB HALL, skip to step #5. If you have
chosen DELAY, you will now be able to adjust delay
time. When the display reads “DELAY TIME,” press
the SELECT jog wheel. The actual delay time value is
now displayed in milliseconds and should be blinking.
The PSD340 is capable of producing delay times up to
1 second. Turn the SELECT jog wheel to adjust the
delay time and press the SELECT jog wheel to enter
the change.
5. Adjust the MIX levels. For each preset, the PSD340
has default MIX settings designed to provide a moder-
ate blend of processed and unprocessed sound. If you
would like to hear more or less Reverb or Delay in
either the right or left channel, adjust the MIX levels.
Here’s how:
a. After completing steps 1-4, the display will read
“MIX LEFT.” Press the SELECT jog wheel to accept.
b. The MIX percentage is now flashing. Turn the
SELECT jog wheel to adjust the MIX level. As you
turn the SELECT jog wheel, you should be able to
hear the change in MIX level. Press the SELECT jog
wheel to accept your setting. The display should
read “MIX LEFT.”
c. If you do not need to adjust the RIGHT MIX level,
press the REV/DLY button to return to the CD
display. If you do need to adjust it, turn the SELECT
jog wheel to change the display to “MIX RIGHT”
and press the SELECT jog wheel to accept.
d. The MIX percentage is now flashing. Turn the
SELECT jog wheel to adjust the RIGHT MIX level.
Press the SELECT jog wheel to accept your setting.
e. Press the REV/DLY button to return to the CD display.
Here’s how the MIX function works.
• A MIX setting of 100% means that all audio is
processed through the Reverb/Delay effect.
- 18 -
REVERB/DELAY
INPUT
>
>
100%
0%
+
100%
ON by turning the SELECT jog wheel. Press it to accept
the change. Press the MENU/STORE button to exit and
proceed with recording. The unit will then increment
tracks when audio falls below a threshold of silence (-
40dB) for a minimum of three seconds.
Minute Track Mode
MINUTE TRACK will automatically create a track incre-
ment every minute during recording. That means each
track is one minute long, offering a quick and conve-
nient way to locate a particular time in a recording. For
example, Track 10 is ten minutes into the recording, and
Track 17 is 17 minutes into the recording.
To access this mode press the MENU/STORE button, then
select “AutoTrack.” Select “MIN” and press ENTER.
Recording from the DIGITAL INPUT
REMOTE
IN
RC-5
OUT
EXT.
INT.
IN
OUT
DIGITAL
OUT
AUX
LINE
MIX
IN
L
PEDAL
FOOT
R
OUT
IN
L
R
Effects Processor