or feel, and therefore,
is
consistent with the rest of the
performance. In this case, enter record ready by
pressing the record and play buttons simultaneously.
The record mode will be activated when a FUNCTION
SELECT button is depressed.
When the FUNCTION SELECT
is
in the UP position,
the musician
will be monitoring reproduce (sync) and
probably play along with the previous performance
until the
time comes to punch-in the correction. When
that moment occurs, simply press the appropriate
FUNCTION SELECT button for the corresponding
track that is ready to be recorded. Two things then
happen. First, you instantly enter the record mode on
that track, and the new part
will replace the previous
one, in sync of course. Second, the monitor
is
automatically switched from tape (UP position)
-
sync
reproduce
-
to source (DOWN position)
-
so the
musician
can hear his new part as
it
is being added. The
logic remains consistent.
3. For very brief "punch-in,"
if you can "cue" or find the
spot to begin re-recording by listening to other tracks
-
depress FUNCTION SELECT to the READY posi-
tion, put the transport in PLAY. For short segments
you
can now press RECORD and hold it down. The
recorder will stay in the RECORD mode as long as you
hold down the RECORD button. When you release it,
the tape will play, but will not be erased. This mode
will
allow you to re-record small parts of a track that
are separated by sections you wish to keep quickly, but
since you cannot hear what's on the tape,
it
can be
risky. You
can also enter and leave the record mode by
raising and lowering the function select buttons while
the transport is "locked" in the RECORD mode. It's
not necessary to enter STOP to stop recording. This is
called "punch and roll" and is sometimes very useful.
Again
it
is
risky because you run the risk of waiting too
long to "punch out." Be careful.
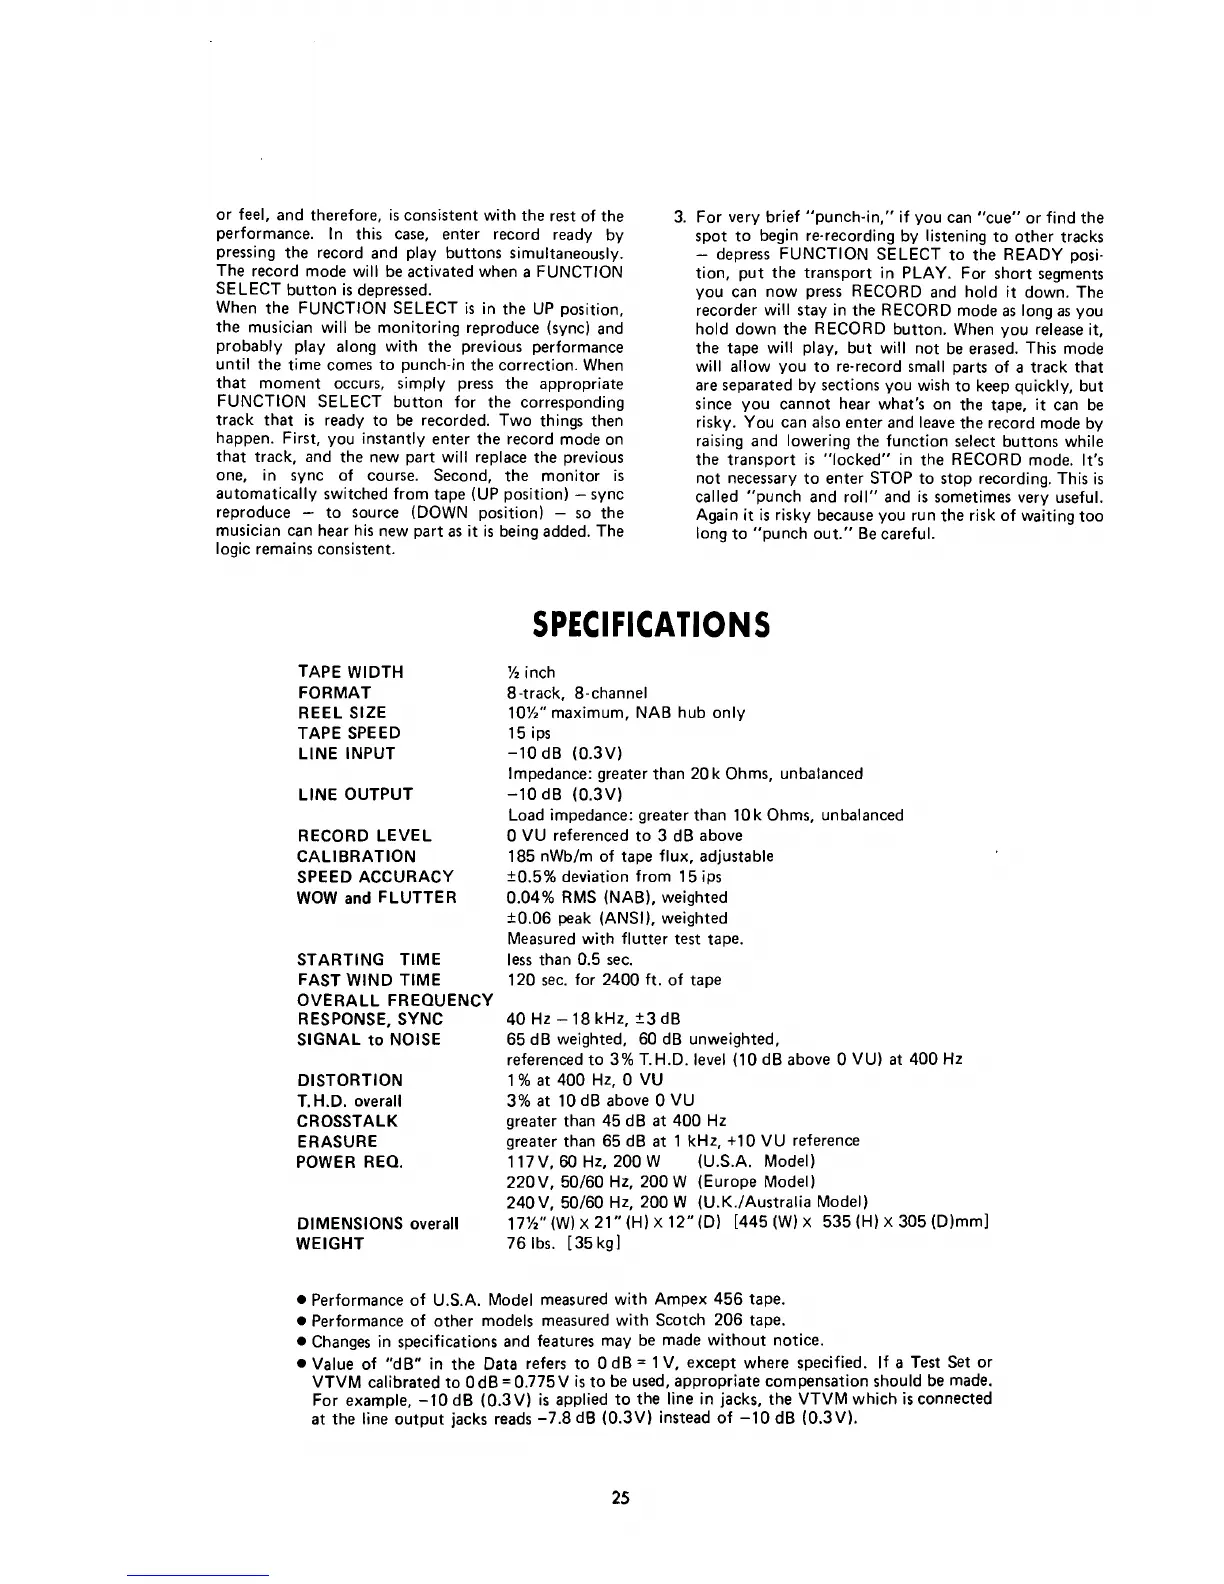
SPECIFICATIONS
TAPE WIDTH
FORMAT
REEL
SIZE
TAPE SPEED
LINE INPUT
LINE OUTPUT
RECORD LEVEL
CALIBRATION
SPEED ACCURACY
WOW and FLUTTER
STARTING
TIME
FAST WIND TIME
OVERALL FREQUENCY
RESPONSE, SYNC
SIGNAL to
NOISE
DISTORTION
T.H.D. overall
C
ROSSTA L
K
ERASURE
POWER REQ.
DIMENSIONS overall
WEIGHT
%
inch
8-track, 8-channel
10%" maximum, NAB hub only
15 ips
-10dB (0.3V)
Impedance: greater than 20 k Ohms, unbalanced
-10
dB (0.3V)
Load impedance: greater than 10 k Ohms, unbalanced
O
VU referenced to 3 dB above
185
nWb1m of tape flux, adjustable
20.5% deviation from 15 ips
0.04% RMS (NAB), weighted
20.06 peak (ANSI), weighted
Measured with flutter test tape.
less than 0.5 sec.
120 sec. for 2400 ft. of tape
40
HZ
-
18 kHZ,
+-3
dB
65 dB weighted, 60 dB unweighted,
referenced to 3% T.H.D.
level (10 dB above
O
VU) at 400 Hz
1
%
at 400 Hz,
O
VU
3% at 10
dB above
O
VU
greater than 45
dB at 400 Hz
greater than 65
dB at 1 kHz, +l0 VU reference
1
17V,
60
Hz, 200 W (U.S.A. Model)
220V, 50160 Hz, 200 W (Europe Model)
240V, 50160 Hz, 200 W (U.K./Australia Model)
17%" (W)
x
21" (H)
x
12"(D) [445 (W)
x
535 (H)
x
305 (D)mml
76 Ibs. [35kgI
Performance of U.S.A. Model measured with Ampex 456 tape.
Performance of other models measured with Scotch 206 tape.
Changes in specifications and features may be made without notice.
Value of "dB" in the Data refers to
O
dB
=
1 V, except where specified. If a Test Set or
VTVM calibrated to
OdB =0.775V
is
to be used, appropriate compensation should be made.
For example, -10
dB (0.3V)
is
applied to the line in jacks, the VTVM which
is
connected
at the
line output jacks reads -7.8 dB (0.3V) instead of -10 dB (0.3V).