Names of Parts
1-4
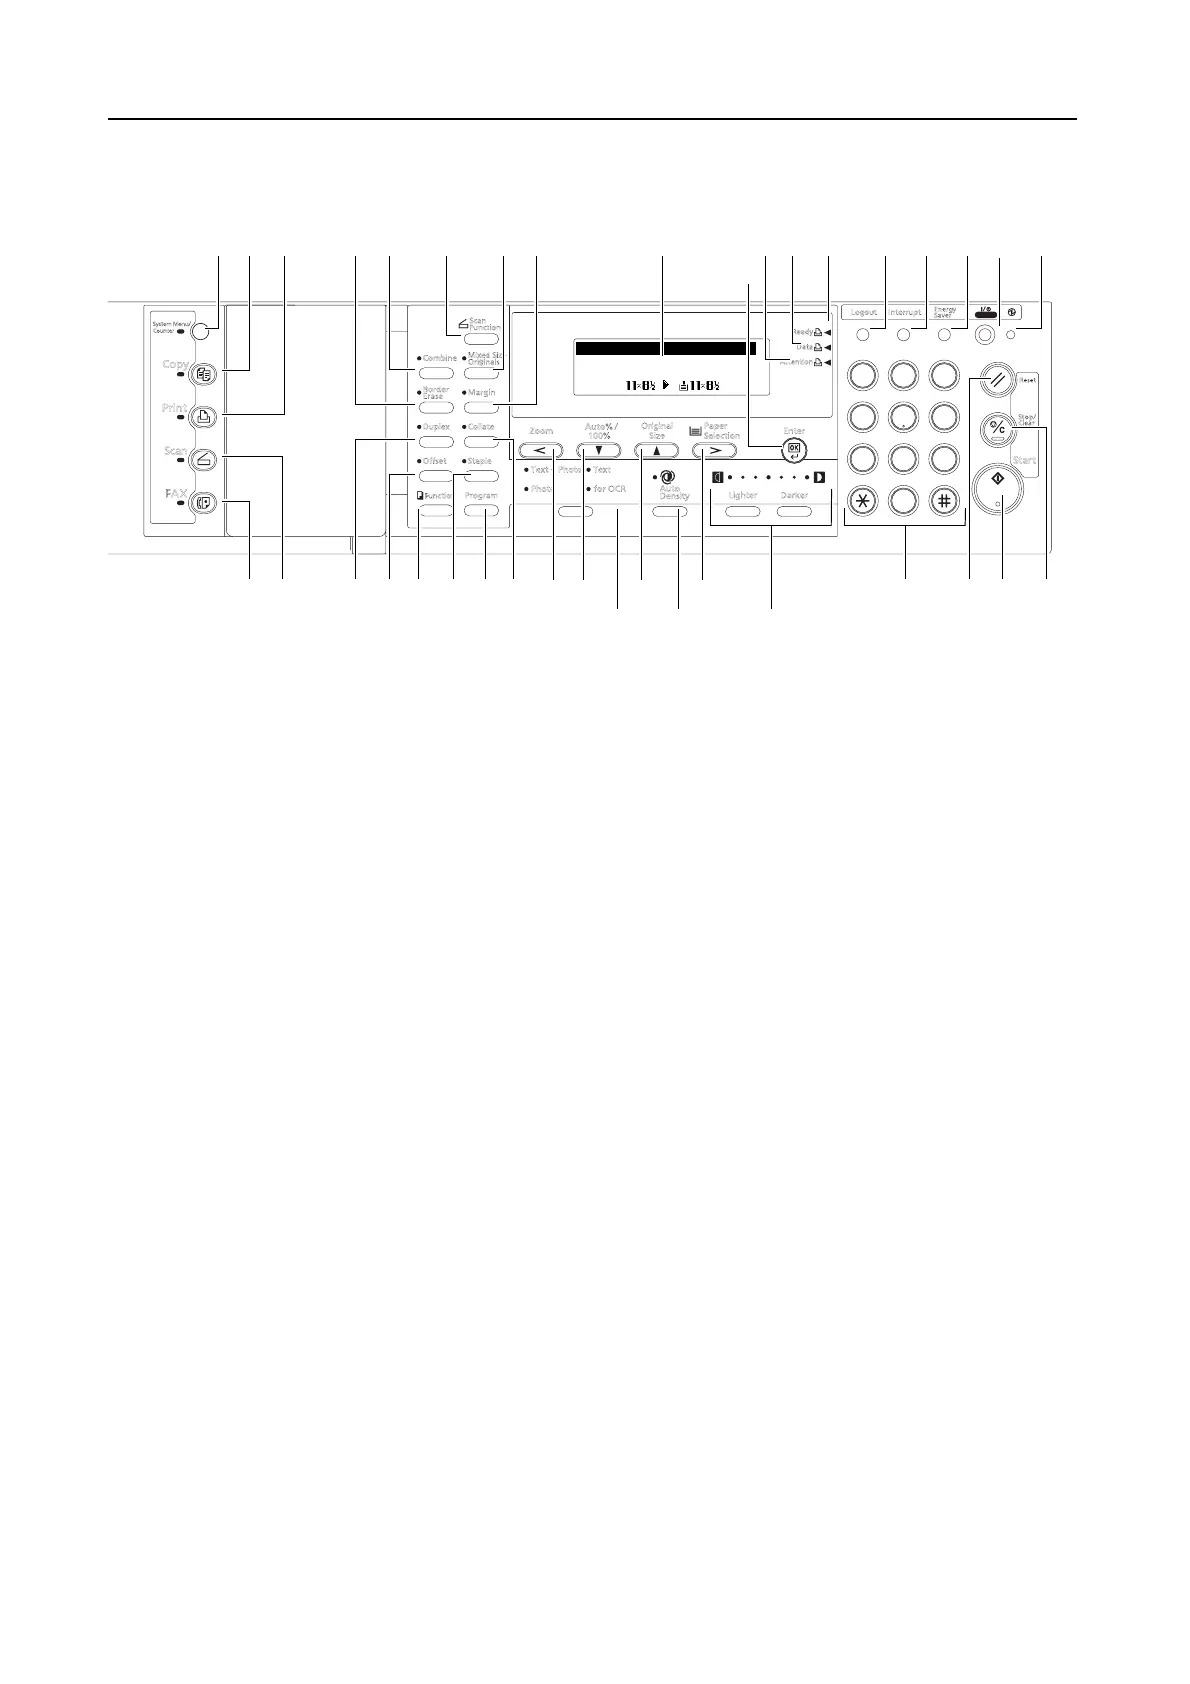
Operation Panel
1 System Menu/Counter key and indicator — Press this key to set the job accounting function,
adjust the default settings or set the machine. (For details, refer to Chapter 3 and Chapter 4 in
Advanced Operation Guide.)
2 Copy key and indicator — Press this key when using the copier functions of this machine.
The Copy indicator will light up when the machine is in the copier mode.
3 Print key and indicator — Press this key when using the printer functions of this machine.
The Print indicator will light up when the machine is in the printer mode.
4 Scan key and indicator — Press this key when using the scanner functions of this
machine. The Scan indicator will light up when the machine is in the scanner mode. For the
scanner functions, the optional network scanner kit must be installed.
5 Fax key and indicator — Press this key when using the fax functions of this machine. The Fax
indicator will light up when the machine is in the fax mode. For the fax functions, the optional
fax kit must be installed.
6 Combine key and indicator — Press this key to use the combine copy function. The
Combine indicator will light up. (See page 3-10.)
7 Border Erase key and indicator — Press this key to use the border erase function. The
Border Erase indicator will light up. (For details, refer to Chapter 1 in Advanced Operation
Guide, Border Erase Mode.)
8 Duplex key and indicator — Press this key to perform duplex copying or use the
split page function. The Duplex indicator will light up. For duplex copying, the
optional duplex unit must be installed. (See page 3-6 and 3-7.)
9 Offset key and indicator — Press this key to perform offset copying. The Offset indicator will
light up. (For details, refer to Chapter 1 in Advanced Operation Guide, Offset Copying.)
10 Function key — Press this key to set the orientation of the originals or perform continuous
scanning copying, auto rotation copying or EcoPrint mode. (For details, refer to Chapter 1 in
Advanced Operation Guide.)
11 Scanner Function key —
Press this key to adjust various scanner settings. For the sca
nner
functions, the optional network scanner kit must be installed.
12 Mixed size original key and indicator — Press this key when using the auto selection mode. The
Auto Selection indicator will light up. For the auto selection mode, the optional document
processor must be installed. (For details, refer to Chapter 1 in Advanced Operation Guide,
Auto Selection Mode.)
13 Margin key and indicator — Press this key to use the margin function. The Margin indicator
will light up. (For details, refer to Chapter 1 in Advanced Operation Guide, Margin Mode.)
123
46
789
0
5
Func ti on
Scan
Function
Combine
MixedSize
Ori
g
inals
Border
Erase
Margin
Collate
Staple
Duplex
O?set
Program
Auto % /
100%
Original
Size
Zoom
Paper
Selection
Enter
Lighter Darker
Text+Photo Text
Photo forOCR
Auto
Density
Data
At tention
Ready
FA X
Copy
Print
Scan
SystemMenu/
Counter
Logout Interrupt
Energy
Saver
Power
Reset
Start
Stop/
Clear
Auto
1
100%
Ready to copy .
Auto
276
36 353433
37
31
3029
23 2422
8
7
910
11 12 13
16
15 14
1
2 3
45 17 18 19 20
2628
21
25
32