Page 20 Vision Microsystems Incorporated
Section 3 - INSTALLATION
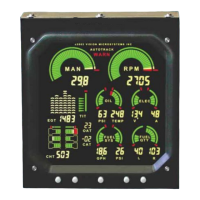
Indicator Installation
The unit is mounted to the panel from the backside by using the provided
mounting screws which will accommodate panels of 0.062 to 0.050 inch
thickness. For other thickness determine the screw length and test them
by finger tightening them into the unit insuring that they do not bottom-out
in the indicator. Mounting information is provided in the figures below.
EC100 System Installation (Optional)
Refer to the figure below for panel mounting information.
Fabricate the flat display cable (provided with your EC100 kit) per the
included instructions. Connect between the VM1000C Indicator ribbon
connector P7 and the EC100 connector. Note that the connectors are
keyed to prevent incorrect insertion and also that the EC100 connector
has small black arms that snap over the ribbon connector to lock it into
position.
The EC100 audio out signal connects to the audio system of the aircraft.
(Note: You should not connect the audio out/in lines of the VM1000C
when using the EC100). The audio record and playback levels are
adjusted via the small slotted trimmer potentiometer screws located in
the back of the unit. These were adjusted at the factory to standard
levels, however you may need to adjust them for your conditions. See
your audio panel or radio installation manual for the proper audio input
connection locations and options. Note: Be sure to select that the EC100
is installed (see SETUP MENU) and then later configure your EC100
Checklist using the Excel Checklist spreadsheet (EVMASTER.XLS). See
EC100 Operation for instructions.
Various optional connections are available such as:
• Five external warning inputs (ground for either active/inactive).
• 6 discrete enunciators light driver outputs (grounds the lamp).
• Remote front panel button inputs (ground to activate).