2903400000/00/09.202234
► Switch on the printer.
► Connect the compressed air supply to the applicator.
1
2
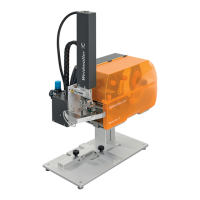
Image 11.1 Switch on the laser pointer
► Switch on the laser pointer at the switch (1).
► Place the object to be labelled on the product mount.
► Apply the label without a print job.
The lasers form a square of individual lines on the object
that indicate the position of the label.
Image 11.2 Laser pointer
► Unscrew the screws (2) and remove the cover from the
laser pointer.
A
B
C
D
Image 11.3 Align the laser
► Calibrate the laser with screws A to D so that the lines
precisely surround the label.
A
D
B
Image 11.4 Assign the adjusting screws to the laser lines
11 Setting up the laser pointer