21
AFTER SALES SUPPORT
1300 663 907 CUSTOMERCARE@WINPLUS.COM.AU MODEL: HE170703
5.4 Removing Filament
Follow these steps to remove lament.
NOTE: You do not have to remove lament after each print, however if you do not intend to print for
long periods of time, we recommend removing and storing lament in a resealable air tight bag
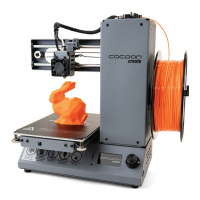
1. Turn on the 3D Printer with the power switch located at the back of the printer
2. Push the dial button to access the Main Menu and navigate to Quick Settings
Change
Filament
Remove Filament. The extruder will automatically raise and preheat; always wait
until it has fully preheated
3. After the extruder has preheated, hold the lament clamp on the top of the tower and push
the lament so a small amount begins to extrude
4. Once lament is extruding from the nozzle, while holding the lament clamp, quickly pull the
lament out of the extruder and tube
5. Store the lament in a resealable bag to protect it from moisture. For more lament storage
suggestions see page 29
FINISHING
6.1 Finishing Techniques
6.1.1 Useful Tools/Equipment
• Safety goggles
• Mask
• Long-nose pliers
• Wire cutters
• Sandpaper (100, 200, 300, 400, 500, 600 grit)
• Medium, ne and extra ne sanding sponges
• Acrylic based primer spray paint
• Acrylic based spray paint (colour of your choice)
• Acrylic based varnish spray paint
NOTE: Dierent paint types are also compatible with PLA. Consult your local paint supplier for the best
compatibility for your intended purpose.
PRINTING AND REMOVING MODELS