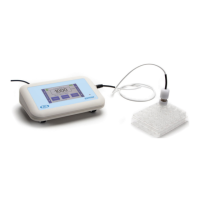
EVOM™ Manual
World Precision Instruments 25
OPERATIONS
IMPORTANT! Before you start making measurements, WPI recommends that you:
• Charge the EVOM™ Manual battery or run under mains power.
• Clean the electrodes. Refer to the Maintenance section of the electrode
manual for cleaning protocols.
• If it is new, test the USB ash drive. See "USB Testing" on page 24.
• Validate the EVOM™ Manual using 1000 Ω test resistor or calibrate the
EVOM™ Manual.
Instrument Diagnostics and Calibration
WPI recommends that EVOM™ Manual be put through the diagnostics described
below before using it for the rst time and then periodically thereafter. If there is a
concern that the meter or the electrode is not functioning properly, the following
protocols may be used to conrm the EVOM™ Manual operating status.
Testing the EVOM™ Manual Meter (Resistance) and Calibration
1. Insert the 99673 test resistor into the electrode port on the meter’s right side.
2. On the main display, select the
Setup
page. In the
Mode units
area, select
Ohms
and 10,000. Press
Return
.
3. Verify that the blank handling is disabled (Setup>Blank Handling). The screen
should display 1000 Ω ±1 Ω. If it does not, select
Setup
, push the
Calibration
button and wait for the process to complete. (This process takes 30 seconds
to complete.) When the date and time are displayed, the calibration process is
complete.
4. Press
Return
to access the main page. The display should show 1000 Ω ±1 Ω.
5. Press the
OK
in the upper left of the octagonal icon on the main display page to
short the electrodes. Verify that the EVOM™ Manual reads 0 ±1 Ω.
6. To return to normal EVOM™ Manual operation, unplug the test resistor and
press the
button (upper left).
Testing the EVOM™ Manual Meter (Voltage)
1. On the main display, select the
Setup
page. Press the
Short Electrodes
button.
2. In the
Mode units
area, select
Millivolts
. Press
Return
.
3. Press the
Probe Null
button and then
Disable
. Press
Return
twice. The main display
should show 0.0 mV. If it does not, verify that the probe null is not active and
that it has a 0.0 V oset, ±0.1 mV.
4. Press the button (upper left) to remove the electrode short.
Test Resistor “Calibration Kit”
The 99673 test resistor is supplied to verify the calibration.