6
Pressure Tank, Pressure Relief Valve and Discharge Piping
Use only “pre-charged” tanks on this system. Do not use galvanized tanks. Select an area that is always above
34º F (1.1º C) in which to install the tank, pressure sensor and pressure relief valve. If this is an area where a water
leak or pressure relief valve blow-off may damage property, connect a drain line to the pressure relief valve. Run
the drain line from the pressure relief valve to a suitable drain or to an area where water will not damage
property.
Pressure Tank, System Pressure
Sizing – A diaphragm tank (not included) is used to cushion the pressure system during start-up and shut-down.
It should be sized to at least 20% of the total capacity of your pump. Example: If your pump is sized for 100 GPM
then size your tank for at least 20 gal. total volume, not draw down. Pre-charge your bladder tank to 15-20 PSI
below your system pressure. The controller is pre-set for 50 PSI at the factory. Therefore a 35-40 PSI pre-charge in
your tank would be required. Use the higher tank pre-charge setting if the system drifts over 5 PSI at a constant
ow rate. NOTE: Pre-charge your tank before lling with water!
CAUTION
Maximum working pressure of HydroPro diaphragm tank is 125 psi.
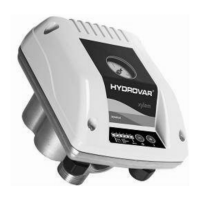
Installing the Pressure Sensor
The pressure sensor requires a ¼" FNPT tting for installation. Install the pressure sensor with the electrical
connector pointing up to avoid clogging the pressure port with debris. Install the pressure sensor in a straight
run of pipe away from elbows or turbulence. For optimum pressure control install the pressure sensor in the
same straight run of pipe as the pressure tank. Ensure the pressure sensor is within 10 feet of the pressure tank.
Installing the pressure sensor far away from the pressure tank may result in pressure oscillations. Do not install
the pressure sensor in a location where freezing can occur. A frozen pipe can cause damage to the pressure
sensor.
The pressure sensor cable is 30' as standard. The cable can be shortened for a cleaner installation. Longer cable
lengths are available, consult factory. Maximum recommended pressure sensor cable length is 300 feet. Avoid
leaving a coil of pressure sensor cable as this can induce unwanted transient voltages and noise into the system.
Do not run the pressure sensor cable alongside the input or output wiring. Maintain a distance of at least 8”
between the pressure sensor cable and input or output wiring.
WARNING
Discharge pressure within the piping system prior to removing pressure transducer or disconnecting any part
of the piping system. Open a valve until pressure on an external gauge reads 0 psi.
SYSTEM DESIGN