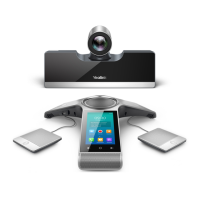
User Guide for the VC120 Video Conferencing System
26
a) Mounting the camera on a TV
When the thickness of your TV is between 35-120 mm, you can mount the camera on your TV.
Do the following:
1. Lock the camera to the L-bracket.
2. Remove one Velcro.
3. Put the L-bracket on the top of the TV.
4. Stick a Velcro onto the back of the TV, and make sure that the bracket and the back of the
TV are tightly positioned against each other.
b) Mounting the camera on a wall
You can also decide to mount the camera on a wall. The recommended height for camera
positioning is 1.5m-1.8m above the ground.
Do the following:
1. Punch holes into the wall and then insert the expansion bolts.
Installation location for the expansion bolts and punching requirement are shown above.
2. Lock the L-bracket with the M3×8 screws.
3. Move the setscrews on the L-bracket to the left holes.
4. Lock the L-bracket to the wall with T4×30 screws.
5. Connect one end of the DVI cable to the camera and put the other end of the cable
 Loading...