Page
21
Air Techniques, Inc.
Equipment Setup
NOTICE
Danger of mechanical damage to
the X-ray tube
• Mechanical damage to the X-ray tube
due to the X-ray emitter falling
• Safely mount the X-ray emitter.
CAUTION
Danger of lead poisoning
• Do not touch the X-ray tube without
protective clothing.
• Wear protective clothes when disas-
sembling the tubular housing.
CAUTION
Damage to the unit due to incomplete
assembly
• If replacement task is interrupted, the
securing strap can loosen, the unit can
fall and the scissor arm can relax.
• Completely mount the X-ray unit.
CAUTION
Damage to the unit due to relaxing
of the scissor arm
• The scissor arm can relax during
assembly work.
• Make sure that the scissor arm is folded
during all assembly work.
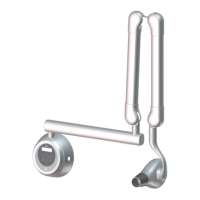
5.7 Installing the X-ray Emitter
Mount the X-ray emitter on the installed scissor arm by performing the following procedure.
NOTE: Apply grease lightly to the X-ray emitter shaft as necessary.
1. Insert the X-ray emitter shaft into the scissor arm making sure not to pinch the associated
cables.
2. Secure the X-ray emitter with the X-ray emitter lock.
3. Connect the mating connectors; black to black and white to white.
4. Connect the ground cable to the PE conductor by using the truss head screw.
5. Install the supporting arm cover with the two M3x8 screws making sure not to crush the
cables when installing the cover.
X-ray Emitter
Lock
Cable
Connections
Supporting
Arm
Cover
X-ray
Emitter
Lock