3–6 Installing the Module
Installing a 1336-GM1 Board
Required Tools and Equipment
To install your 1336-GM1 board, you need the following tools and
equipment:
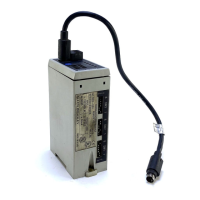
• Remote I/O communications board (1336-GM1).
• A kit that includes one grounding wrist strap, four Phillips
mounting screws, four stand-off nylon headers, and one snap-in
comm housing with mounting instructions (supplied with board).
• #1 Phillips screwdriver.
• Appropriate cable for the Remote I/O connection. Refer to the
“Selecting Cables” section in this chapter.
Installing the 1336-GM1 Communications Board
The following instructions explain how to physically install a Remote
I/O communications board.
Important:
If you are attaching the communications board to a 1336
PLUS II, refer to the one-page insert included with the kit
for mounting instructions.
1. Remove power from the SCANport product, and verify that it is
not holding power.
2. Remove power from the Remote I/O link.
3. Put on the grounding wrist strap.
!
ATTENTION: The 1336-GM1 communications board
contains ESD (Electrostatic Discharge) sensitive parts.
Static control precautions are required when installing, test-
ing, or servicing this board. Device malfunction may occur
if you do not follow ESD control procedures. If you are not
familiar with static control procedures, refer to Rockwell
Automation Publication 8000-4.5.2, Guarding Against
Electrostatic Damage, or other applicable ESD protection
handbook.
!
ATTENTION: Remove all power from the SCANport
product before installing the 1336-GM1 board. Failure to
disconnect power may result in death or serious injury. Ver-
ify all power is removed before installing the 1336-GM1
board.
Artisan Scientific - Quality Instrumentation ... Guaranteed | (888) 88-SOURCE | www.artisan-scientific.com
 Loading...