Do you have a question about the Amano MTX-30F and is the answer not in the manual?
Lists the items included in the MTX-30F Push terminal package.
Provides instructions and considerations for mounting the MTX-30F Push terminal on a wall.
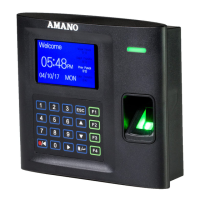
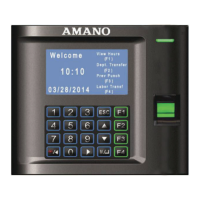
Describes the controls and indicators on the front and side panels of the terminal.
Explains the function of each key on the MTX-30F Push terminal keypad.
Details the initial power-on sequence and display of the MTX-30F Push terminal.
Explains how the terminal displays user information after a successful punch.
Overview of everyday usage scenarios for the MTX-30F Push terminal.
Covers various methods for punching in/out: Fingerprint, Card, Password, and combinations.
Instructions on how to view the last punch record using the F3 key.
Outlines the three methods available for enrolling users into the system.
Step-by-step guide for enrolling a new user via the terminal interface.
Managing existing user data, including editing and deletion.
Customizing how user information is displayed on the terminal screen.
Explains how to assign roles and define user privileges within the system.
Details how to set up network communication via Ethernet and Wi-Fi.
Customizing terminal appearance and sound prompts for user experience.
Procedures for backing up terminal data to a device or USB disk.
Steps for restoring terminal data from a device or USB disk.
Describes options for downloading data and managing settings via USB.
Explains how to perform various diagnostic tests on the terminal's components.
Displays information on the terminal's user and storage capacities.
Provides details about the terminal's hardware, software, and firmware versions.
The Amano MTX-30F Push is a sophisticated data collection terminal designed for time and attendance solutions, particularly for small businesses. It integrates directly with Amano Time Guardian software, whether PC-based or cloud-based, to automate the calculation and accumulation of employee work hours based on company payroll policies. This system is capable of categorizing hours into regular and overtime pay, and can display this information directly at the terminal if enabled.
The primary function of the MTX-30F Push is to serve as a time and attendance terminal, allowing employees to punch in and out using various verification methods. It is designed to record and store employee punches and related data, which can then be transferred to the Time Guardian software for payroll processing.
The MTX-30F Push offers multiple methods for employees to record their punches, ensuring flexibility and convenience:
Fingerprint (FP) Verification: This is a core feature of the MTX-30F Push. Users enroll their fingerprint template into the terminal's database. When an employee presents their finger to the sensor, the terminal captures a new template and compares it to the pre-enrolled one. A successful match results in a "Verified" confirmation, often accompanied by a "Thank you" voice prompt and a solid green LED. If verification fails, an "FP Verify fail" error message is displayed, and a red LED flashes. The terminal also incorporates "re-punch protection" through its "Recheck Min" feature, preventing multiple punches within a set timeframe from being recorded in flash memory, although they will still be verified.
Proximity Card (Prox) Punching: Employees can also punch in or out by placing a proximity card approximately one inch in front of the reader. Similar to fingerprint verification, a successful card read results in a "Verified" confirmation, a "Thank you" voice prompt, and a solid green LED. Invalid card entries will trigger an "FP Verify fail" error and a flashing red LED.
Password (Pwd) Punching: For users who prefer or need to use a password, they can enter their User ID via the keypad, press OK, then input their password, and press OK again. An incorrect password will display an "Error Pwd." message and an "Incorrect password" voice prompt, with the red LED staying on until a correct password is entered or the entry times out. If a user does not have a password, they will be prompted to "Place Finger."
Combined Fingerprint or Password Punching: This method offers a backup in case of fingerprint validation issues. Users can either place their finger on the sensor or enter their User ID via the keypad. The terminal will then prompt for the alternative method (e.g., remove finger or input password). Upon successful verification, the screen displays the user's name, User ID, "Verified" confirmation, and a "Thank you" voice prompt, followed by a momentary display of hours worked for the active pay period.
Combined Fingerprint and Password Punching: For enhanced security, users can be required to provide both a fingerprint and a password. After placing a finger on the sensor or entering a User ID, the terminal will prompt for the password, and then potentially for the finger again if the User ID and password were used first. Successful verification follows the same display and voice prompt sequence as other methods.
Viewing Previous Punches: Employees can view their previous punches by pressing the F3 key. The terminal will ask for a Badge No. or Fingerprint for identification. After selecting the date, previous punches will be displayed. It's important to note that previous punches are reset (cleared) every time the clock is polled by the Time Guardian software.
Display and Voice Prompts: The terminal features a TFT Display Screen that shows time, date, day, and operational information. A built-in speaker provides audible voice verification for operations such as "Thank you," "Incorrect Password," "Access Denied," "Invalid Id," and "Please try again."
Keypad Functionality: The keypad is used for inputting User IDs, passwords, and navigating menu operations. It includes numeric keys (0-9), function keys (F1-F4), ESC for exit/cancel, and M/ for menu/OK. Arrows are used for scrolling through menus and modifying item values.
LED Indicator: A green LED flashes once per second during normal standby operation. It stays solid for three seconds upon successful user verification and flashes red for three seconds upon verification failure.
USB Port: A USB port is available for downloading software, copying passwords, and other data management tasks.
The MTX-30F Push includes several features for management and maintenance, accessible through its main menu:
User Management:
User Role Management: This feature allows administrators to define and assign specific rights and privileges to different user roles (e.g., Registrar, User Defined Role 1, User Defined Role 2). These rights can cover various functions like User Management, Communication settings, System settings, Personalization, Data Management, USB Manager, Attendance Search, Short Message, Labor functions, Autotest, and System Info.
Communication Settings:
Personalization:
Data Management:
More Options (USB Manager):
Autotest: This diagnostic feature allows for testing various components of the terminal:
System Information: Provides details about the device's capacity and firmware:
Reset Button: A physical reset button is available to clear all current settings and revert the terminal to its factory default settings.
Power On/Off: The terminal can be powered on and off using a dedicated button. When powered off, it retains all templates and transactions.
The MTX-30F Push is designed for easy installation, with clear instructions for wall mounting and connecting power and communication cables. Its robust feature set aims to provide a comprehensive and user-friendly time and attendance solution.
| Type | Time Recorder |
|---|---|
| Display | Digital |
| Display Type | LCD |
| Power Source | AC Adapter |
| Time Format | 12/24 Hour |
| Operating Temperature | 0°C to 40°C |
| Battery Life | Approximately 3 years |
| Humidity Range | 10% to 90% RH (non-condensing) |