Ascon Tecnologic - X34 - OPERATING INSTRUCTIONS - PAG. 4
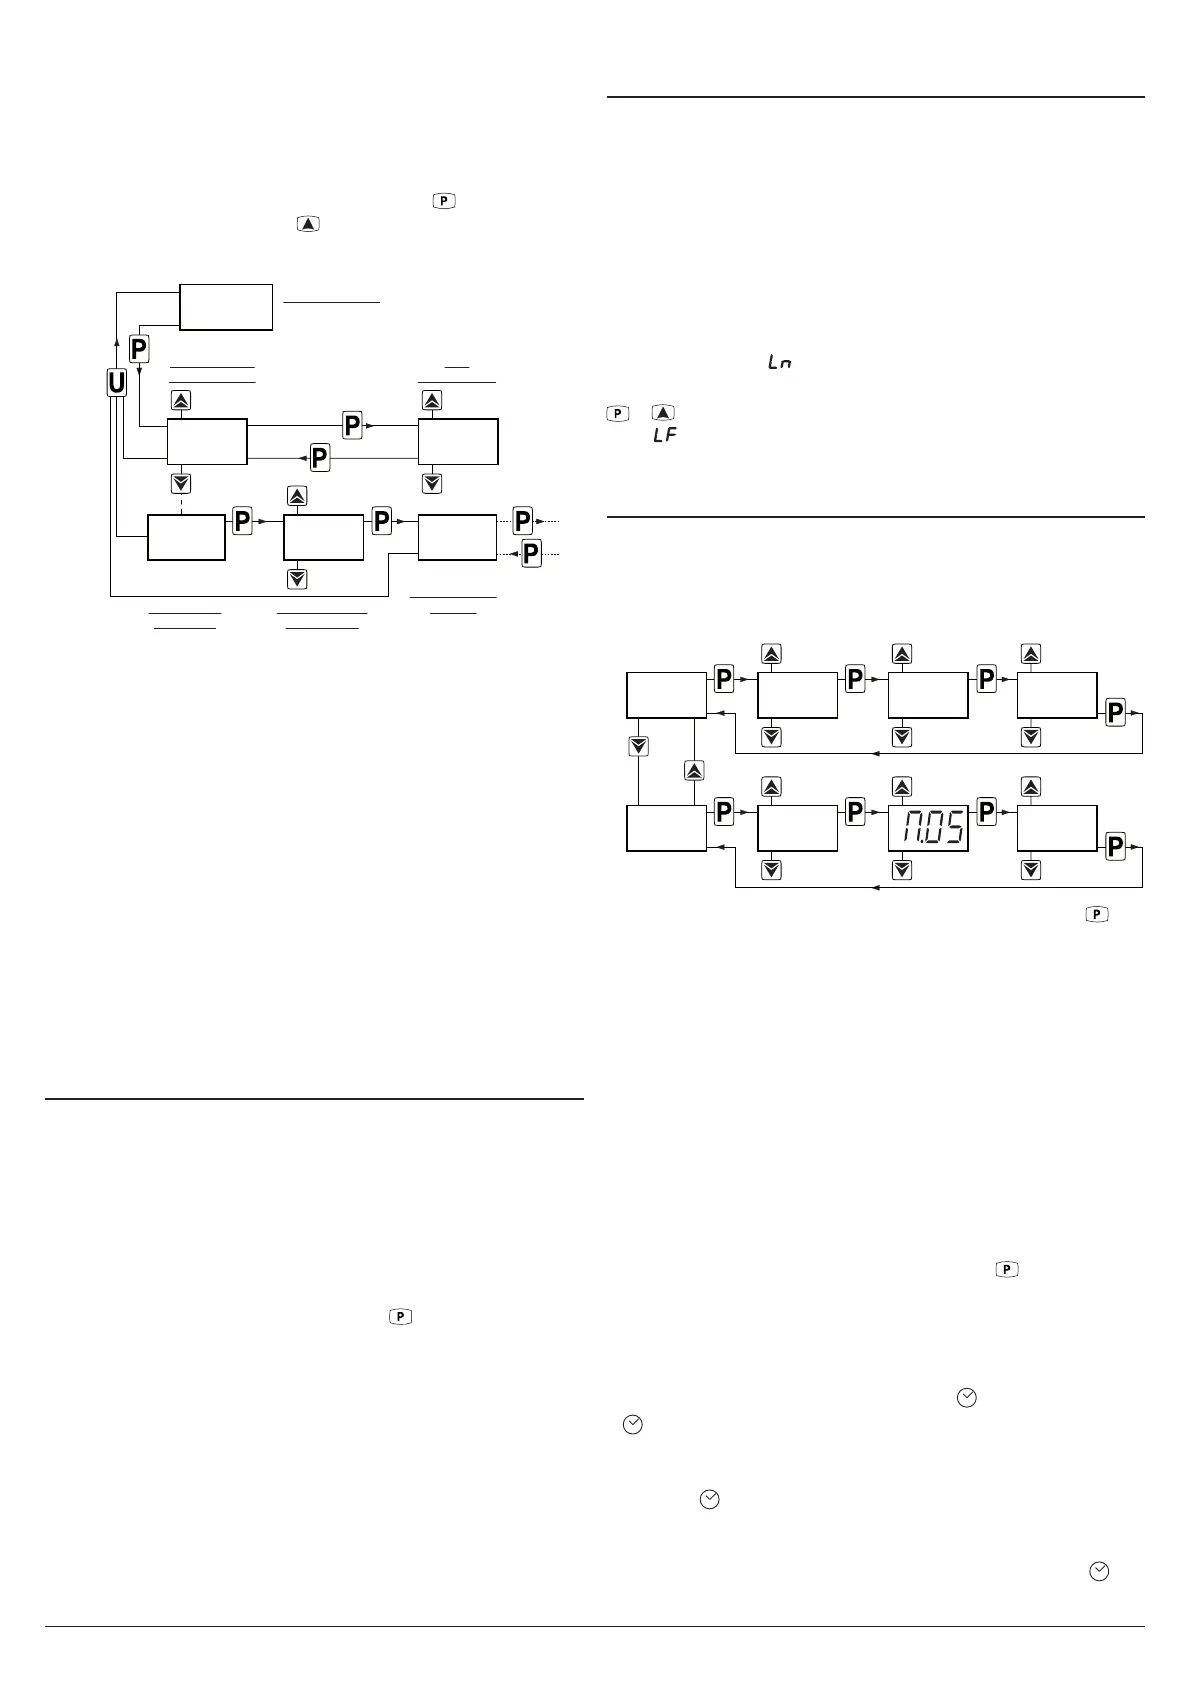
– Once the parameter has been selected, if the SET LED
blinks means that the parameter is programmable by
entering the password (is protected), if the SET LED is
steady lighted means that the parameter is programmable
without password (is not protected).
To change the parameter visibility, press the key and keep-
ing it pressed also press the key. The SET LED changes
its state indicating the new access level of the parameter
(on = not protected; blinking = protected by password).
Previous
Parameter
Next
Parameter
SET
PA RAMETER
Increase
Value
Decrease
Value
35.0
-25.5
NOT Protected
PA RAMETERS
NORMAL MODE
Hold
for 2 s
Hold for 5 s
PARAMETERS
GROUP
(PROGRAM MODE)
INS. CORRECT
PASSWORD
Increase
Value
Decrease
Value
0.R.P.
PASSWORD
REQUEST
]SP
a.HI.
In case some parameters are not protected, accessing
the the programming mode the display first shows the not
protected parameters, then the r.p parameter (through which
will be possible to access the “protected” parameters).
With regard to setting unprotected parameters, an exception
is HACCP alarm-related parameters (H.01, H.02 etc. which
are visible only when there are alarms stored in memory)
whose display level can be set via the t.HA parameter.
If t.HA = 1 the parameters related to stored HACCP alarms
are visible only within the ]HA group (which can be displayed
like all other groups without a password if t.PP = oF or by
entering the selected t.PP password).
If t.HA = 2 the parameters related to stored HACCP alarms
are visible both within the ]HA group (which can be dis-
played like all other groups without a password if t.PP = oF
or by entering the selected t.PP password) and as unprotect-
ed parameters if the t.PP parameter is given a password.
2.5 Reset parameters to default value
The instrument allows the reset of the parameters to those
values programmed in factory as default.
To restore the default parameters value set value -48 at r.p
password request.
Therefore, to make the reset to the default parameters, en-
able the Password using the t.PP parameter so that the r.p
setting is requested, at this point insert -48 instead of the
programmed access password.
Once confirmed the password with the
key the display
shows “---” for 2 s after which the instrument resets all the
parameters to the factory default setting.
2.6 Keyboard lock function
On the instrument it is possible to completely lock the key-
board. This function is useful when the controller is in an
accessible area and the changes must be avoided.
To activate the keyboard lock it is enough program the pa-
rameter t.Lo to a value different than oF.
The t.Lo value is the keys inactivity time after which the key-
board will be automatically locked.
Therefore, pressing no buttons for the time set at t.Lo, the in-
strument automatically disable the normal functions of the keys.
When the keyboard is locked, if any of the key is pressed,
the display shows Ln to indicate that the lock is active.
To unlock the keyboard it is enough to contemporarily push
+ keys and keep them pressed for 5 s, after which the
label LF appears on the display and all the key functions will
be available again.
2.7 Setting the current time and date
When the instrument is supplied with the internal calendar/
clock, this must be enabled and programmed to the current
time and day of the week using the c.CL parameter and to
the current date using the c.dt parameter.
Increase
Value
Decrease
Value
Increase
Value
Decrease
Value
SET DAYSET MINUTES
Increase
Value
Decrease
Value
N.45h.13
SET HOUR
D. 1c.cl
CLOCK/CALENDAR
PA RAMETERS
Increase
Value
Decrease
Value
Increase
Value
Decrease
Value
SET DATESET MONTH
Increase
Value
Decrease
Value
y.10
SET YEAR
d.31c.DT
After the c.CL parameter has been selected, press the
key
repeatedly to cycle through the following options:
h. + 2 digits for the hour of day in 24h format (e.g.: h.14);
n. + 2 digits for the minutes (e.g.: n.52);
d. + 1 digit for the day of the week (e.g.: d. 1);
oF Clock disabled.
The days of the week are numbered as follows:
d. 1 Monday;
d. 2 Tuesday;
d. 3 Wednesday;
d. 4 Thursday;
d. 5 Friday;
d. 6 Saturday;
d. 7 Sunday.
After selecting the c.CL parameter,press the
key repeat-
edly to cycle through the following options:
y. + 2 digits for the current year (ex. y.10);
M. + 2 digits for the and current month (ex. M.05);
d. + 2 digits for the and current date (ex. d.31).
When the internal clock is running, the
LED is lighted.
If LED is ON and steady indicates that, since the time the
clock was enabled, the instrument power supply has never
failed and therefore the current time is probably correct.
A flashing
LED indicates that, after the clock has been
enabled, a power failure certainly occurred and therefore
the current time may not be correct. When in this condition,
pressing any key cancels the failure indication and the
LED returns to solid (on and not flashing).