- 29 -
►
Checks and connection
The refrigeration circuit is very sensitive to dust
and humidity: check that the area around the
connection is clean and dry before removing the
plugs protecting the refrigeration connectors.
Indicated blowing value: 6 bar for minimum
30 seconds for connection of 20 m.
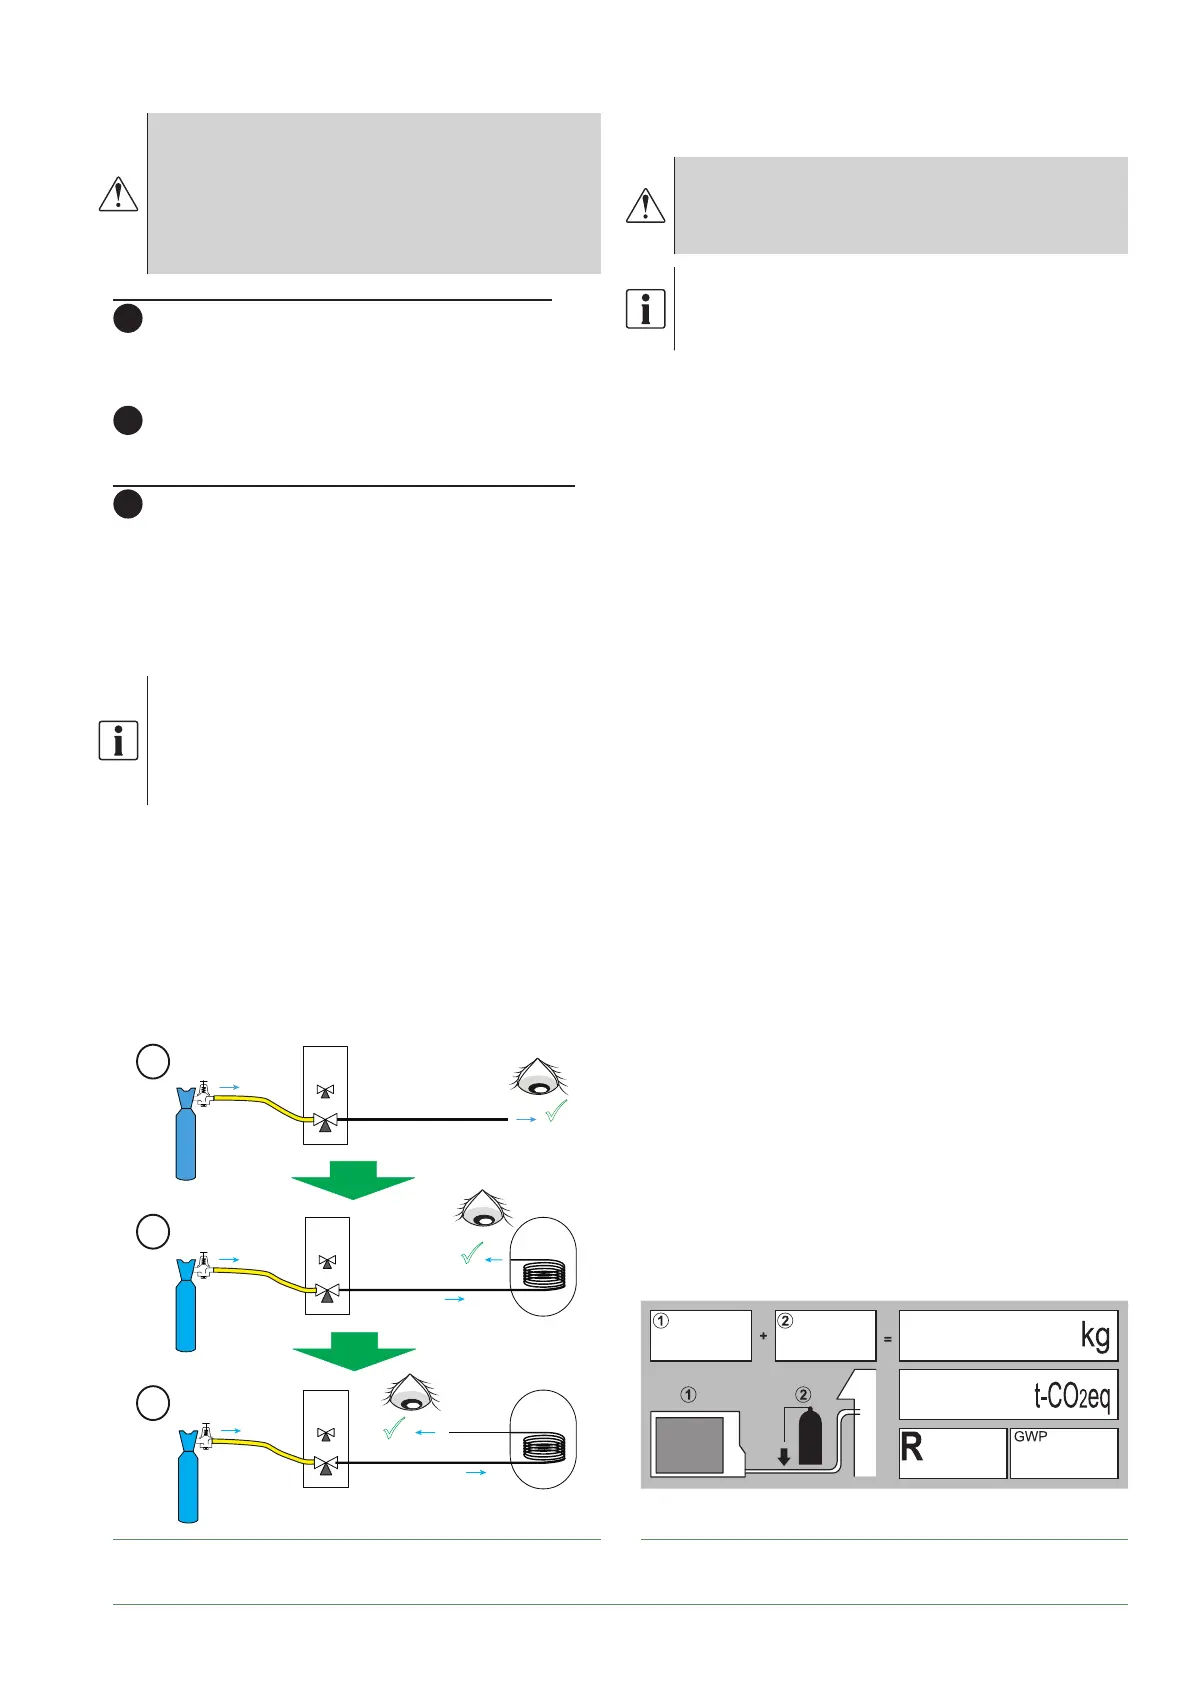
Checking the gas connection (large diameter).
1
Connect the gas connection to the outdoor unit. Blow
dry nitrogen into the gas connection and inspect its end:
- If water or impurities emerge, use a brand new
refrigeration connection.
2
Otherwise, proceed with fl aring and connect the
refrigeration connection to the outdoor unit immediately.
Checking the liquid connection (small diameter).
3
Connect the liquid connection to the hydraulic unit.
Blow nitrogen into the gas-condenser-liquid connection
system and inspect its end (outdoor unit side).
- If water or impurities emerge, use a brand new
refrigeration connection.
- Otherwise, proceed with fl aring and connect the
refrigeration connection to the outdoor unit immediately.
Take particular care to position the tube
opposite its connector so as not to risk
damaging the threads. A properly aligned
connector can be attached easily by hand
without much force being required.
- Where necessary, connect an adapter (reducer)
1/4''- 3/8'' or 1/2''- 5/8'' (fi g. 32).
- Remove the plugs from the pipes and the refrigeration
connections.
- Comply with the indicated tightening torques (fi g. 31,
page 27). If it is too tight, the fi tting may break after
a long period of time and cause a refrigerant leak.
fi g. 33 - Checking refrigeration connections
▼
Filling with gas
■ See Appendices page 76
Indicate on the label present on the outdoor
unit, the amount of gas (Factory + additional
fi lling) see
fi g. 34.
If additional fi lling is required, do it before
fi lling the hydraulic unit with gas. Refer to
paragraph "Additional fi lling", page 30
- Remove the access plugs (A) (fi g. 56, page 77)
from the valve controls.
- First of all fully open the liquid valve (small) and
then the gas valve (large) using an Allen (hex) key
(anti-clockwise direction) without using excessive
force against the stop.
- Quickly disconnect the hose from the Manifold.
-Refi t the 2 original caps (be sure they are clean) and
tighten them to the recommended tightening torque
indicated in the table fi g. 31, page 27. A seal is
achieved in the caps only with metal to metal.
- The outdoor unit does not contain any additional
refrigerant allowing the installation to be bled.
- Bleeding by fl ushing is strictly forbidden.
▼
Final sealing test
The sealing test must be carried out using a certifi ed
gas detector (sensitivity of 5g/year).
Once the refrigeration circuit has been gassed as
described above, check that all the refrigeration
connectors are gas-tight (4 connectors). If the fl arings
have been made correctly, there should be no leaks.
If necessary, check the seal of the refrigeration valve
caps.
If the event of a leak:
- Return the gas to the outdoor unit (pump down).
The pressure should not drop below atmospheric
pressure (0 relative bar read on the Manifold) so as not
to contaminate the recovered gas with air or moisture.
- Redo the connection,
- Restart the commissioning procedure.
fi g. 34 - Additional fi lling label
Liaison
liquide
UE
gaz
Azote
3
MH*
3
UE
Azote
3
MH*
Liaison
gaz
2
UE
Liaison
gaz
Azote
3
1
Nitrogen
Nitrogen
Nitrogen
Gas
connection
OU
HU
HU
OU
OU
Gas
connection
Gas
Liquid
connection
Alfea Extensa A.I. R32 / INSTALLATION / 2114 - EN