14
How to operate
Basic operation
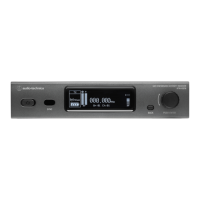
1. Turn on the main power switch of the receiver (ATW-DR3120/
ATW-DR3120DAN).
2. Turn on the power button of the receiver (ATW-DR3120/ATW-
DR3120DAN).
• The display lights and the main screen is displayed.
3. Set the operating frequency.
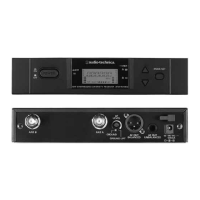
4. Turn on the power switch of the transmitter (ATW-DT3101/ATW-
DT3102).
• The indicator lamp lights and the display shows the main screen.
ATW-DT3101 ATW-DT3102
5. Set the transmission frequency.
6. Check the RF level indicator on the receiver.
• Check that antenna A or B lights up.
7. Speak into the microphone.
• Check that the AF level indicator lights up on the receiver.
• Turn on the power switch of the transmitter while holding down its
DOWN button to start with the RF output in the off state (RF OFF mode).
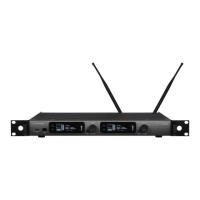
Using IR SYNC
This function allows you to set the transmitter with the details
configured on the receiver.
1. When IR SYNC is started as part of setting the receiver, the
“Communication in standby” screen is displayed.
2. Position the IR SYNC windows of the receiver and transmitter so
they face each other.
3. Press the SYNC button on the transmitter.
• Wait several seconds until communication is complete.
4. When the SYNC is complete, the “completed” screen is
displayed.
• The transmitter is synced to the settings made on the receiver.
• If an error occurs in the SYNC process, an error screen opens, and then
the display returns to the menu screen. Check the IR SYNC windows of
the receiver and transmitter, and then SYNC again.
• To cancel the SYNC process, press the BACK button on the receiver. You
will be returned to the previous screen.
Using QUICK SYNC
QUICK SYNC allows you to easily send receiver settings to the transmitter.
1. Press and hold (for approximately 2 seconds) the control dial on
the main screen.
2. Select [Sync], and then press the control dial.
ATW-DT3101
ATW-DT3102
 Loading...