17
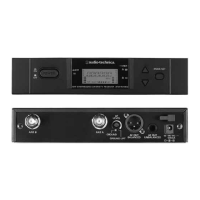
Setting the ATW-DR3120/ATW-DR3120DAN
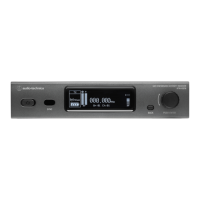
Setting the audio output
Setting the Line/Mic level
1. From the menu screen, turn the control dial, select [AUDIO], and
then press the control dial.
2. Turn the control dial, select [LINE/MIC], and then press the
control dial.
3. Turn the control dial, select [Line] or [Mic], and then press the
control dial.
• The setting is complete.
Setting the audio output level
1. From the menu screen, turn the control dial, select [AUDIO], and
then press the control dial.
2. Turn the control dial, select [LEVEL], and then press the control
dial.
3. Turn the control dial to set the audio output level.
• The level is adjusted by 1dB each time you turn the control dial.
• The level can be set to a value from −12 to 20dB.
4. Press the control dial.
• The setting is complete.
Setting the audio output mixing
Set whether to mix and output the audio of the RECEIVER1 and
RECEIVER2 receivers.
1. From the menu screen, turn the control dial, select [AUDIO], and
then press the control dial.
2. Turn the control dial, select [MIX OUTPUT], and then press the
control dial.
3. Turn the control dial, select [ON] or [OFF], and then press the
control dial.
• The setting is complete.
Scanning for open channels
Scan for unused channels in the current environment for use.
1. From the menu screen, turn the control dial, select [SCAN], and
then press the control dial.
2. Turn the control dial to select the group you want to scan. After
selecting a group, press the control dial.
3. Turn the control dial to select the preferred threshold. After
selecting the threshold, press the control dial.
• You can select [Normal], [High], or [Low] sensitivity.
High: Prioritize the number of channels.
Normal
Low: Prioritize stable operation.
• The scan starts.
4. Confirm the scan result, turn the control dial, select [OK], and
then press the control dial.
• If you want to scan again, select [Retry].
5. The usable channels and frequencies are displayed in a list. Turn
the control dial, select a usable channel, and then press the
control dial.
• The setting is complete.
Setting transmitters via IR SYNC
This function allows you to set the transmitter with the details
configured on the receiver. The following are the available settings and
setting values:
Settings Setting values
Freq Current setting value, NoChange
Name Current setting value, NoChange
Input Mic, Inst, NoChange
Gain −10 to +20dB, NoChange
Sens.* 0, +10dB, NoChange
RF Pwr Low: 2mW, Mid: 10mW, High: 20mW
HPF OFF, 80Hz, 120Hz, 160Hz, NoChange
Lock Lock, Unlock, NoChange
Batt Alkaline, Ni-MH, NoChange
* ATW-DT3101 only
1. From the menu screen, turn the control dial, select [TX SYNC],
and then press the control dial.
2. Turn the control dial to select a setting you would like to sync
the transmitter to, and then press the control dial.
3. Turn the control dial to select the setting value, and then press
the control dial.
4. Repeat Steps 2 and 3 for each setting you would like to sync the
transmitter to.
5. Turn the control dial, select [SYNC START], and then press the
control dial.
• The communication function is in standby. Refer to “Using IR SYNC”
(p. 14) for subsequent steps.
 Loading...