75.5753.15 LZR-MICROSCAN T 20180720 Page 1 of 16
LZR-MICROSCAN T
2
1
3
5
4
8
9
6
7
Stand-Alone, Door-Mounted, Safety Sensor System
for Automatic Swing Doors* (US version)
* LZR-microscan sensors are intended to be used
with pedestrian, swing-door systems.
75.5753.15 LZR-MICROSCAN T 20180720 Page 1 of 16
ENGLISH
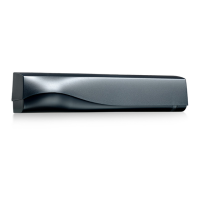
DESCRIPTION
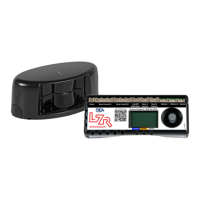
1. tilt adjustment 4. endcaps 7. adjustment knob
2. sensor connection ports 5. optical window 8. LCD
3. sensor LED 6. plug-n-play ports 9. hub LEDs
INCLUDED KIT COMPONENTS
DESCRIPTION PART NUMBER SINGLE PAIR/DE
Left LZR-microscan T Sensor 10LZRMICROLEFTT 1 2
Right LZR-microscan T Sensor 10LZRMICRORIGHTT 1 2
LZR-microscan T Hub 10LZRMICROSCANHUBT 1 1
Master Sensor Harness 35.1326 1 2
Slave Sensor Harness 35.1327 1 2
Door Control Harness 20.5222 1 2
System Harness 20.5304 1 1
Eagle Harness 20.5096 2 2
Power Supply Harness 20.5095 1 1
Home Switch (Surface Mount) 50.5283 1 2
Door Loop / Cap Kit 70.0202 / 50.0078 1 2
On / Off / Hold Open Switch Jumper 20.5310 1 1
Left Pass-Through Sensor Endcap 41.7922 1 2
Right Pass-Through Sensor Endcap 41.7923 1 2
Sensor Spacer 70.5554 1 2
Spacer Mount Screws (Metal) 50.0048 2 4
Spacer Mount Screws (Wood) 50.5319 2 4
Sensor Mount Screws (Metal) 50.1818 4 8
Sensor Mount Scews (Wood) 50.5282 4 8
Endcap Screws 41.8632 4 4
Velcro Tabs 50.0046 2 2
LZR-microscan T Mounting Template 75.5754 1 1
LZR-microscan T User’s Guide 75.5753 1 1
LZR-microscan T Wiring Tech Bulletin 78.0053 1 1
Universal Kit
(Power Supply - 30.5558, On / Off /
Hold Open Switch - 10DOORSWITCH)
10MICROSCAN-UKIT
1 (Universal Kit ONLY) 1 (Universal Kit ONLY)
REQUIRED TOOLS
TOOL
Power Drill
Tape Measure
Magnetic Phillips #0
Phillips #2
1
⁄
8
” Drill Bit
5
⁄
16
” Drill Bit
3
⁄
8
” Drill Bit
1
⁄
2
” Drill Bit
Pencil
Center Punch / Hammer
Wire Nuts
Wire Snips
Wire Fish
KITS
DESCRIPTION PART NUMBER
Single Door
10LZRMICROSCAN1T
Pair / Dual-Egress
Door
10LZRMICROSCAN2T
Universal Single
Door
10LZRMICROSCAN1UT
Universal Pair /
Dual-Egress Door
10LZRMICROSCAN2UT
Narrow-Frame Door
10MICROSCANMOUNTT
Glass/Fire Door 10MICROSCAN-Y
Universal Kit 10MICROSCAN-UKIT