HD-973P Series Multi-Level Parking Lift 50 P/N 5900076 — Rev. B3 — January 2024
P1/P2 most commonly stands for the Hydraulic Power Out, while T1/T2 commonly represents the
Hydraulic Return.
Installing the Safety Shutoff Bar and Microswitch
The Safety Shutoff Bar and the Microswitch go on the underside of the Aluminum Decks on the Upper
Platform; together, they prevent a Vehicle from contacting the underside of the Upper Platform.
The following steps describes how to install, but not make the connections to, the Microswitch for
your Lift. An Electrician is not needed to install the Microswitch, only to connect the Microswitch to the
Power Unit. That will be covered later in the installation process.
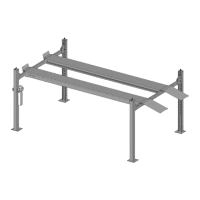
Side View. Not drawn to scale. Not all components shown.
To install the Safety Shutoff Bar:
Locate one short and long Aluminum Deck, then orient the Decks so that the Deck with the
opening (used for routing the Microswitch cable to the Power Unit) is next to the Power Post.
Refer to Installing the Runways for more information about Runway placement.
Lower the Decks onto the Utility Rails between the Runways.
Find the Safety Shutoff Bar, then align the marked holes on the Safety Bar Mounting Bracket with
the Mounting Plates underneath the Deck.
Attach the Safety Shutoff Bar to the Mounting Plate using a M10 x 38 mm Hex Bolt and a
M10 x 1.5 Nylock Nut on each end.
Go to the middle of the Runways, underneath where the two Aluminum Decks meet.