Home
BenQ
Laptop
Joybook
Page 41 (Using QShot Application)
BenQ Joybook - Using QShot Application
76 pages
Manual
Save Page as PDF
To Next Page
To Next Page
To Previous Page
To Previous Page
Loading...
Using your J
oybook
37
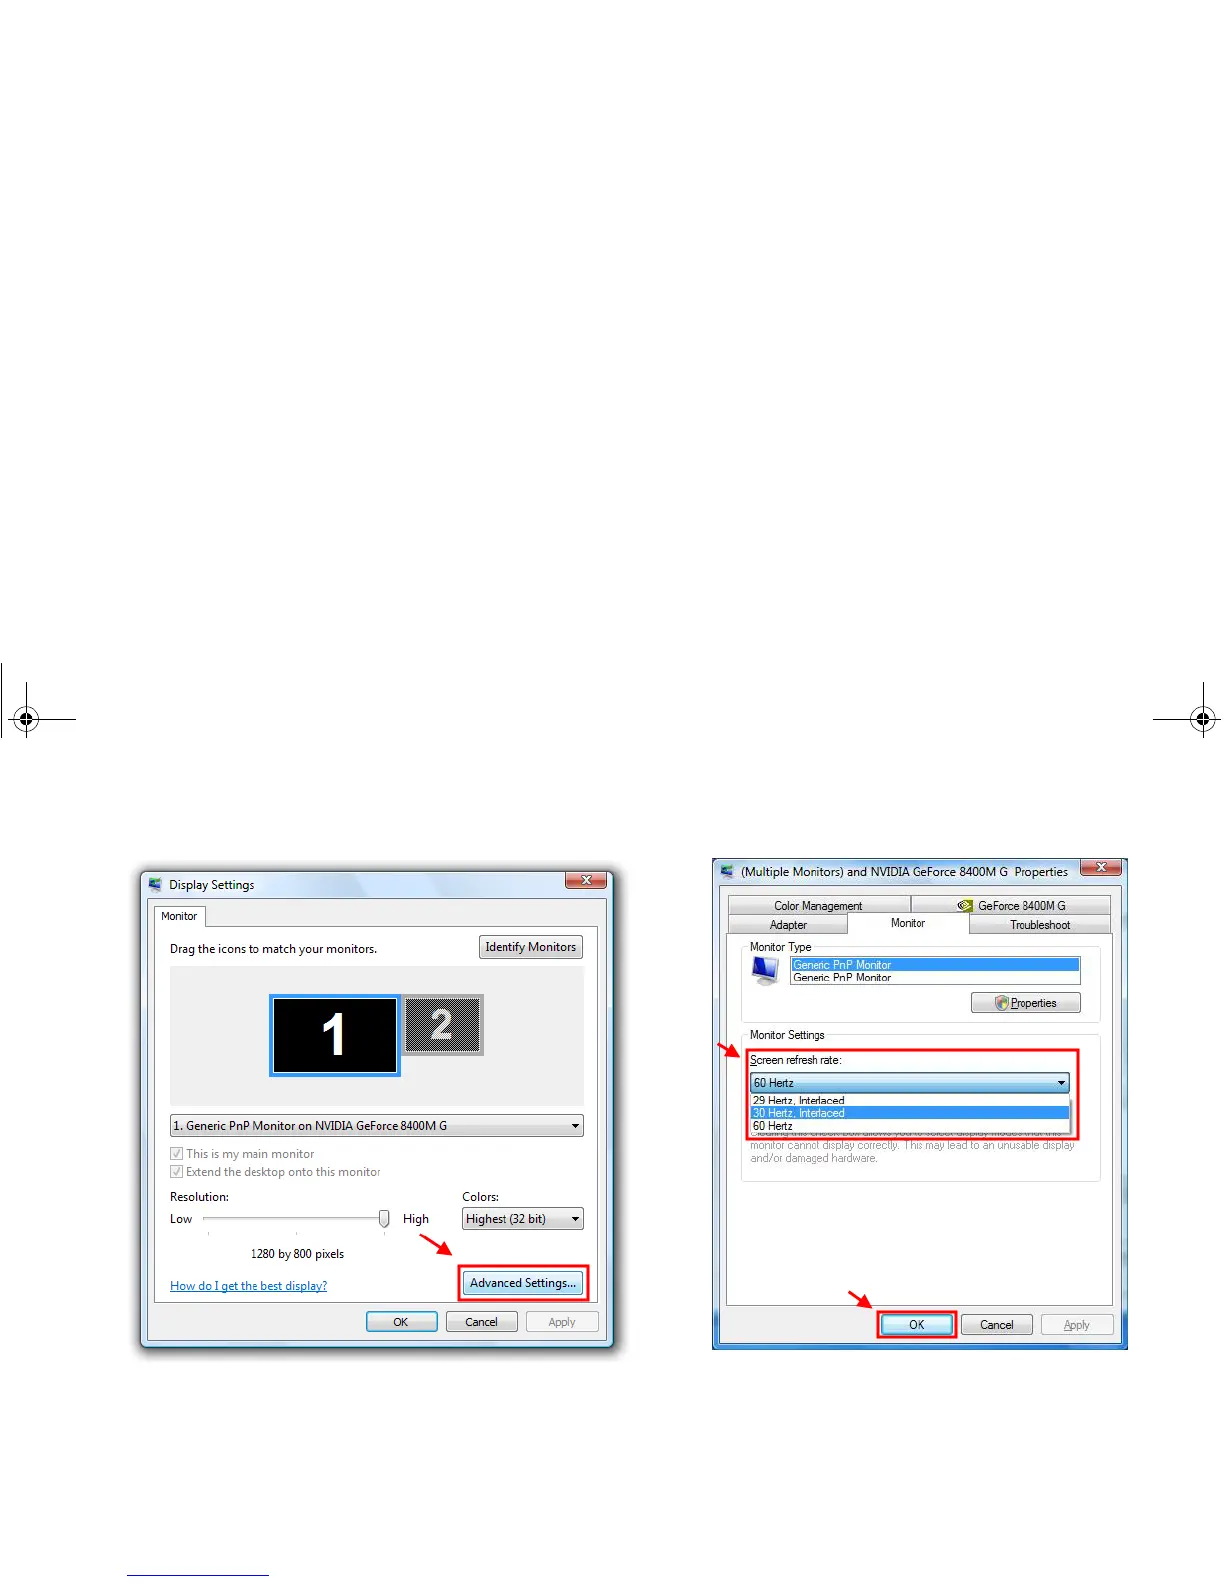
3.
In t
he
Displa
y Settings
windo
w that ap
pears
, clic
k
Adva
nce
d
Settings...
.
4.
Under t
he
Mo
n
it
o
r
tab
, tr
y t
o adju
st to a
n applic
able scr
een
refresh rate, and then click
OK
.
JB_R56_en.book Page 37
Tuesday, July 3, 2007
10:01 AM
40
42
Table of Contents
Main Page
Table of Contents
3
Overview
5
About this Book
5
Typographics
6
Getting Started
7
Package Contents
7
Getting Your Joybook Ready for Use
7
Connecting the Power
8
Expanding the Capabilities of Your Joybook
10
Touring Your Joybook
14
Front View
14
Left Side View
15
Right Side View
17
Rear View
19
Bottom View
20
Indicators
21
Getting Started with Windows Vista
23
Turning off Your Joybook Properly
23
Using Windows Mobility Center
24
Using Your Joybook
25
Using the Touchpad
25
Enabling the Virtual Scrolling Feature
26
Using the Keyboard
27
Function Hotkeys
27
Windows Keys and Lock Keys
29
Using Built-In Wireless Connectivity (Available on Selected Models)
31
Connecting to a Wireless Network
31
Using Bluetooth (Available on Selected Models)
33
Turning Bluetooth on or off
33
Navigating the Classic View Screen
33
Pairing with Your Bluetooth Device
34
Sending a File to a Bluetooth Device
35
Using Qmedia Bar
37
Introduction to Qmedia Bar
37
Setting up Qmedia Bar
37
Using the HDMI Output Socket
38
When Connecting to an HDMI-Capable LCD TV
39
Adjusting the Audio Output
39
Adjusting the Video Output
40
Using Qeye
42
Using Webcam Companion
42
Main Screen
42
Capturing Images or Recording Videos
43
Monitoring
44
Video Conferencing
44
Using Qshot
45
Using the Main Features of Qshot
45
Capturing Desktop Images
46
Using Qshot in Webcam Companion
47
Using Qshot in Cyberlink Powerdvd
47
Using BIOS Setup
48
When and How to Use BIOS Setup
48
Navigating the BIOS Setup Screen
49
Main Menu
49
Advanced Menu
50
Security Menu
50
Boot Menu
50
Exit Menu
51
Boot from LAN
51
Recovering Your System
52
Using Qdatatrove
52
Launching Qdatatrove
52
Backing up Your Files
52
Recovering Your Backup Files
53
Restoring Your Backup Image
53
Restoring Your Joybook to Factory Default Settings
53
Recovering Your System Using the Supplied Discs
54
Step 1: Reinstalling a Clean Copy of Windows Vista
54
Step 2: Reinstalling Drivers and Applications
55
Protecting Your Joybook from Viruses and Other Security Threats
55
Connecting to External Display Devices
56
Connecting to a VGA Display Device
56
Installing Additional Memory
57
FAQ and Troubleshooting
60
General
60
Battery and Power
60
Connection
62
System
63
Display
67
Cleaning and Battery Maintenance
69
Battery Maintenance
69
Cleaning Your Joybook
69
Service and Support
70
Benq Joybook Global Online Service
70
Joybook Overseas Regional Warranty (ORW) Online Registration
70
Appendix
71
General Safety Information
71
Safety Information about the Battery
71
Safety Information about the Power Adapter
72
Safety Information about the Modem
72
Caution
72
Disposal of Waste Electrical and Electronic Equipment by Users in Private Households in the European Union
72
Declaration of Conformity
73
Safety Instructions for Poland, Romania, Slovenia, Bulgaria, Latvia, and Croatia
74
Related product manuals
BenQ Joybook Lite
68 pages
BenQ Joybook Lite U121
68 pages
BenQ Joybook A52 Series
44 pages
BenQ Joybook R42 Series
52 pages