1 689 989 188 2016-12-20| Robert Bosch GmbH
Operation | 1 687 010 398 | 31 en
4.4.5 CRI Piezo test procedure
DANGER – Risk of fatal injury from electro-
magnetic fields
The high voltages at the CRI Piezo (charging
of the actuators) and at the adapter cables
are a source of potential fatal injury for per-
sons wearing pace-makers.
¶ Anyone wearing a pace-maker is not al-
lowed to perform "Common Rail Injector
(CRI Piezo)" testing.
! Do not check any damaged and/or severely corroded
components.
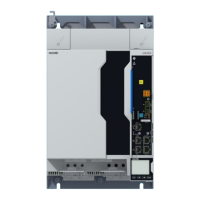
458881-272_Ko
6
Fig. 21: Block diagram of CRI Piezo connection
1 CRI Piezo return inlet
2 CRI Piezo return outlet
3 Test connection for return quantity and adapter with check valve
4 Test connection for injected fuel quantity with inlet filter
5 CRI Piezo socket
6 Injection chamber
7 CRI Piezo
8 Connection adapter
9 High-pressure hose
i Use is to be made of the accessory set
1 687 010 400 (special accessory) for non-Bosch
injectors.
Procedure:
1. Clean the DHK/UI (see Sec. 4.3).
2. Fit the injection chamber on the DHK/UI.
i A UI can only be connected using the UI connection
adapter (special accessory).
3. Attach the DHK/UI (Fig. 20, item 3) to the clamp .
! To avoid twisting and premature wear, do not con-
nect the high-pressure hose directly to the DHK/UI.
4. Connect the high-pressure hose with the connection
adapter (Fig. 20, item 4, 5) to the DHK/UI.
! The connection adapter must be tightened to a
torque of between 25 Nm and 30 Nm. If the con-
nection between the connection adapter and the
DHK/UI is leaking, the screw connection is not to
be re-tightened. In the event of a leak, unfasten the
connection again, clean the sealing surface and re-
connect the connection adapter applying the correct
tightening torque.
5. Connect the hose 1 680 712 362 to the quick-release
coupling of the injection chamber (Fig. 20, item 2)
and to the "DHK/UI flushing connection and test con-
nection" (Fig. 20, item 1).
6. Close the guard.
7. Perform the test.
i DHK/UI testing is described in the Online Help.
 Loading...