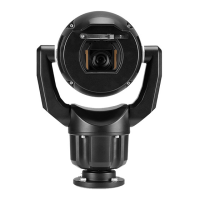
26 en | Installing a MIC Camera on a Hinged DCA MIC IP ultra 7100i │ MIC IP starlight 7100i
2019-12 | 1.2 | Installation Manual Bosch Security Systems
9 Installing a MIC Camera on a Hinged DCA
The hinge feature allows installers to “hang” the camera temporarily but securely during
installation for easier connection of cables/wiring before final bolts are installed.
Parts List
Quantity Component
1 MIC Hinged DCA (MIC-DCA-Hx)
4 Stainless steel hex bolts, M8 x 30
4 Stainless steel plain washers, M8
1 O-ring, 80 mm x 3 mm
1 conduit adapter (male M25 to female 3/4" NPT) (Available in specific regions
only.)
1 Blanking plug, M25 x 1.5, with O-ring
1 Quick Installation Guide
Additional Tools Required
1 Torx driver, T25, to loosen and tighten the hook bolts
1 Wrench/driver to secure M8 bolts (supplied) to mount the camera onto the DCA
1 Wrench/driver to secure user-supplied bolts (maximum M8 or 5/16” diameter) to mount the DCA to the
mounting location
1 Phillips-head screwdriver to attach ground wire
* * (Optional) MOLYKOTE® 111 grease [from Dow Corning] for primary O-ring
Warning!
Ensure not to damage the paint on the housing of the camera or the mount.