OPHERALYNEA BASIC LYNEA NOVA MITHO VAS/100.30
DVC/01
DVC/01 ME
MITHO
MITHO
IT
INSTALLAZIONE
ATTENZIONE. Per la pulizia utilizzare solo
panni morbidi ed asciutti oppure leggermen-
te inumiditi con acqua; non utilizzare alcun
tipo di prodotto chimico.
Utilizzare il terminale solo con la penna in do-
tazione o con strumenti simili; non utilizzare
utensili, penne o altri strumenti appuntiti che
potrebbero danneggiare il display e compro-
metterne il funzionamento.
Non esporre lo schermo LCD alla luce diretta
del sole.
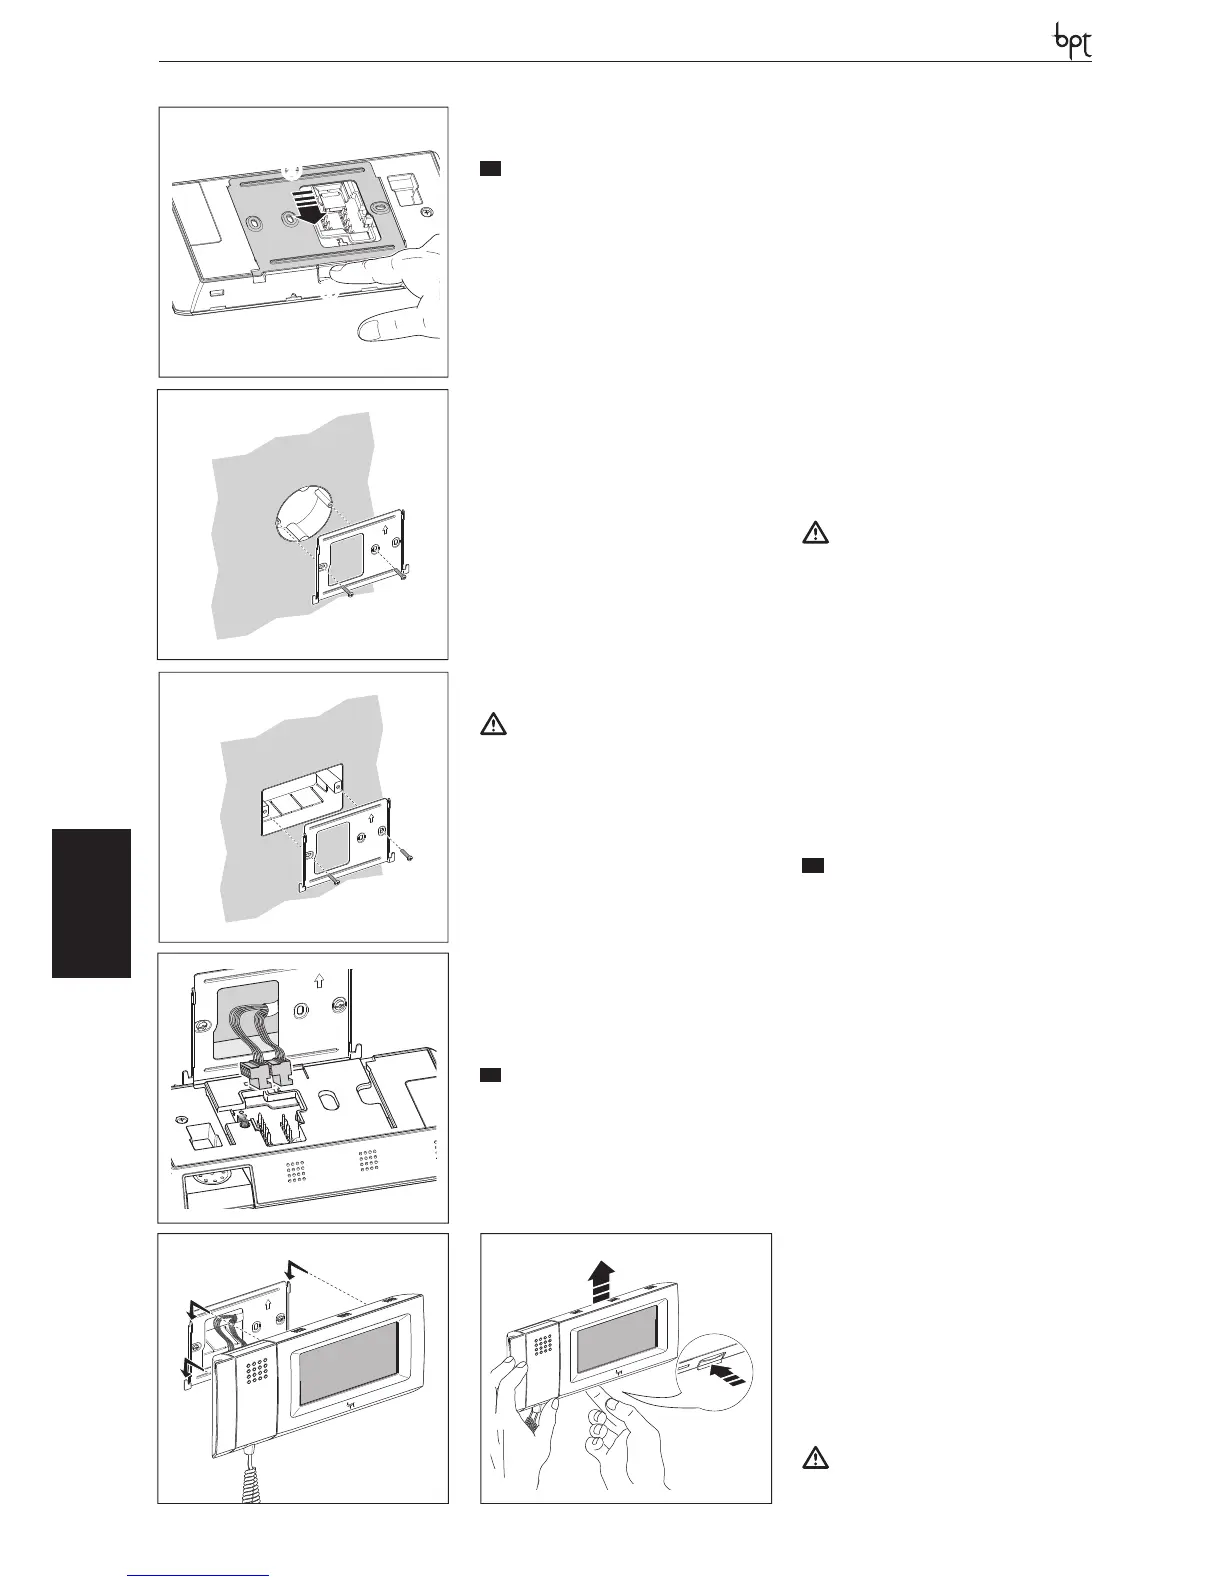
Sganciare l’apparecchio dal supporto metallico,
facendolo scorrere su di esso dopo aver premuto
il pulsante plastico (fi gura 1).
Fissare il supporto metallico alla scatola d’incas-
so tonda Ø 60 mm (fi gura 2) oppure alla scatola
rettangolare 503 utilizzando le viti in dotazione e
rispettando l’indicazione ALTO (fi gura 3).
La scatola deve essere installata ad un’altezza
adeguata all’utente.
Evitare il serraggio eccessivo delle viti.
Eff ettuati i collegamenti, agganciare il videoter-
minale al supporto metallico (fi gura 5).
Per sganciare l’apparecchio dal supporto metalli-
co premere il gancio plastico e sollevare il termi-
nale (fi gura 6).
Inserimento/rimozione della scheda MICRO
SD
ATTENZIONE
Prima di inserire o togliere la MICRO SD, to-
gliere l’alimentazione al videoterminale ri-
muovendo le morsettiere M1 e M2 ( gura 7).
Funzione del pulsante RESET
Ogni volta che anomalie di funzionamento, in-
terventi e altre ragioni tecniche richiedono il
reset dell’apparecchio, premere leggermente
il pulsante collocato all’interno dell’apertura in-
dicata in fi gura 8; rilasciare il pulsante appena
lo schermo si oscura e attendere che riappaia il
menù principale prima di riprendere l’uso nor-
male dell’apparecchio.
NOTA. Questa operazione NON comporta la
cancellazione di eventuali programmi che sa-
ranno ripristinati, assieme agli altri dati, al riavvio
dell’apparecchio.
EN
INSTALLATION
WARNING. Only use soft, dry or slightly damp
cloths to clean the terminal; do not use any
chemical products.
Use the terminal only with the pen provided
or with similar instruments. Do not use tools,
pens or other sharp instruments which may
damage the display and compromise opera-
tion.
Do not expose the LCD screen to direct sun-
light.
Remove the unit from the metallic support by sli-
ding it after pressing the plastic button (fi gure 1).
Fasten the metallic support to the round built-in
box of Ø 60 mm (fi gure 2) or to the rectangular
box 503 using the provided screws and obser-
ving the UP indication.
The recessed box must be fi tted at a suitable
height in relation to the user.
Avoid excessive tightening of the screws.
Once the connections have been made, hook
the video terminal to the metal support (fi gure
5).
To release the unit from the metal support, press
the plastic hook and lift the terminal (fi gure 6).
Insertion/removal of the MICRO SD card
ATTENTION
Before inserting or removing the MICRO SD,
cut o the power supply to the video termi-
nal by removing the terminal boards M1 and
M2 ( gure 7).
Function of the RESET button
Each time operating malfunctions, work or other
technical reasons make it necessary to reset the
unit, lightly press the button located inside the
opening shown in fi gure 8; release the button as
soon as the screen darkens and wait for the main
menu to reappear before resuming normal use
of the unit.
NOTE. This operation does NOT delete any pro-
grammes, which will be restored, along with
other data, when the unit is restarted.
DE
INSTALLATION
ACHTUNG. Für die P ege nur weiche und tro-
ckene oder mit wenig Wasser angefeuchtete
Tücher verwenden, keine chemischen Pro-
dukte benutzen.
Das Terminal nur mit dem beiliegenden Stift
oder einem ähnlichen Instrument benutzen.
Keine Werkzeuge, Schreibgeräte oder an-
dere spitze Gegenstände benutzen, die das
Display beschädigen und die Funktionalität
beeinträchtigen könnten.
Den LCD-Bildschirm nicht direktem Sonnen-
licht aussetzen.
Das Gerät an der Metallhalterung aushängen,
dabei nach dem Drücken der Kunststoff taste
(Abbildung 1) das Gerät auf der Halterung ver-
schieben.
Die Metallhalterung am runden Unterputzkasten
Ø 60 mm (Abbildung 2A) oder am rechteckigen
Gehäuse 503 befestigen, hierfür die beiliegen-
den Schrauben benutzen und die Angabe OBEN
(Abbildung 3) beachten.
Der Kasten muss auf für den Benutzer geeigneter
Höhe installiert werden.
Die Schrauben nicht zu stark anziehen.
Nach den Anschlüssen das Videoterminal an der
Metallhalterung einhängen (Abbildung 5).
Um das Gerät von der Metallhalterung auszuklin-
ken den Plastikhaken drücken, und das Terminal
anheben (Abbildung 6).
Einsetzen/Entfernen der Platine MICRO SD
ACHTUNG
Vor dem Einstecken oder Herausnehmen der
MICRO SD, die Versorgung des Videotermi-
2
1
4
5
6
3
1
2
26

 Loading...