100-214-239 Rev. A 4-9
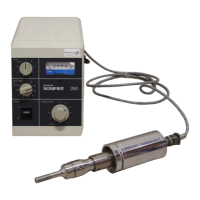
Assembling the Equipment
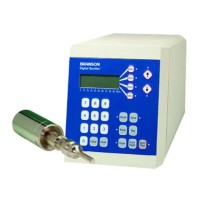
Digital Sonifier
4.4 Assembling the Equipment
The Digital Sonifier unit is pre-assembled and requires no special tools, however other com-
ponents must be connected to the unit in order for the system to operate. Some assembly of
the ultrasonic horn is required, as described in the following sections.
4.4.1 Setup Procedure
To set up your Digital Sonifier for an experiment, take the following steps:
To remove a horn, use spanner wrenches shipped with the system. Never attempt to remove
a horn by holding the converter housing in a vise. If necessary, secure the largest portion of
the horn in a soft-jawed
vise. See
Section 4.4.2, Connecting Tips, Horns, and Converters
, on page 4- 10.
Step Action
1
Connect the tip, horn, and converter, following the procedure in Section
4.4.2, Connecting Tips, Horns, and Converters, on page 4-10.
2
Mount the converter/horn assembly in a laboratory stand or other suitable
support. Secure the clamp on the converter housing.
3
Set the ON/OFF switch on the front of the unit to the O (OFF) position
4
Plug the line cord into the unit, and then into an appropriate electrical
power outlet, ensuring that the power supply is grounded to prevent elec-
trical shock.