Statement 1032—Lifting the Chassis
To prevent personal injury or damage to the chassis, never attempt to lift or tilt the chassis using the handles
on modules, such as power supplies, fans, or cards. These types of handles are not designed to support the
weight of the unit.
Warning
Statement 164—Lifting the Chassis
2 people are required to lift the heavy parts of the product. To prevent injury, keep your back straight and lift
with your legs, not your back.
Warning
Statement 1006—Chassis Warning for Rack-Mounting and Servicing
To prevent bodily injury when mounting or servicing this unit in a rack, you must take special precautions to
ensure that the system remains stable. The following guidelines are provided to ensure your safety:
• This unit should be mounted at the bottom of the rack if it is the only unit in the rack.
• When mounting this unit in a partially filled rack, load the rack from the bottom to the top with the
heaviest component at the bottom of the rack.
• If the rack is provided with stabilizing devices, install the stabilizers before mounting or servicing the
unit in the rack.
Warning
Statement 1047—Overheating Prevention
To reduce the risk of fire or bodily injury, do not operate the unit in an area that exceeds the maximum
recommended ambient temperature of: 104°F (40°C)
Warning
Procedure
Step 1 Remove the 16 screws, 4 screws in each corners and and lossen the 8 bolts, 2 bolts in each corner attaching
the chassis to the pallet.
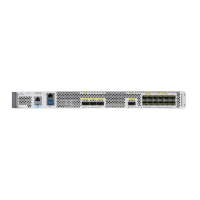
Step 2 Holding the switch with both hands using the handles, position the back of the switch between the front posts
of the rack.
Hardware Installation Guide for Cisco 8500 Switches
29
Unpack and Install the Chassis
Mount Chassis Into the Rack