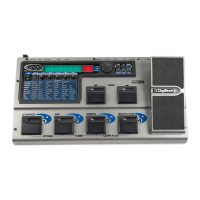
Using the GNX4’s JamMan
™
Delay Looper
The GNX4’s recorder also doubles as a JamMan Delay Looper. The JamMan is used to create a recording
loop that you can playback with. The JamMan functions are accessed using the GNX4’s footswitches while
they are in Recorder mode. The only difference between regular multi-track recording and looping is the
way you use the footswitches after recording your first track.
When recording multiple tracks for a song,you would normally record your first track, stop,rewind,and then
set up for recording your overdub track. The GNX4’s footswitches provide hands-free operation for these
functions. But when you want to create loops on the fly that you can layer,you want the transition from the
first take to the second and so on to be seamless.
To use the JamMan feature of the GNX4 you must first have the footswitches in Recorder mode. To do this,
press Footswitches 4 and 5 simultaneously until the DOWN/UP footswitches are lit red. If you have
songs already in memory, you must select a new Song to record your loop to. To select a new song,press
the UP footswitch. A new song is defined as a song that has no previously recorded material present on any
of its tracks.
You are now ready to begin recording a loop.
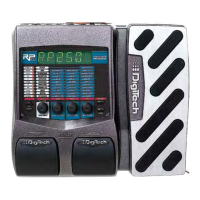
Recording a Loop
Recording a loop is no different than doing multi-track recordings. Here are the steps for creating a loop:
1.Press the RECORD footswitch. The TRACK 1 button automatically lights red,indicating it is armed to
record, and the recorder begins recording on this track. The TIME display begins counting off the
recording time.
2.Just as you reach the end of your take,press the PLAY footswitch. This sets the loop length and
places TRACK 1 into playback. You can listen to what you just recorded, and the TRACK 2 button
will flash red indicating it is now armed and ready to begin recording on.
NOTE: If the RECORD footswitch is pressed instead of the PLAY footswitch after recording
the first pass, recording is disabled and the loop’s length is set. The TRACK 1 button
is still armed for recording (flashing red) but is now playing back what you just
recorded. You can now add material to track 1 rather than record on a new track by
pressing the RECORD footswitch to record on this track again. The new material is
added to existing recorded material. Until the PLAY footswitch is pressed, only
track 1 is available to record on.
87
The GNX4’s 8-Track Recorder