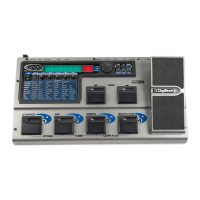
Using the GNXFC for Looping
Recording a Loop
To begin recording a loop is no different than when you are doing multi-track recording. You must begin
with a new song in order to create a loop. Press the GNX4’s UP Footswitch (the GNX4’s
footswitches must be in Recorder mode first) or the FFWD button on the Recorder Panel to select a
new song that has not been recorded on. Here are the steps for creating a loop:
1.Press the RECORD footswitch. The TRACK 1 button will automatically light red, which will arm it
to record, and the recorder will begin recording on this track. The TIME display will begin counting off
the recording time.
2.Just as you reach the end of your take,press the PLAY footswitch. This will set the loop length and
place TRACK 1 into playback. You will now begin hearing what you just recorded. You will now see
that the TRACK 2 button is flashing red meaning it is now armed and ready to begin recording on.
You have just successfully recorded you first loop and are now ready to start layering overdubs.
NOTE: If the RECORD footswitch is pressed instead of the PLAY footswitch after recording
the first pass, recording is disabled and the loop’s length will be set. The TRACK 1
button will now be armed for record (flashing red). You will begin hearing playback
of track 1 at this time. If you decide you want to add material to track 1 rather
than recording on a new track, press the RECORD footswitch again to enable
recording on this track again. The new material will now be added to existing
recorded material. Until the PLAY footswitch is pressed, only track 1 will be
available to record on.
Recording Layered Overdubs to Your Loop
To begin adding overdubbed layers to your first loop is easy. Since TRACK 2 is already armed for
recording, press the RECORD footswitch when you are ready to begin recording your overdub.
1.Press the RECORD footswitch. The TRACK 2 button will light solid red and will begin recording on
this track.
2.When finished,you can press PLAY to arm the next track for recording or just press RECORD to
begin adding your next overdub.
If at anytime you are not satisfied with your current take, you can undo it by pressing and holding the
STOP/UNDO footswitch. This will erase the last recorded track and let you proceed with trying
another take without having to stop. (See Using Undo While Recording is in Progress on page 86.)
89
The GNX4’s 8-Track Recorder