9
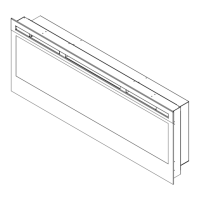
Figure 3
Partially
Reective Glass
Glass Bracket
Bracket Screws
Installation
1. Select a location that is not
susceptible to moisture and is away
from drapes, furniture and high
trac.
2. For ease of electrical hook up, you
may wish to locate the replace
near an existing outlet (for plug-in
convenience) (refer to NOTE 1,
page 7).
3. Remove replace, front glass and
hardware from box and remove
all packaging materials before
installation.
4. Store the replace in a safe, dry and
dust-free location until you are ready
to install the replace.
Fireplace Installation
Hardwire Installation
The replace is packaged with a
three-prong plug installed for plug-in
convenience. Hardwiring the replace
is also an option for any installation.
WARNING: Do not attempt to wire
your own new outlets or circuits.
To reduce the risk of re, electric
shock or injury to persons, always
use a licensed electrician.
WARNING: Ensure that the circuit
on which the replace is to be
installed has the power cut o at
the service panel until installation
is complete.
1. Remove the partially reective
glass from the replace:
• Lay replace on its back.
• Remove two Phillips screws from
each of the two glass brackets
(Figure 3).
• Remove the glass brackets.
• With one hand keeping pressure
on the partially reective glass, tilt
the replace upright and slightly
forward to allow the partially
reective glass to fall out of the
inside framing.
CAUTION: Do not bump or drop
the partially reective glass to
avoid breakage and personal
injury.
 Loading...

